About Stacks Guru
Stacks Guru is born from the need to search the vast number of videos out there on stacks built for Stacks Pro and the Stacks 5 plugin for Rapidweaver.
We have scraped over 500 videos to get the transcripts for each in order to make the spoken word searchable.
Please use this free tool to help you learn and discover the awesome power that Stacks and the stacks made for Stacks have to offer.
Stacks Guru
Video Reference
2011 06 16 weavercast ep6
07/25/2016
Transcript
00:04 so let's get started I'm going to kind00:12 of step back a little bit today and I for the past few sessions a I haven't been here for a couple weeks right at
00:18 WWDC last week which was awesome had a blast learned a lot met a lot of really cool people especially all the the real
00:27 Mac team so so that was awesome learned Medus again great guys there's really
00:34 fun and exciting meeting all of them and can't wait to meet me again probably next year hopefully um got some really
00:42 cool stuff coming down the pipe with with lying as you guys have all heard right and cam tastic of course as you
00:51 see here this is my cam tastic app it will be lying only now I can't show you some of the really cool new line features because this is a Snow Leopard
00:59 machine so so I'm really excited about that and again I'm going to step back
01:06 today a little bit and do some little bit more basic stuff previous webcast I kind of did you know some CS CSS stuff
01:15 and kind of diving into some little bit more advanced topics again I'm going to step back a little bit today and and and
01:24 do some more the basics right get back to the basics okay right now I have
01:31 rapidweaver open uh and of course here is a stacks page right and we're going
01:39 to go over kind of the really basic stuff within stacks and really help you guys build a foundation okay so as we
01:48 added added a stacks page of course you know stacks has two modes as as every
01:54 rapid uber plug-in does you have edit mode which is that where you actually edit and create your page and then you
02:03 have preview mode which of course allows you to preview all the changes that you've made okay so in our edit mode you
02:11 also have a stack slide very over here on the right right that contains all of your third party stacks hopefully you have a lot of mine right
02:19 and many others so as you see that there is just a huge list of stacks sorted by the the name of the stack on the file
02:27 system so that you can easily find stuff okay I am going to review some of the just the default out-of-the-box stuff
02:35 today and maybe at the end I'll go over a couple of my latest stacks and updates towards the end of the today's webcast
02:42 okay so two to drag out a stack basically if you want to add a stack to your page you simply take it out of your
02:51 library and drag it onto the page okay um i drugged out a text act in this
02:58 particular instance here and to edit that text you simply need to you know highlight the text add whatever text you
03:04 like okay now since this is a text stack you'll notice down here at the bottom there is also the default rapidweaver
03:13 formatting bar so that you can change the of course the style of the text okay so if you want to go ahead and make that
03:20 text bold or if you want to make it italic if you wanted to you know change the font okay so on and so forth make a
03:28 bullet list okay so anything that you can do basically in in the normal rapidweaver text page you can definitely
03:35 do here okay now a couple of tricks with it with the text area is of course if we
03:43 were to just quickly add an awesome warm up some text oops okay so there are some some default lorem ipsum text that we
03:52 can we have in our page now if you notice this actually inserted a couple HTML characters and you can have HTML
04:01 within your text stack okay and but if you if you want to make sure that it is defined as HTML basically you select
04:10 your text and then you say format in the menu bar and you do ignore formatting okay so that that way you can actually
04:20 mix kind of HTML and um text within your tech stack so if you wanted to make
04:27 sure you had a nice heading or something of that nature or or whatnot okay you can definitely type in the HTML so you
04:35 can get stuff exactly how you want if you want to get your hands dirty with some HTML highlight that and do ignore formatting and you're good to go okay
04:42 but if you just want to manipulate straight text and you know format it within you know within you know the
04:50 normals things of kind of WYSIWYG right you can make this green you know blue text so on and so forth it will if we go
04:57 ahead and go into preview mode will see that the the text that i had formatted
05:03 via the toolbar is blue bold and italic as I defined it and then this text that
05:10 I said ignore formatting it's just plain text okay it's in a paragraph and basically it's ignoring any formatting
05:18 okay so it's just going to take that as straight HTML okay now i'm going to jump
05:27 into some more common configurations and settings across all stacks ok so to go
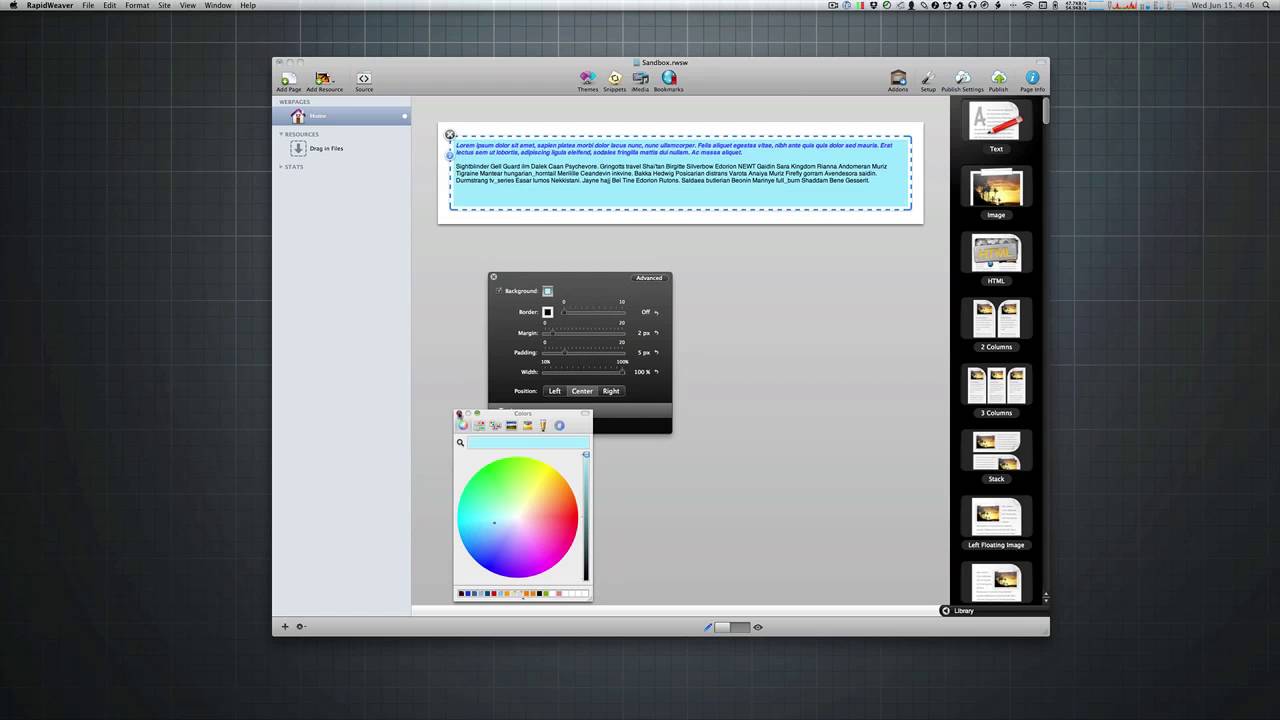
05:35 into your stacks configuration there is the information HUD ok and in this setting said you'll notice that this
05:44 common area at the top is the same for every single stack third-party stacks out of the box tax it doesn't matter ok
05:53 all of these settings here are identical for every single stack in your library ok so let's go over these settings we
06:03 have the the very first one is of course the background setting ok so if you want to define a background by default it is
06:10 transparent so if we go to if we go to preview mode we see that my background here now the background of my content
06:18 area is white ok um but basically if my if the content area were black on my site you would see this text on on the
06:27 you know on black ok but if we want it to make that a background color we can say yes I want to choose a color
06:34 background you can then select what color background you want let's say we want kind of one the light blue background okay and then
06:43 we can easily go and we see that I now have a blue background for my stack easy
06:49 enough right um let's go ahead and let's go a step farther let's will leave my
06:56 background blue let's say we wanted to add a border okay the default border is of course 0 pixels so it has no border
07:04 around it okay and let's say I want to add a two pixel border and I want to go
07:11 ahead and make the color red okay so now I've added a two pixel red border you
07:20 can see all of this happening right here live within the edit mode okay of course if you want to preview that you can then go ahead and see that you have you
07:29 definitely do have a blue background and with a red border okay next is margin
07:37 and padding now in the past few webcasts I've kind of gone over exactly what margin and padding are right um but
07:45 let's let's show you an example of what that is ok so the margin is going to be the gap between the border and whatever
07:54 is next to your stack okay so if we go ahead and let's just increase that you'll notice that the edge of your stack the gap between the edge of the
08:02 stack and then the border has increased so I've given this particular stack a
08:10 margin of 20 that means there is 20 pixels between the border and the outside of your stack okay now if we
08:18 want to adjust the padding the padding is going to be the distance between the
08:23 border and the content of your stack ok so again margin is going to be from the
08:33 outside of your stack to the border padding is going to be the distance from the border to the content ok so again
08:42 all these settings are the same without within all stacks ok so this is very useful to use if you wanted to play with
08:50 spacing maybe again you wanted some more you know spacing between the border of something and and whatnot this is where
08:57 you can change that ok so again padding and margins now if we wanted to preview
09:05 that you can see exactly what that looks like we now have a slightly larger gap from the edge of the the content area to
09:14 the border and then we have a slightly larger buffer from the border to the me content of my tech stack right now the
09:24 next setting is with right so how wide do we want our stack to be ok so of
09:33 course the default is a hundred percent so it takes up the entire width of of the page ok so we're going to take up
09:41 one hundred percent of our width ok but you can easily change that lets say we want it to be you know sixty-two percent
09:49 ok you can easily then do a look now my you know my steck stack is now taking up
09:57 sixty-two percent of the width of my page ok now a lot of people are wanting
10:05 how do i do static with right let's say i want to have you know i want to make sure it's 500 pixels ok well right now
10:13 there really isn't a way in in the current version of stacks to do that however if you know if we do go into our
10:21 page inspector okay and look at what the width of my content area is so i can say
10:27 with i know my my width of my page is is a thousand pixels right and part of that
10:35 with let's say i wanted to go ahead and say oh look my content area is going to be approximately you can measure it out
10:43 and i know this is about 750 pixels right and you say if I wanted to be 500
10:49 pixels you know what's the percentage of 500 pixels to 750 right I don't know exactly what that percentage is off top
10:58 of head I think it's about 75 or something like that right so you know you can't have to kind of do a little bit of math work right but
11:06 the whole point of stacks is having a fluid layout okay so um a lot of people you know think of I want something to be
11:14 exactly 500 pixels well you know a majority the time you really don't need to have something exactly a particular
11:21 number of pixels there are instances of that and there are third-party stacks out there that allow you to do that okay however again the point of stacks is
11:30 really a fluid layout okay to kind of just let things fall as they are you know to kind of you know get to get it as good as you want right so I know if I
11:38 want you know about fifty percent you can kind of see how things are going to look okay so on and so forth now um you
11:46 know stacks a new version of stacks what we're looking at a stacks version one as all you know stacks to is coming out
11:53 within you know the future so hopefully you know they're there will be new new
12:02 things that you could do to be able to you know statically position and have you a little bit more control over that ok but we'll see we'll see what comes in
12:11 the future okay now the next the last setting that we have that is again a common setting across all stacks is this
12:19 actually a setting that kind of confuses a lot of people because a lot of people they say um I want to have my stack on
12:26 the left okay but if you set your stack to one hundred percent it really doesn't matter this position right left or
12:35 Center okay because if I set it to left and it's a hundred percent it doesn't really matter yeah it's going to be
12:42 positioned to the left but if the stacks taking up one hundred percent with I'm not going to really notice that okay but
12:49 if we adjust things let's say let's go back down and unjust our stack okay to sixty-two percent we have positioned
12:57 left position center and position right so if we then pro preview our stack
13:04 you'll notice that hey look I made my stack narrower it's sixty-two percent with and then I made it you know float
13:13 on the right okay so again if you want to use these positionings okay it doesn't make any
13:21 sense if you're with is one hundred percent you're gonna have to make sure you know you kind of you know adjust things so that you know it's a smaller
13:29 percentage with and then you can easily adjust other light left center or right
13:35 okay so that kind of goes over the positioning and a lot of the default
13:43 settings within stacks okay now let's go ahead and do a little bit more advanced
13:50 some of the more advanced settings so let's take these same settings and let's see how we can tweak them a little bit
13:58 more okay and we do that by if you actually view in this HUD you'll notice that there's an advanced button okay so
14:07 if we want to go ahead and click this advanced button you will see that it brings up our page inspector and that we
14:14 have a little bit more granular controls within the Advanced Settings as you see
14:25 here we we definitely we still have control over our background color so this is the same exact setting as if we
14:33 had you know changed it inside the settings HUD okay same thing with border we can change our border color okay
14:40 however you'll notice that right now we actually have control over all four
14:47 corners of the border so in the HUD here if we look at this over here okay will
14:55 notice that in the border we really have access to change you know all four
15:01 corners at the same time okay so but if we notice in the settings HUD ok we have
15:08 access to change the individual side so if i want my top borders to be 10 pixels
15:16 oops 10 um let's say I want my sides to be 0 okay i want my bottom to be 10 okay
15:25 and i want my right to be 0 okay now just an FYI I if you change settings here I'm in any
15:34 of these advanced settings if you type in your number so let's say I do 10 here right it won't take effect until you
15:41 either exit that or you click enter or you know you tab out of it so if i would
15:49 just said 0 and then i closed my HUD ok or I close that window you notice that it actually that those changes didn't
15:56 take effect ok again you have to make sure you you make your change and either
16:01 hit enter or you hit you hit tab or you
16:08 click out of this cell ok important ok so as you see here you'll notice that i did a top and bottom border of 10 pixels
16:16 and my left and right borders are 0 and that's exactly what we see here in edit mode ok a very similar to border you can
16:26 that we now have also have access to change the individual margins on all four sides of the stack so if i wanted
16:35 my top margins to be 0 and i wanted you know my left and rights to stay at 20 we
16:42 can definitely do that and you notice that we see that being reflected inside edit mode so if we look at at our edit
16:50 mode will notice that at the very top our margins are 0 that there is no gap between my border and the outside of the
16:57 stack however on the left and right we we will notice that I definitely have a 20 pixel gap between the edge of my
17:07 stack of a edge of the border which is 0 right because we set our left Porter's 20 and the edge of the stack ok now
17:15 other things that we can use this for is if you notice here in the in the default settings for the stack um the maximum
17:23 size that I can go to is 20 ok so if you ever wanted a larger margin ok then say
17:29 20 let's say I wanted to have a a 50 pixel margin ok and you wanted to have that everywhere
17:38 I now have a 50 pixel margin all around my stack okay so it allows you to
17:46 definitely go a little bit larger and manually um you know put in numbers let's say you wanted an obscure number like 53 on the top for some reason okay
17:55 you can definitely do that so in this advanced setting that's where you can actually define your own number it there
18:03 with no constraints okay and define individual sizes for each side okay now i'm not going to show padding padding is
18:10 it is identically the same you can of course define whatever size that you want and customize that for every single
18:17 side of your stack okay and of course you can turn that on and off so if you
18:25 wanted 0 or plus or more padding okay and you do that for everything now there you'll notice that there are two more
18:33 settings here okay and what these settings are is render HTML in edit mode
18:40 now when you when you have this turned on you'll notice that your your edit mode is kind of it's a little bit more pretty you can kind of see a quasi
18:48 preview of what your stack probably is going to look like in preview mode okay
18:55 but if you were to turn that off okay you'll notice that it basically changes from the nice pretty text that you saw
19:03 okay to basically the HTML that would be rendered for that stack okay now there
19:11 are some stacks especially some older third-party stacks I still have some that are using some of the very original
19:19 first stacks api's and some of those stacks such as a perfect example as my
19:25 moving box stack still requires this to really edit the content of some of the stacks um you'll notice that you actually have to turn off it is a
19:34 requirement to use some stacks to turn this on and off okay a majority of
19:41 stacks now has the ability to really control edit mode a little bit better so a majority of stacks don't require this
19:49 to be turned off and it is turned on by it mode by default in edit mode but there are still a few straggling stacks out
19:59 there that use the really old legacy ap is where it may require you to turn this setting on or off okay again any newer
20:08 stacks probably won't have to have you require to do that but some older stacks may require you to turn that on and off
20:17 okay another setting here is basically if you use plus kit and you probably
20:24 know what at import does it allows you to basically take contents from another page and import it into your stacks page
20:32 okay if you would like to render that content and you know seamlessly in in stacks you can basically check this and
20:40 it will make sure that the content that you import is rendered in your stacks
20:45 page okay so that kind of goes over the
20:52 the common settings that you see across all stacks okay um that it's I'm going
21:09 that are let's see if you're not using background color or border should you use padding or margin to separate
21:17 content so um yes so if I it so if you
21:26 wanted let's say I had to text axe here okay and I wanted to kind of increase the gap between um you know this stack
21:35 in this stack so if we go into edit mode you'll see that I I definitely have a gap here but let's say I wanted to increase that gap you know I most
21:43 definitely use margins or padding it you know it really depends on or doesn't really matter it depends on if you have
21:51 a border um do you want that gap to be you know under the border or above the border right so i can add a bigger
21:59 margin to this stack here so let's say if i want to go down i want to make my my bottom margin he
22:06 150 okay um that will then increase the padding or the distance between my two
22:14 stacks so yes use margins and or padding okay to increase most likely margins if
22:23 you want to deal with you know the gaps between two stacks um you know that you can definitely use margins to basically
22:30 play with that okay and to shift things around on your page a little bit okay um
22:38 again the difference between padding so it you know this stack if I had a I
22:45 could definitely take this stack and say increase the padding on it so let's say I increase the top padding okay let's go
22:53 ahead and increase the top padding to 115 pixels okay so as you notice that
23:01 will definitely increase the the gap again between my two stacks okay but let's say I decided I wanted to add a
23:10 border to this stack okay now if I added a border to this stack all of a sudden things get a little funky right because
23:18 i use the padding um it basically i still have my gap between these two stacks but now i have a big huge gap
23:25 inside this and not what I really wanted was a nice clean border around my content but keep the gap between my two
23:32 stacks right so to fix that basically instead of using padding right let's fix
23:39 my padding um I would then go to the margins and increase my margin right then in preview you notice that I now
23:47 have you know a nicer box around my content but I still keep my padding distance between the two items okay so
23:56 yes definitely use padding you know or margins to increase the content I recommend if you want to use gaps
24:03 probably use a new margins instead of padding okay really only use padding if
24:10 you want to really kind of nudge you know your content within the stack a little bit closer together okay but play around with it you know you could
24:18 definitely be used both um you know to nudge your content you know around the page okay so hope
24:27 that answers your questions now let's go ahead and look at some of the other out
24:34 of the box stacks ok so we've looked into we've kind of gone through and seen the text stack and what you can do now
24:43 other some other features of the text stack that I probably haven't really gone over which is really any text area within rapidweaver is you can also drag
24:51 in images so if you have an image you can drag an image out there right and it definitely works you have you have your
24:59 image okay other things that you can do with your image if you double click on the image you have rapid weavers image
25:06 um you know manipulator so you can scale your image you can rotate it you can give it a shadow you can give your image
25:14 of border okay um and there's some reasons to do to do this this way as you if you notice the image is definitely by
25:23 default it basically is aligned with your text okay um you know you have you do have some control if you wanted to go
25:31 ahead and and select your image and say you wanted to align it to the right of the page do you want it centered just
25:39 like as you were playing with text you you can manipulate your image okay and again double click on the image and it
25:45 brings open rapid weavers image editor a image attribute editor okay so that's
25:55 another thing this isn't really stack specific it's really any uh you know style text area within rapidweaver okay
26:03 you can add text manipulate the text um you know do the the ignore formatting as I showed you earlier um you know
26:12 basically the tech stack inherits all of those features from rapid weavers common style text area that is used that is
26:21 utilized throughout rapidweaver throughout rapidweaver plugins okay so
26:29 that kind of wraps up you know the text areas next is the Mitch stack okay the image stack is another stack that of course comes
26:37 default out of the box with with stacks and if you drag that on your page you'll notice that you have a image drop area
26:45 and essentially all you need to do is take your image and drag it directly onto there okay now you'll notice that
26:55 again the stack has the same exact settings as your text stack again it's the common settings across everything
27:04 okay now if you wanted to you know reduce the width a little bit and then have your image on the left or on the
27:11 right you know that's definitely where you can start playing with you know testing the widths and alignments of
27:17 things okay but there's another specific settings hood just for the image stack
27:24 okay um if you double click on your image you'll notice that the uh the image will show up in a kind of a new
27:31 gray box okay and you'll notice that there's a little gear if you click on this gear it will it will show you a new
27:39 settings hood that is specific only for images okay now this is the same if you have a third-party stack that contains
27:48 an image I'm here let me show you one let me find a stack that contains an image um here's here's my here's one of
27:57 my stacks right whoops that's a bad example um fancy Image Zoom okay so
28:04 fancy image zoom as you see here contains a drop area drag and drop an image and you have that you have access to the same exact image settings hoods
28:13 in a third-party stack as you do the out-of-the-box one okay so just to let you know that this little settings HUD is really going to be leveraged
28:21 throughout not only the out-of-the-box stack but any image drop area that even
28:28 third-party stacks utilize okay now be aware that sometimes if you were to you
28:35 know add a border to an image or a shadow it may kind of affect the look and feel of that particular stack a
28:44 little bit ok so if it's a third-party stack and maybe it's doing some you know some javascript animations and stuff like that if you
28:53 add a shadow or blur or an offset via these settings which I'm just going to go over right now um it may or may not
29:01 work okay okay you may need to maybe you know edit your image outside in you know
29:08 photoshop or Pixelmator or some other image editor ok so these tools are great
29:14 that stacks provides but again you know your mileage may vary depending on your third-party stack that you're using ok
29:23 so let's go over these these settings here the top is scale ok so if you want to scale your image to be you know a
29:32 hundred percent if you wanted a little bit smaller so on and so forth you can definitely scale your image ok um
29:40 rotation so if you want to rotate your image slightly ok you can definitely do that ok if you want to give your image a
29:49 border again this is a little bit different than if i were to give i'm
29:55 going to go ahead and make my i'm going to keep it actually another cool little
30:03 thing if you notice what i just did was I had changed my rotation and this is the same as pretty much any slider
30:10 configuration in any stacks HUD there's going to be this little arrow and basically it'll reset it to the default value ok so if you're if you're trying
30:18 to get it back and you're like I can't get it to zero oh shoot ok just click on the little arrow and it'll reset it back
30:25 to the default value ok um the next setting of course border as I said you can change just like the stack you can
30:33 change your configuration and make it you know whatever border color you want let's say we want an orange border ok you can definitely give your image a
30:41 shadow so if you want to give it a drop shadow ok give another thirty percent eight thirty percent shadow let's make
30:48 it kind of a little lighter shadow ok so again shadow size shadow color you can
30:57 give your your image Oh your shadow blur okay so if you wanted to give you know your shadow what size blur do you want
31:06 do you want the shadow on the on the right side do you want it on the left side do you want your shadow on the the
31:13 top do you want it on the bottom ok so these four settings here are you know again the percentage the size the blur
31:22 of your shadow the X or horizontal offset of your shove your shadow and then why is the vertical offset of your
31:30 shadow ok let's go ahead and preview this and see kind of what our image is looking like so if we look at our image
31:37 I added a border I gave it a shadow I made it you know kind of blurred so you can kind of see it and it's offset to
31:46 the left and on the bottom so as you see I just had a straight duck image um but
31:53 I modify that by giving the image of border and a drop shadow okay um next
32:01 feature oops the next two settings that are on the bottom of the image settings HUD is file name okay basically filename
32:12 allows you to assign and give your image a specific file name now when you drag an image out okay stacks is going to
32:21 basically give your your image a kind of an auto-generated name okay and by default all of your all stacks images
32:30 are exported as pngs okay so I do recommend that you go ahead and your hat
32:40 at your head has some great fa cues on their site about um you know image sizes
32:47 and if i drag in a jpeg why is it exported as a PNG so on and so forth okay um so stacks if you use this little
32:57 image settings of this image stack or any third-party stack that uses that API
33:03 the file is exported as a PNG okay the default will it will auto name the file
33:10 to whatever it needs it to be okay but with this setting let's say out wanted to name my file ducky okay so
33:18 basically I can give that you know I can I wanted to make sure that this image is called is named ducky dot PNG or something like that right this allows
33:26 you to name us give your image a specific file name okay I personally hardly I never I've never done that um
33:34 okay I just let stacks assign the name whatever and wants it to be I really don't care what the name is right and
33:42 then the alt tag is of course you know for SEO purposes if you want to put in you know you know rubber ducky okay as
33:51 your alt tag within the image that way you know good old google and yahoo and bing or whatever your search engine of
33:59 choices can index your page and find your alt tags of your images okay so that kind of goes over the image stack
34:08 settings again and all of this settings head is available not only for the out of the default out-of-the-box image
34:16 stack but it works for any image drop area on all third-party stacks as well okay now one thing I want to give you
34:26 clarification on is that that some people may be confused at is there is a border setting for your image okay but
34:34 how does that differ from the border setting on your stack okay well let's go ahead and look at that so I'm going to leave my border on my image and then I'm
34:43 going to go ahead and go into the the stack settings so I'm going to go and highlight my stack go into the stacks
34:50 settings may I add a border here okay so if you notice okay that there are two
34:58 different borders okay the border that was in the image settings HUD went exactly on the image okay but that when
35:07 I added a border to the stack it basically added a border around the stack okay as you notice there's a gap
35:14 between the image and the edge of the stack okay this is essentially because the stack is going to be a div okay a
35:22 div tag and that div is currently set to be 48
35:28 I with of my page ok now another thing i
35:34 should add with the image stack is if you make modifications to this the resulting image stack actually modifies
35:43 your image itself and creates a new image with the border and the shadow and
35:51 so on and so forth ok these effects are not applied via CSS they are actually modified added to the image and when you
35:59 export your page ok you will notice that your image has been modified ok so if
36:06 you notice here i'm going to track drag this and here's my rubber ducky image if you notice stacks actually added the
36:13 border in the shadow to the image itself ok it didn't apply CSS to that image it
36:21 applied and affected that image in line and actually created a new image off the
36:28 settings that you defined ok any
36:35 questions on the image and image settings within stacks ok the next step
36:48 out of the box stack that will go over is the HTML stack ok then go ahead and clean up our page a little bit ok the
36:58 HTML stack is essentially very similar to your style tech stack ok however basically what you do is you type in
37:07 static HTML in here you'll notice that there is no formatting bar ok what you type in this stack is what you get ok so
37:16 again it's primarily used for static HTML that you would like to of course be rendered so you'll notice that if you
37:26 click out of the the stack your HTML is rendered ok but if you double click and go into edit mode for that content
37:34 you'll notice that you see the exact HTML code that is behind what is in there
37:41 okay so there's not much else here there's no different settings other than what we've already gone over so again
37:49 this stack is used for default HTML okay um the remaining stacks are our kind of
37:57 utility stacks that are allow you to kind of build different things in layouts of your page okay so the two
38:06 column stack is essentially what it what it sounds like it allows you and gives you two columns okay now there are some new settings for the two column stack
38:14 and you'll notice that all the settings down here at the top of the settings HUD are the same exact settings as you see
38:23 on every single stack so we have with we have border margin padding just as we do in every other stack okay but you'll
38:31 notice that there is a new setting down here that is specific to the two column stack okay and basically it's the column
38:41 split so if you want and of course the default is a 50-50 split but if you wanted to adjust that and you want to have the the left column or the right
38:50 column bigger than the other you can easily do that okay so that is the two column stack um again it essentially
38:58 allows you to do some layout and you can change the content with okay of the
39:05 columns now I can go ahead and I can go ahead and modify this stack and give this stack a different border right so I
39:12 want to give this one a green border and then I want to give this one a red
39:19 background oops give that a red background okay just so you can kind of
39:26 see how things are going together if I were to give my my two column stack a background as well you can definitely do
39:33 that right so as you see here I now have a two column stack that has a background of purple a tech stack that has a green
39:43 background and another tech stack that has a red background okay now if you if you preview that you'll see exactly what it is right um there are times I'll
39:52 actually go ahead and and give my as i'm building the page i will give my stacks funky background colors okay such
40:01 as this just kind of see how everything is I can easily visually see um you know
40:08 the spacing between you know what is a part of what essentially right because if if I went in here and said you know
40:16 turned off all my background okay it's
40:24 kind of hard when we if we look at this in preview mode yeah I have a you know a text area here and another text area
40:31 here but by adding the really funky background colors I can kind of visually see where all the components of my page
40:39 are and how that's building out and what's the spacing between each one and so on and so forth right um just a trick
40:46 that I use of course I don't recommend anyone ever publishing the page that has colors like that but it is a technique
40:52 to kind of see and visually see on the block source of stacks on your page and how your page is being organized and
41:01 used okay I'm just a small little tip and trick there the next stack is similar to the two column stack but it's
41:10 a three column stack so if you wanted to have you know three text columns in here okay or if you wanted let's say we
41:18 wanted to have go ahead and another trick if you noticed I'd actually didn't have an image stack in here but if you
41:26 just drag an image onto an empty stack area it'll automatically insert ace an image stack for you okay so that's a
41:34 good little tip you don't have to actually drag an image stack out okay and then drag an image into it okay no
41:43 need for that you could just drag the image out onto your page and it'll automatically insert a image stack for
41:49 you okay um so three column stack just like the two column stack basically has
41:56 the same exact settings as every other stack does and then the another split okay so this basically allows you to
42:03 define how wide of a gap do you want the side versus the center column okay and same
42:14 thing applies you can go ahead and tweak the individual settings for every single stack in here and each one can have its own padding margins backgrounds borders
42:23 so on and so forth okay um the next stack is a stack stack okay and
42:33 essentially what it is is just a generic drop area ok now I'm Italy don't use
42:40 this for very much okay but it is useful when you want it right it's useful if if
42:47 let's say I wanted to have a stack where essentially I wanted to have a
42:54 background okay um for some reason I wanted to give it a purple background um
43:01 oops I wanted to give it a border okay um let's increase the padding a little
43:10 bit and then inside here I wanted a tech stack which had its own border okay and
43:19 its own background okay okay this allows you to do that so basically it's a
43:26 generic box okay that lets you you know add anything you want into it okay now
43:34 there is another thing that probably the most useful that I use the generic stack for is actually creating lines right so
43:44 a lot of you probably know that you can go ahead and insert HTML stack and then insert the code HR okay and basically
43:53 you get a line okay and then you can go ahead and adjust the width of your line and so on and so forth right okay that
44:03 that's all great and fine and dandy but what if I wanted to actually you know
44:10 change the color and have a blue line or something of that nature um a really easy thing to do is essentially go ahead
44:18 and add a stack out here ok just a regular empty stack stack ok let's go to advanced I'm
44:27 going to go ahead and I'm going to turn let's see i want border ok i want a
44:33 let's do a orange border ok um and I don't want to give it a bottom border I'm going to give it a bottom border of
44:42 two pixels ok let's adjust the width
44:49 little bit there we go I have an orange
44:56 line right um now there are other things you could do such as if you were to have
45:02 my my styled stack you can do the same exact thing but add little maybe a little drop shadow to it as well so you
45:11 cut up a line with a nice little drop shadow on it a good effect i use that as well ok but again just a trick if you just want a simple line you don't need
45:19 to have anything in the stack at all right but it makes a nice little separator and then you can play with the the margins here to basically give the
45:28 gap between you know your two areas so if you know if I have my three column stack here my two columns stack there ok
45:36 if we preview that sometime today there
45:46 we go you'll notice that I definitely have kind of a slightly bigger gap here and a large you know solar gap there
45:54 let's say we want to increase that right I don't know we can just increase the margin a little bit of course you can
46:02 also just go ahead and increase the bottom let's say we want the bottom to be a little bit bigger let's say we want
46:07 30 pixels there so on and so forth ok go ahead and preview and there we go you
46:16 know I have a line on you know that's separating to content areas and I increase the gap between them with a
46:22 margin ok so convenient convenient thing to do with a with a stack stack ok let's
46:32 go ahead and look at our final two stacks that we're going to be going over today and it is a left floating image
46:40 and a right floating image now these two stacks are essentially the same it's just one has an image drop area on the
46:49 left and one has one on the right okay so i can go ahead and add my little ducky there i can drag my ducky there
46:58 okay and if you notice here you have an image a styled text area to play with
47:06 over here okay so you have your title your style text on the right here any of
47:14 your style text on the left on this stack okay um and that's essentially again it has the same exact settings
47:23 there's no specific settings it's just you know that you drag an image out and
47:29 then you put in your style text okay um so that kind of goes over the basics of
47:38 stacks the last thing I'm going to go over is basically some of the stacks preferences to kind of give you an
47:45 overview of what preferences stacks has and some caveats that you might need to be aware of as you're working with your
47:52 stacks pages so the go-to stacks preferences basically you go to your page inspector okay and he click on the
48:06 preferences okay there's a setting that that most people have turned on because
48:13 it's turned on by default and if you notice you'll see exactly what that is and that's display frame outlines so if
48:20 you want to display your frame outlines you can definitely see exactly where the stack is okay or you can turn that off if you kind of wanted to see a more
48:30 preview esque view of your stacks area okay um I prefer having the outlines
48:36 turned on mostly because it allows me to easily see where my stack is started and where ended okay and then the the last
48:47 setting that we hit preference that we have here is reduce large images now by default these are set to I believe 800 pixels x
48:56 800 pixels okay and essentially what these are is a stopgap to basically help
49:05 you from yourself okay I'm going to go ahead and let's find a a large image
49:13 okay um I've been great if I was ready
49:19 hold your hold on for one second okay so
49:30 here i have a an image let's just drag down on my desktop okay this is a
49:38 screenshot and if we look at the size of this image it is 1280 pixels wide x 800
49:46 pixels tall okay let's say I wanted to add this screenshot to my website okay as you would think you'd go and drag
49:55 that onto your stats page and it hence creates an image stack for you okay with
50:02 you can go ahead and you can go ahead and edit the attributes of this image okay now if you notice by default
50:10 stacked kind of noticed that you already had a big image ok it was 1280 pixels which is pretty big for a for a web page
50:19 right so it went it went and went and scale the image down for us automatically down to thirty eight percent okay so if we preview our page
50:28 will notice that we have a small preview of our screen shot okay but I want it bigger I want to make sure that my image
50:36 is big it's seen ok so let's go ahead and and scale that back up to one hundred percent now if we preview this
50:47 you'll notice that will my webpage area let's go ahead and make it a little bit
50:53 lighter ok there we go so you'll notice if we look at this image now um it's it
51:02 bigger but it definitely isn't the 1280 pixels that the image that I drug in was
51:10 so what's going on here what's what's going on I demand to know why I don't have my image the way I wanted it okay
51:20 and it all has to do with that preference in the stacks preferences okay so in this in our stacks
51:29 preferences we said reduce large images and make them a maximum of 800 pixels
51:37 tall or 800 pixels high so stacks is protecting us from ourselves by saying
51:44 you probably really didn't want to put in a image that was 1280 pixels tall so I'm going to go ahead and shrink it to
51:52 800 pixels so stacks kept the proportion of the image reduced our image to 800
52:09 to be 1280 pixels wide okay oh there is there isn't actually allowed maximum i
52:16 think the the maximum is 1100 so let's say I want a thousand pixels wide okay I
52:22 can go ahead and basically and after you change a preference you have to have to add your image back in okay go ahead
52:30 oops go in the image settings change it to one hundred percent I preview it
52:39 again you'll notice now it's gone off the page but it definitely is a thousand pixels wide ok so again this setting is
52:49 very important if you're if you're using large images and you're dragging them onto your web page okay and you know in
52:57 your you're wondering why your image is smaller than what you think or expect it should be okay definitely have a look at
53:05 this setting okay because it's probably what your issue is now another thing
53:11 that users have issues with is going ahead and
53:16 if you notice that oops I'm going to go ahead and shrink this down let's go
53:24 ahead and make it a little bit smaller preview it now there are times you can't
53:31 really notice it here too much but a little bit you'll notice that the image might be a little bit blurry or out of focus or the image quality just isn't as
53:40 good as the image that you drugged into the into the stack okay so i had a jpeg and basically stacks under the covers
53:48 you know manipulated the image shrunk it down a little bit to protect myself maybe it added a border or shadow to it
53:56 because I asked it to and the image just isn't sharp it's kind of just maybe a little bit blurry okay now this is a
54:06 known issue with stacks and really the the only way around it is to essentially reference the image externally from
54:14 stacks okay so basically not don't use the actual stacks image HUD okay or the
54:23 image so don't don't use this okay if you want to have a large screen shot of something and you want to make sure that
54:31 it's still extremely crisp and clear just as you see here is if you were open it locally on your machine essentially
54:39 you're going to want to use some HTML okay to reference that image maybe you add this image to your to your local
54:46 resources and then you add that resource to your stacks page okay via HTML okay
54:53 I'm not going to go over exactly how to do that in this cast but that's essentially what you're going to want to do now a little rabbit may have told me
55:02 that things are getting better in stacks too so stay tuned and things will hopefully you know in that realm will be
55:10 getting better but pretty much what we have now insects one is pretty awesome right we can we can edit our images
55:18 stacks save us from saves us from our self and make sure that we don't you know upload you know huge 1280 pixel
55:27 size or sometimes maybe even a you know someone drugged drags in a JPEG from their camera and it's like 4
55:34 megapixels right stacks will reduce that for you okay and and help you save yourself from yourself okay so that's a
55:41 great thing uh the last tab that we see in the stacks settings is defaults ok
55:49 and then essentially allows you to change the default background the default border the default margin and
55:56 padding's of a stack when you drag it out ok so that means if you drag out a new stack what is the margin going to be
56:04 set to the default here is set to 2 pixels padding the set to 5 pixels border and Brack background or set to 0
56:12 ok but let's say you wanted to have every stack had a default border of 1 pixel or had a default margin of 0 ok
56:21 you could definitely change that and where you change that is in the defaults tab within the stacks settings ok um so
56:31 with that that pretty much wraps up our overview of stacks defaults and you know kind of gives you a pretty thorough
56:40 explanation of stacks and how to use it ok so as I wrap up please let me know if
56:48 there's any other questions let's check out the chat room I'm going to go ahead and give you a sneak peek at my new
56:55 scroll stack so this is my new scroll stack that I released this week just a
57:04 couple days ago um and if we look at the icon and say a beautiful icon that is a
57:12 nice film canister ok now as you drag the stack out you'll notice that it has a 1 image drop area and allows you to
57:20 customize and add as many as you like or not as many you can have up to 50 ok and then basically you drag your images out
57:29 I already have one set up but basically you drag your images out that you'd like to use ok now one caveat is to really
57:36 make that the scroll stack shine make sure that your images are all the same height ok
57:43 so I've done some work and before I added all of these images into rapidweaver I made sure that I resized
57:51 all of them to so that they were all exactly the same height okay i meant a head and went and made sure the scale was set to 100 so that all of the images
58:09 a nice kind of a scrolling view of my images you have some navigations on the left and right where you can actually go
58:18 if you hover over you can speed through and if the closer you get to the stacks edge the faster the preview gets okay
58:27 now when you when you get to the end essentially it will automatically go ahead and start going back in the opposite direction however there are
58:36 some settings to modify that so if you if we look at the scroll settings you can go ahead and say what slide do you
58:44 want the effect or the show to start at by default we started slide number one okay so it's going to start here on number one but if you wanted to start it
58:53 you can start at any position within the slide deck okay speed this of course allows you to you know control the speed
59:02 do you want it to be slower or faster okay loop this basically says instead of when you reach the very last slide go
59:11 back in the opposite direction it will loop and do an infinite loop so once it reaches the last slide it will go ahead and load the first slide again and just
59:19 keep on scrolling in the same direction okay we can also hide our navigation okay so basically if we look at preview
59:28 now will notice that I have scroll I've adjusted the speed so it's going a little bit faster but my navigation is
59:37 also gone okay now at any time if you hover over you can pause the navigation
59:45 ok so again whenever your mouse enters it the the sliding will pause okay and
59:52 even though the navigation is is hidden you it's still effective so if I actually scroll on to the side you can
59:59 actually still navigate through your slide deck uh now as well as hiding the
01:00:07 navigation you can also customize the color and opacity so if you wanted to make sure your if you wanted to have a slightly more opaque and solid color
01:00:15 navigation okay you can definitely modify that so you have kind of a more solid color navigation feel for the
01:00:24 slide deck okay so that is scroll that's a great introduction to scroll I hope you like it it is available now on my
01:00:32 website so make sure you go check it out Joe workman net so with that everybody I want to thank you very much for joining
01:00:40 today's webcast I hope you learned a lot I enjoy doing this and I hope you enjoy attending them so again thank you very
01:00:47 much and until next time see you later bye
Search the page
0
