About Stacks Guru
Stacks Guru is born from the need to search the vast number of videos out there on stacks built for Stacks Pro and the Stacks 5 plugin for Rapidweaver.
We have scraped over 500 videos to get the transcripts for each in order to make the spoken word searchable.
Please use this free tool to help you learn and discover the awesome power that Stacks and the stacks made for Stacks have to offer.
Stacks Guru
Video Reference
Customizing CSS with Pi
01/22/2019
Transcript
00:00 what happened to the point in math class00:04 it grew square roots hey everyone
00:14 Jill workman here and in this video
00:15 we're gonna be looking at PI and how we
00:19 can use it to apply CSS to our pages
00:22 pretty cool stuff this is definitely
00:24 some more advanced use cases for pi
00:26 right cuz in this demo we're gonna be
00:29 looking at demos 4 & 9 in the PI demo on
00:33 the product pages and what that does is
00:35 we're gonna be modifying some text sizes
00:38 and then we're also gonna be applying
00:40 some custom colors and modifying some
00:43 colors on the page and that's all done
00:45 with the power of Pi right the this is
00:48 definitely some it more advanced use
00:50 cases for pi and but let's see how fun
00:53 it is let's jump on in and have a look
00:56 okay so here we are in the demo project
00:59 that ships with Pi and we're gonna be
01:01 looking at demo for first now this
01:04 particular demo is really simple in
01:05 terms of the PI input right we just have
01:07 a simple number input that gives us a
01:10 number and the PI it actually doesn't do
01:13 any formula we just actually return the
01:16 value from the font-size number input so
01:20 I mean if we wanted we could add some
01:22 math into here maybe since this is
01:24 pixels we could divide it by 16 which
01:26 returns the remm right but right now I
01:29 just want to just do a one to one where
01:31 this number input defines the pixel size
01:34 of the font that we want and then in PI
01:37 we're gonna apply that so let's see how
01:40 we do that inside PI if we look at the
01:42 settings there is a button here to
01:44 enable CSS actions
01:47 now in order to use the CSS features of
01:50 Pi you're gonna have to know a little
01:52 bit about CSS there's no way around it
01:56 you're gonna have to know a little bit
01:57 of CSS in order to use this so hopefully
02:00 you're aware of CSS there's a lot of
02:03 really great resources out there check
02:05 our FAQ I have some great links for you
02:07 to check out next so here in the CSS
02:11 settings we're gonna want to put in a
02:13 CSS selector so here I use dot PI -
02:18 sighs now this is just a PI sighs is
02:22 just a class that I came up of out of
02:25 the blue because we're changing the size
02:27 of something and in CSS we use a dot to
02:30 represent that we actually are using a
02:33 class so the dot says look for
02:36 everything that has a class of Pi -
02:38 sighs now if we if you know anything
02:41 about foundation its header stack allows
02:44 us to provide a custom class so inside
02:48 the header stack you can add custom
02:50 class and then you just put PI - sighs
02:53 now you don't put the period here you
02:55 just do the actual class name which is
02:57 PI - size
03:00 and that's all we need to do for the
03:01 selector because we have dot pie size
03:03 that allows us to do you know the class
03:06 of pie size so next we want to define
03:09 our CSS property and as we said in this
03:12 example we want to modify the font size
03:15 and in order to modify the font size of
03:18 something the CSS properties actually
03:20 font - size and then we want to provide
03:23 a CSS unit if we need to so in this
03:26 particular case we want pixels because
03:28 we're defining the number of pixels that
03:30 we want our font size to be and if you
03:33 look inside PI inside edit mode you'll
03:35 see that we get a little bit of an idea
03:37 of what the CSS selector will look like
03:39 it's gonna do dot Pi size curly brace
03:42 font size colon and then this underscore
03:45 PI underscore is where it inserts the
03:47 value and then it does a px after that
03:50 right so this is the kind of the CSS
03:52 that's going to be applied to your page
03:54 so everything that has the PI size class
03:57 will now become 50 pixels so here we are
04:01 in demo 4 and if I click on this and we
04:05 increase the number we'll see that we
04:07 can increase the font size obviously we
04:09 can change the number as well and that
04:11 will change the font size and that's all
04:13 done with pi right so pi is seeing that
04:15 oh I see you change it to 25 I'm gonna
04:18 apply the CSS rule to be font size 2
54:21 pixels now you might notice down here
04:23 there is a cool little button bar and
04:25 this basically with cool little buttons
04:29 we can increase decrease and set it to
04:31 predefined sizes pretty cool now this
04:34 button bar has actually nothing to do
04:36 with pi I just thought it would be a
04:39 cool implementation and basically what
04:41 it is it's just a straight foundation
04:43 button bar that modifies the value
04:46 inside the the number box and since
04:49 we're modifying the value in the number
04:51 input pi sees that and then changes the
04:54 text right so it's just an interesting
04:56 way you know to kind of you know have
04:59 buttons to control the values instead of
05:02 having to actually type in a value
05:04 directly into the number input now if
05:07 you want to see how that's done
05:08 again this has nothing to do with pi at
05:10 all
05:12 I just used some fancy JavaScript so
05:15 here in the button if you look at the
05:17 link there's some really fancy
05:21 JavaScript in here that it takes the
05:24 name of the number input rights because
05:27 I called it font size then the actual
05:29 number form input is called font size so
05:32 it takes that and sets the value to be
05:34 25 so pretty simple and then also this
05:38 particular one is a little bit more
05:40 advanced the plus and minus because it
05:42 takes the the current value that it has
05:43 and increases it or decreases it by one
05:46 right but if you have this demo file
05:49 feel free to maybe you know steal that
05:52 little snippet of JavaScript that's in
05:53 the link setting here and have fun again
05:56 that has nothing to do with pie it's
05:58 just something cool that I thought would
05:59 be interesting to add to the demo so
06:02 have fun with that so the next demo that
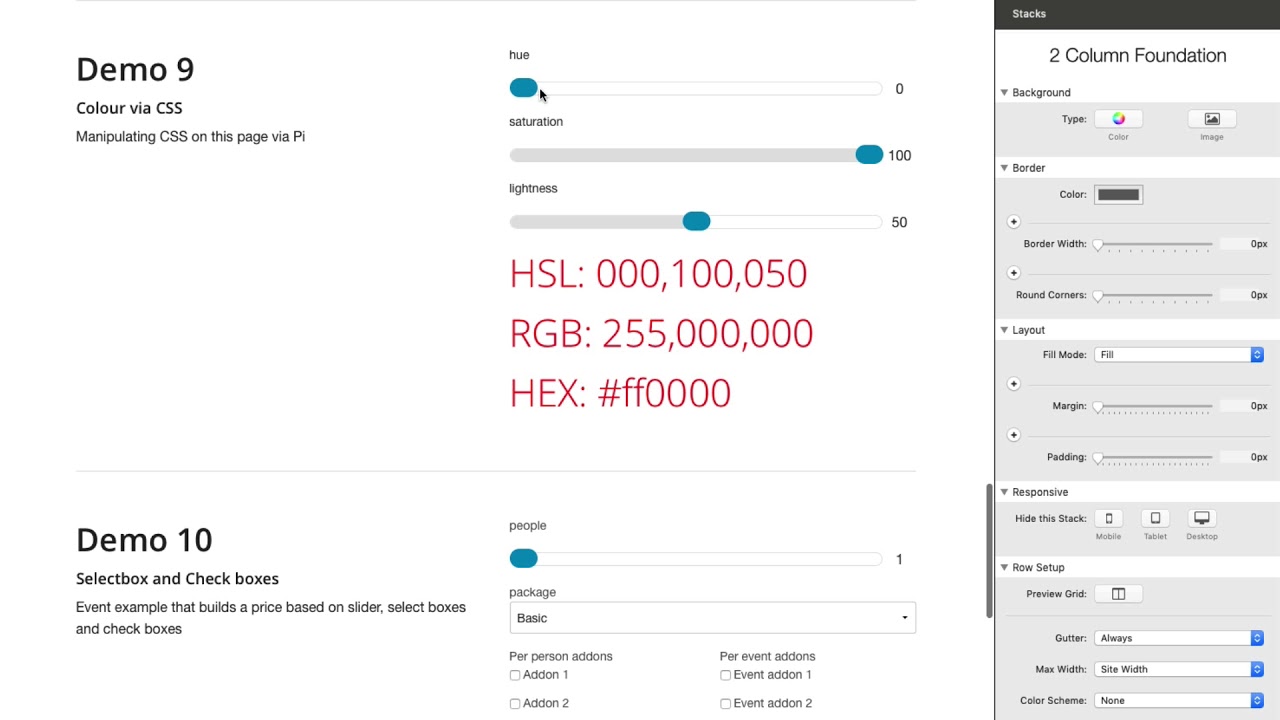
06:05 we're gonna look at is demo 9 and this
06:07 has to do with colors now this demo is
06:10 really interesting that it's actually
06:11 kind of an advanced demo of Pi but what
06:15 it does is it has three sliders that
06:17 actually modify HSL values HSL is a type
06:22 of number input that that is actually
06:27 all numbers kind of like RGB right you
06:28 can probably a similar setup here with
06:31 RGB values okay but here we have the hue
06:34 and as you notice as we change the hue
06:37 we can see the actual colors change here
06:39 of the text and then we can we can
06:42 adjust the saturation and then the
06:45 lightness right so really cool depending
06:48 on you know these values you can you can
06:50 find almost any color that you want now
06:54 that this demo does other things such as
06:56 it actually converts that value to RGB
06:58 into hex values we're not going to dive
07:00 into the details of that but we're gonna
07:02 glance over it a little bit but we were
07:06 curious into in terms of how we're gonna
07:08 actually apply the CSS here okay so here
07:12 we are an edit mode to look at demo nine
07:15 and it's a little bit more complex the
07:17 demo for that we just looked at because
07:19 we have three slider values right for
07:21 hue saturation and lightness and if you
07:24 look at these PI's there
07:25 actually kind of crazy right if you
07:28 notice they all have some custom
07:29 JavaScript functions that are quite
07:31 complex now there are four pies total
07:34 for this we have one that creates the
07:37 HSL a string that you see that's
07:39 displayed on the page another one for
07:41 RGB and another one for hex all of these
07:44 have their own custom JavaScript
07:46 functions that take the values of the
07:48 sliders and then convert them into the
07:50 actual HSL string that you see now I'm
07:53 not gonna be reviewing how to do custom
07:55 functions in this particular video we
07:58 have a separate video on how to do
07:59 custom functions in it and some more
08:02 advanced things with pi but just know
08:04 that these particular ones actually
08:06 aren't required to do the CSS stuff
08:10 which is what we want to talk about in
08:11 this video so if we look at this very
08:13 last pie here it's the most simple of
08:16 this set and I gave it a name of color
08:19 HSL because it applies the HSL color
08:21 value to our text and if you look here
08:25 in the pie I'm just doing an h SL string
08:27 in CSS so basically I'm creating a CH SL
08:30 parentheses then I'm adding the hue the
08:32 saturation I'm adding a percentage after
08:34 the saturation and then a lightness and
08:37 I'm adding a percentage sign after the
08:38 lightness now notice that I'm actually
08:41 putting this entire thing in double
08:43 quotes because I want this to be a
08:44 string I don't want it to be a number I
08:47 don't want it to be evaluated as some
08:49 sort of JavaScript function I want this
08:51 to be a string so that I'm encapsulating
08:54 this all inside text or all inside
08:57 double quotes
08:59 now basically what we want now is we're
09:03 gonna do just as we did in the previous
09:05 example I create a class here I'm just
09:07 going to call it PI color text and we
09:10 have the dot here because that's I want
09:12 to apply it to the class pi color text
09:17 now the CSS property for changing the
09:19 font color is color and then we don't
09:23 need any units here because colors don't
09:25 have units so we just leave that blank
09:26 and if we look at the pie here in edit
09:29 mode we'll see that we have dot pie
09:31 color text curly brace color colon and
09:35 then pi will insert the value that this
09:38 formula generates into this here now if
09:42 you remember inside the foundation
09:44 header stack we can easily apply a class
09:47 to the header now if you notice here
09:49 actually have multiple classes defined
09:51 inside this header because you can add
09:53 more than one here I have PI color text
09:56 now this pi HSL is actually coming from
10:00 this stack because this pi is using the
10:04 class to actually inject the contents so
10:07 you can do multiple things here right so
10:09 here we're applying the actual text
10:13 value so we're doing HSL colon and then
10:16 the HSL color value and then we're also
10:19 applying the color all with a different
10:21 class so you can have as many classes as
10:23 you want on something now if we look at
10:26 the other thing since there's RGB here I
10:28 have PI color text and then I have
10:30 another class of pi RGB and classes I
10:33 should note I should note when you add
10:34 them here they're just separated by
10:36 spaces so you have class name space
10:39 class name space class names so on and
10:42 so forth okay and then on the hex one I
10:44 also have the PI color text and then I
10:46 have the PI hex because PI hex is gonna
10:49 add is going to be used by this pie
10:53 called hex that inserts the hex value
10:57 and that's basically it hopefully that
11:00 wasn't too confusing um so here we have
11:02 you know we can adjust this and because
11:05 we have that pie color text class on
11:08 this header the color values are applied
11:11 to each one of these so there we have it
11:15 there are two really solid examples of
11:17 how you can use pie to adjust CSS now I
11:21 do have to say I only chose simple CSS
11:24 selectors right with just a class right
11:26 most people can you know kind of grok
11:29 that example where you apply a class to
11:31 something and then you know that style
11:34 is applied to a class you can obviously
11:37 do some more complicated selectors where
11:39 you're doing you know nested things or
11:41 if you want to apply CSS to something
11:44 custom on the page you're gonna have to
11:46 figure out that selector now I have some
11:48 videos on my youtube channel that teach
11:50 you how to use the dev inspector and how
11:52 to find the selectors and and all that
11:54 jazz so make sure that you go to the
11:56 YouTube calm Weaver space and you know
12:00 while you probably there if you're
12:01 watching this video and search around
12:03 for videos on how to you know learn some
12:07 you know basics of CSS how to use the
12:10 dev inspector to help you figure out
12:12 what those selectors are now again on
12:15 our ethic hues I'm gonna have some
12:17 resources for you know learning what CSS
12:19 selectors are and maybe teaching you a
12:22 little bit about what CSS properties are
12:24 available head over to most of those are
12:27 pregnant a link to w3 schools calm it's
12:29 a great resource for learning how to do
12:32 simple things like that so that wraps up
12:36 this video I hope you enjoy by I'm
12:39 excited to see how you use this right I
12:41 hope you don't do too crazy things right
12:44 I mean letting users just move all kinds
12:46 of stuff around the page I'll be
12:49 interested to see how you use it so I
12:52 hope you enjoy pie I hope you're
12:53 enjoying the power of it and that we
12:56 will see you on Weaver space and post
12:58 all the amazing things that you're doing
13:00 with it so make sure you share so that
13:02 we all learn we could all make things
13:03 better and I'd appreciate that as well
13:05 so take care I hope you have a wonderful
13:07 day and enjoy pie bye"}]
Search the page
0
