About Stacks Guru
Stacks Guru is born from the need to search the vast number of videos out there on stacks built for Stacks Pro and the Stacks 5 plugin for Rapidweaver.
We have scraped over 500 videos to get the transcripts for each in order to make the spoken word searchable.
Please use this free tool to help you learn and discover the awesome power that Stacks and the stacks made for Stacks have to offer.
Stacks Guru
Video Reference
Display Swatch - Foundation 6 Stacks Swatch Pack
06/01/2021
For more information about this swatch and all other swatches in the Foundation 6 Swatch Pack check out https://www.foundationstacks.com/demo... For more great stack to help you with drag and drop web design, head over to https://www.weavers.spaceFor more information about this swatch and all other swatches in the Foundation 6 Swatch Pack check out https://www.foundationstacks.com/demo...
Transcript
00:09 this is probably going to be a really00:11 the display swatch and if you notice
00:13 here i say
00:14 custom visibility because that's what a
00:16 lot of people are going to use this for
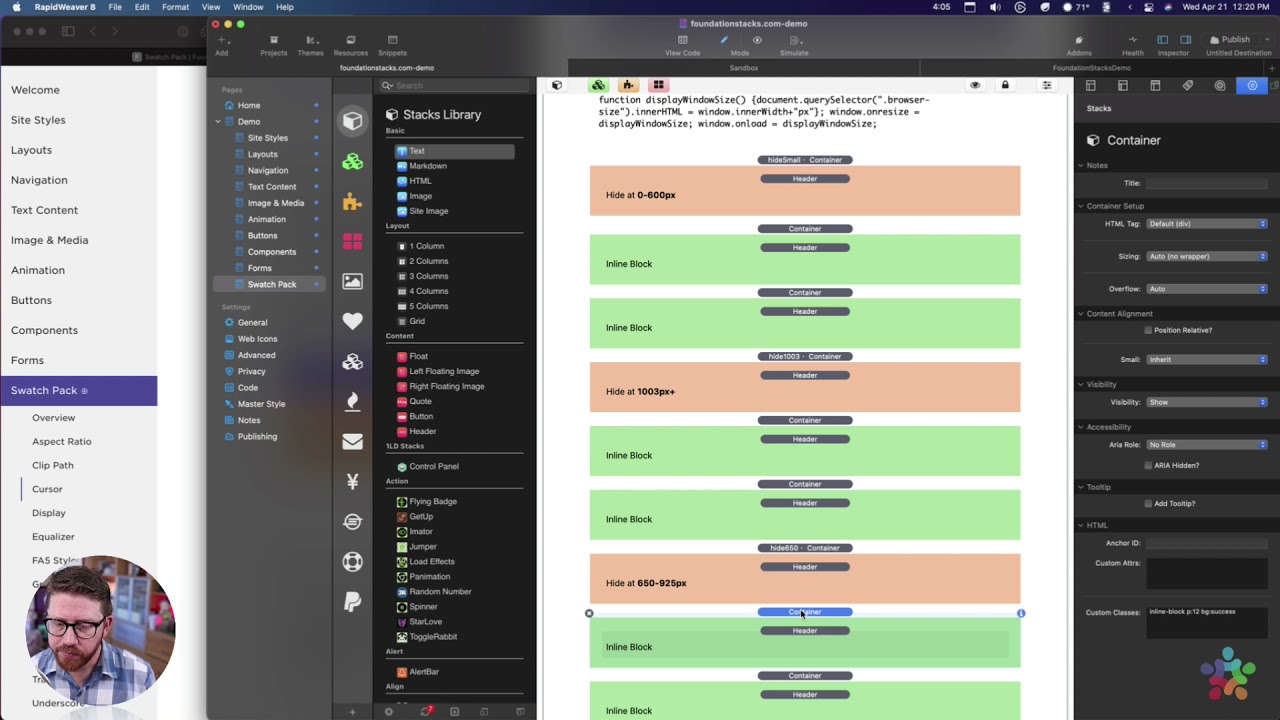
00:18 okay so in this demo i have this little
00:21 box that currently displays your current
00:23 web browser size
00:24 okay and as you see here there's a bunch
00:26 of inline blocks
00:28 um now as you know
00:32 um these are actually containers and by
00:34 default a container will take up the
00:36 entire width of the page
00:38 however um that is something called
00:40 display
00:41 block okay um we're getting into css
00:44 terms
00:45 okay and so a block tells
00:49 an element to go full width to expand as
00:51 far out as you can
00:53 okay now with the displace watch we can
00:57 actually change that behavior
00:59 so um in this example all of these
01:01 little blocks in this grid
01:03 are using something called an inline
01:05 block
01:06 okay and an inline block just says
01:09 take it but basically is take up as much
01:11 space as you need
01:12 and then the next thing will just come
01:14 right after it right
01:16 so as you see when i resize this browser
01:19 window
01:20 um the blocks kind of flow
01:24 you know onto new lines as it grows
01:28 okay um and then these orange blocks
01:30 will hide and show
01:32 based upon um the browser size so this
01:35 particular one is
01:36 hide uh it'll hide it from zero to 600
01:39 pixels
01:40 this one will hide at 650 to 925 pixels
01:44 and if you play around with this you
01:45 just kind of resize the browser so let's
01:47 resize it to like
01:48 here we're now at 860 which was less
01:50 than 925
01:52 you see that we see a new one that says
01:54 hide at 1003
01:56 pixels plus and the reason i did these
01:58 odd numbers
01:59 is to show you that you can do a custom
02:02 size
02:02 right it's not just i mean the default
02:05 visibility stack inside foundation six
02:08 allows you to you know hide based on
02:09 small medium large
02:11 but this now allows you to show and hide
02:13 content based on a
02:14 custom break point okay so a custom
02:18 size of the browser window so really
02:21 cool um that
02:22 i know a lot of people are going to use
02:23 that for custom visibility it was a
02:25 a very sought after feature um so there
02:28 we go now we have that
02:30 okay uh display
02:34 um if you uh
02:37 if you're really interested on how i did
02:38 this little pixel uh box thing
02:41 um all the codes right here it's just
02:43 this little code in the javascript stack
02:45 um that yeah that's the javascript code
02:47 just to uh that populates this
02:50 little header um with uh with the
02:53 content
02:54 yeah pretty simple stuff um or you know
02:56 it's some
02:57 relatively simple uh javascript and uh
03:01 just says whenever we resize or the page
03:03 loads
03:04 essentially get the the current browser
03:06 side size
03:08 um and then replace the contents with
03:10 the current browser size
03:12 so yep um yeah cool if you ever want to
03:15 figure out not sure why you would want
03:17 that on your particular website but
03:18 there you go
03:26 okay so if you look here
03:29 in this example i have a bunch of
03:31 container stacks
03:34 and as we talked before normally
03:37 a container will go the full width
03:41 of whatever you're within right so a
03:44 container will always
03:46 try to grow as far as it can
03:51 but this display swatch
03:54 if you look here i created a swatch
03:57 called it class
03:58 inline block then i can set the display
04:01 property if you notice here there's
04:03 a lot of different values i'm not going
04:06 to review
04:07 all of these values if you'd like to
04:08 know what some of them are and so what
04:10 some of them do
04:11 feel free to research the css
04:13 documentation
04:15 to learn about all of these
04:19 i will be talking about two things today
04:22 we'll be talking about inline block or
04:24 inline
04:25 inline block and inline are very similar
04:28 most time you're going to want to use
04:29 inline block
04:30 okay and then we're going to be talking
04:32 about none which is
04:33 how we can do custom custom visibility
04:37 so um here i created a class called
04:40 inline block
04:41 and i set that to be inline display
04:43 inline block
04:44 surprisingly right and i added that to
04:48 each of these containers so every single
04:50 one of these containers
04:51 has the inline block class
04:57 and what that does is it is it
05:00 makes the container um basically
05:04 size to the width of its content so if
05:06 you see these orange blocks are a little
05:08 bit wider
05:09 um you know this one's actually more
05:11 narrow than this one is because
05:12 it it will shrink down to the size of
05:16 its content
05:17 and then um what all the content that's
05:20 within it will just kind of start piling
05:22 on top of each other
05:22 or not on top but next to each other
05:26 okay so this is definitely a valid
05:28 layout and actually
05:29 you know it works very similar to
05:31 buttons i don't know if you've noticed
05:34 uh with buttons but if you have a button
05:37 two button stacks directly on top of
05:38 each other
05:39 um they will actually uh
05:42 be next to each other uh in preview they
05:45 won't be on top of each other
05:46 um so yeah so and that's because buttons
05:49 by default
05:50 are inline they're not they're not
05:52 display block
05:53 okay so that's pretty simple
05:57 right how to get the inline block so
06:00 that's what we can do if you want
06:01 something like that
06:03 next now let's look at how we can use
06:06 some of this display none
06:08 okay so if you see here i have three
06:10 different um
06:11 display swatches that hide based on
06:14 different break points
06:15 so for this one i have a class called
06:17 hide small and i set that to be display
06:20 none and then it displays none at a
06:23 custom break point so you click on the
06:25 custom break point and you set that to
06:26 be 0 to 600
06:28 so from 0 to 600 whatever i
06:31 add this class to will be hidden right
06:34 and i
06:35 i apply this little force button just to
06:37 use the hammer
06:39 put the hammer down on it force that
06:41 style
06:42 okay next up we have
06:45 hide 650 which sets to display none
06:50 custom break point from 650 to 925
06:54 so you as you see here you can define
06:56 the exact break point from
06:59 a smaller side to a larger side so this
07:02 gives you
07:02 very granular control
07:07 next up i have hide 1003 and essentially
07:10 i just wanted it from hide
07:12 from basically 1003 pixels above so what
07:15 i did is i just set the minimum to be a
07:16 thousand three
07:17 and then i just set the maximum to be
07:19 ten thousand i mean like
07:20 i don't know anyone that's going to have
07:22 a browser 10 000 pixels wide so i just
07:24 set it to
07:25 you know so essentially this is
07:27 effectively you know going from a
07:29 thousand pixels
07:30 or a thousand and three pixels up
07:34 okay and then all i did is um i styled
07:36 uh i added those classes to these orange
07:39 containers
07:40 um with the proper labels to so that you
07:42 can see inside the demo
07:44 what those are actually doing and it
07:46 does this job as we saw earlier
07:50 right pretty cool
08:01 you"}]
Search the page
0
