About Stacks Guru
Stacks Guru is born from the need to search the vast number of videos out there on stacks built for Stacks Pro and the Stacks 5 plugin for Rapidweaver.
We have scraped over 500 videos to get the transcripts for each in order to make the spoken word searchable.
Please use this free tool to help you learn and discover the awesome power that Stacks and the stacks made for Stacks have to offer.
Stacks Guru
Video Reference
Drift Pro - Morph SVG
05/20/2022
Transcript
00:08 hey guys joe here and man i need to take00:11 a second to celebrate because this is my
00:14 19th drift video it's the final one that
00:17 i'm recording for the drift release
00:20 and wow it's been a long journey and if
00:23 you're using morph you're probably going
00:24 to be an advanced user this stack is not
00:27 for the faint of heart okay i will show
00:30 you the
00:32 super basics at the beginning
00:34 and then we're gonna dive into the weeds
00:37 okay
00:38 um there's a lot going on here the stack
00:41 is pretty magical though right uh
00:44 i'm sure you've already seen the demo
00:45 you can do really amazing stuff like
00:47 that
00:48 like that is just mind-boggling how it
00:51 takes
00:52 a shape
00:54 okay and i can't take credit for this
00:55 this is from the the green sock team
00:57 over at you know the gsap team at
00:59 greenstop and uh wow i mean this is just
01:02 magical how we can go from one shape to
01:06 another not only that but it looks so
01:08 fluid and here i added a little bounce
01:10 to it like
01:12 pretty mind-blowing
01:14 to get this though
01:16 is quite a bit of work
01:19 okay just like anything
01:21 really awesome takes some work okay but
01:24 let's look at the defaults so let's just
01:26 look at this svg really quick again
01:28 we're going to dive into the weeds a
01:29 little bit later but right now i have my
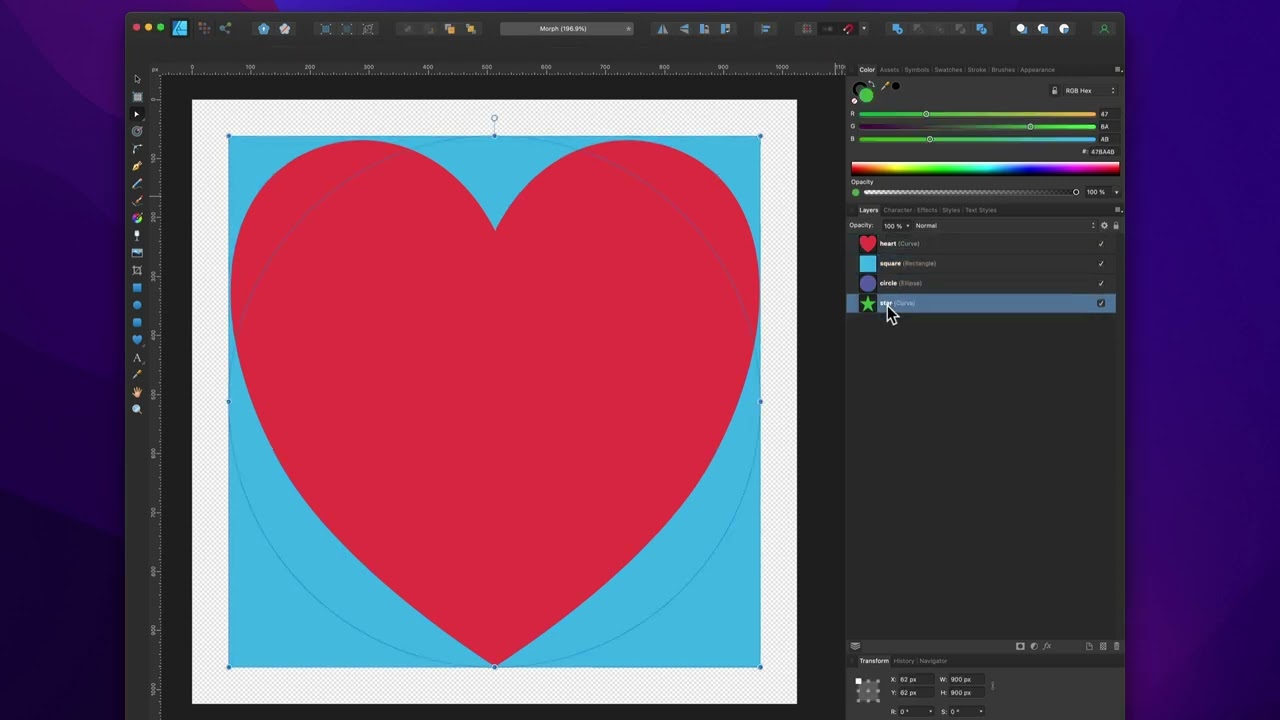
01:32 svg i have two paths
01:35 i have um this first path here is the
01:38 square and if you notice it has an id of
01:40 square
01:41 and this path is the star you'll notice
01:44 that has an id of star
01:47 you have to add ids to your paths in
01:50 order for motion path to work it's the
01:52 only way it will work
01:55 okay
01:56 so
01:57 next up
01:58 is uh inside morph fcg we're going to
02:01 say what is our start path we're
02:03 starting from
02:04 a square
02:07 i guess here i have svg class and that
02:09 is you know kind of a parent to your svg
02:11 so here we have an svg stack
02:14 i have morph on that
02:16 so inside morph we're looking for
02:17 multiple ids
02:18 we're going to be looking for square and
02:20 we're going to be looking for star
02:22 we're going to start from square we're
02:24 going to finish at star
02:27 go ahead and look at that
02:31 we've already seen that okay now what
02:33 are some of the other things let's go
02:35 from uh the morph type okay so we can go
02:37 from rotational i think it's nicer
02:39 looking to linear
02:43 not sure if you you can really notice
02:45 the difference there let's switch back
02:46 to morph or to rotational
02:50 if you look at it just has kind of a
02:52 more movement feel okay now you can
02:55 change the origin here
02:56 um and i mean most time you're going to
02:59 want it the origin at the center but if
03:01 we do on like 25 50 you can kind of see
03:06 all right let's make it a little bit
03:07 more drastic here
03:11 as you see there it the the origin the
03:14 center of the morph is happening over
03:16 here okay if you if you look up here
03:19 kind of makes things
03:20 funky
03:21 okay um but depending on on the shapes
03:24 that you're
03:25 morphing
03:26 okay um you're going to want to move
03:28 that center point to be somewhere
03:31 it happens to be the center point for
03:33 the for both of these shapes that i
03:34 chose for this example it's gonna be
03:36 dead smack in the middle
03:38 okay
03:40 but definitely play around with that if
03:42 you have some odd
03:43 you know oblong shapes
03:45 the center origin might not be the point
03:48 right so you're gonna have to find at
03:50 what point is the gonna be the center of
03:52 your animation or of your rotation okay
03:56 or you can just go with linear and just
03:57 call it quits okay but the rotation you
04:00 have to find that center of where things
04:02 are going to be rotating
04:04 the next setting here is prioritize and
04:07 i would always start with the default of
04:09 size right a lot of this morphine um
04:11 you're going to spend a lot of time
04:13 tweaking things and testing animation
04:14 and testing settings out
04:16 and one of the things you're going to
04:17 test is
04:19 if the priority if your things aren't
04:21 morphing properly changes prioritization
04:24 okay we're not going to really notice
04:25 that here but again just depending on
04:28 the svg shapes that you have
04:30 um you might need to you know change one
04:32 of these
04:33 i would always start with size hopefully
04:36 that's just going to work out it just
04:37 bases um you know there's a full
04:39 explanation here in the tool tip it's
04:41 basically um where the morph plug-in how
04:45 is it going to match up point a to point
04:48 b for each point is going to be based on
04:50 the size of that particular component
04:52 the position of those points
04:54 um and then a
04:56 complex algorithm that is definitely
04:58 going to be more resource intensive to
05:00 do the animation okay with the
05:03 complexity prioritization
05:07 um next up these other settings here
05:09 we're going to dive into these a little
05:11 bit later i'll give you a quick overview
05:13 of them now um convert shapes to pixels
05:16 if you're svg in our svg you'll notice
05:19 that they're all paths
05:21 okay i recommend you convert all of your
05:25 shapes because in svg they're shapes
05:27 such as circle um rect ellipse i
05:31 recommend you you export all those as
05:33 paths
05:34 okay
05:35 um
05:36 because paths are what is required to
05:39 make this happen
05:40 um so you can if we're going from you
05:42 can't go from a circle to a square but
05:44 you can go from a path to a path
05:46 okay therefore um this
05:49 square this checkbox
05:51 therefore this checkbox allows you to
05:53 automatic convert those to paths but
05:57 i recommend you do that in your svg
05:59 editor so that way this plug-in it
06:00 doesn't take extra page resources just
06:03 doing something that you can do already
06:05 before beforehand in your svg editor
06:10 next is define a custom path index um
06:13 this this has to do with
06:16 um debugging morph and we're going to
06:18 dive into that and lastly pre-compiling
06:21 um
06:22 this is the ultimate in performance
06:25 and once you really have things
06:27 fine-tuned i'm gonna recommend that you
06:29 use this and we're gonna dive into that
06:32 okay
06:33 now we're about to dive into the weeds
06:36 and um to do that we're gonna start off
06:38 with an svg
06:40 okay so here we are inside affinity
06:43 designer now i think affinity designer
06:45 does a really good job at exporting
06:48 about one
06:50 actual kind of flaw
06:52 i think it's a bug i'm not sure but
06:53 we'll dive into that in a little bit now
06:55 i will supply this file as a download as
06:58 an svg file on the drift product page so
07:01 make sure you check that out you can go
07:03 ahead and download this exact file and
07:05 then open it in affinity designer or
07:08 whatever your favorite
07:10 vector imaging app is
07:14 now one thing to note is
07:16 all of the i've named my layers right so
07:19 all of the layers here have names and
07:20 what's nice about affinity when we
07:22 export this as an svg
07:24 is all the names for your layers are
07:26 going to be assigned to the id so that's
07:29 one bit kind of handled for us
07:32 now if you notice
07:34 the types of layers here um this heart
07:37 one is a curve
07:38 the square is a rectangle the ellipse is
07:41 a circle or the circle is an ellipse and
07:44 the star is a curve now i created all of
07:47 these using just the standard shape
07:48 tools inside affinity
07:51 now
07:54 when we export this as an svg this curve
07:57 anything that's a curve should be
07:58 exported as a path and as i told you
08:00 earlier we want to make sure that
08:02 everything is a path
08:04 now in order to change this rectangle
08:07 and this circle
08:08 uh we basically select the layer we
08:10 right click and we say convert to curves
08:15 and let's go ahead and do the same thing
08:16 on this square we're going to right
08:17 click and say convert to curves
08:21 and
08:22 in theory all of these should export as
08:25 a path
08:28 let's go ahead and do that i'm going to
08:30 go ahead and file we're going to export
08:33 i'm going to do svg for export we're
08:35 going to export this
08:37 let's just call it morph
28:40 and here's our svg that got exported
08:43 uh you notice that all the ids are there
08:45 that is
08:46 awesome it's a great start
08:48 however
08:51 the star is a path the heart is the path
08:53 but the circle and rectangles are not
08:56 they're still
08:58 circle and rectangle elements
09:00 so
09:01 that is a little annoying i wish
09:03 affinity would
09:05 really export all curves as a path
09:09 that would be really nice
09:10 i searched and searched and searched i
09:13 could not find
09:14 how to get affinity to do that
09:17 um if you know how please post it on the
09:20 community i'd love to know um it would
09:23 be nice and i'm sure other people would
09:24 appreciate it as well so we're gonna
09:27 have to do a little bit of work here in
09:28 order to get this working with morph
09:31 okay um at least
09:33 this will work but without that convert
09:36 uh setting that we saw earlier so i can
09:38 go ahead let's go ahead and copy this
09:41 copy
09:42 okay
09:43 i'm gonna go back into rapidweaver and
09:45 let's go ahead and i'm just gonna paste
09:47 this in
09:48 okay directly into my svg stack
09:51 now remember since all of these weren't
09:53 didn't start off as paths we're gonna
09:55 have to convert these shapes to paths
09:57 inside the morph svg stack okay let's go
10:00 ahead and check that and let's preview
10:03 and there we go now if you look this
10:05 animation is a little bit different
10:07 right
10:08 but let's go ahead and let's preview in
10:10 the browser
10:12 and if we open up the inspector
10:14 and inspect that svg
10:16 we will notice that we have paths for
10:19 everything now
10:21 okay
10:22 so
10:22 what we can do
10:24 is i can go ahead and i can right click
10:27 on this and i can say copy
10:29 html
10:32 okay and then what we're going to do is
10:34 i'm now going to go back into
10:35 rapidweaver and i'm going to paste that
10:38 bad boy in there
10:40 so now
10:42 everything that i have is a path so i
10:44 don't need that any longer
10:46 now the animation is it's not looking as
10:49 as
10:50 nice as i'd like right
10:52 let's go ahead and tweak some of these
10:53 things
10:56 let's just start tweaking this and
10:58 actually uh
11:01 another thing i do i'm going to change
11:02 this time just scroll based instead of
11:05 click based
11:14 okay let's go into more
11:21 all right so now every time i change
11:23 this
11:25 okay
11:31 hmm
11:33 all right
11:33 so let's time to take this game up a
11:36 notch
11:37 and um
11:39 we're going to go to the next level of
11:40 debugging here
11:42 and what we're going to do is i'm going
11:44 to go ahead and add in
11:47 morph svg helpers
11:51 okay and we're going to have to give our
11:53 svg a class
11:54 and so this one it was just a class of
11:57 morph
11:59 okay
12:00 and we're gonna help um find out the
12:03 index we have two helpers here we can
12:05 help find an index and we can help find
12:07 the origin and then you have to give the
12:10 start and end path ids
12:12 okay we're still going from square to a
12:14 star
12:16 all right so let's go ahead and preview
12:17 this now
12:20 and what you'll notice now
12:22 is
12:24 we have kind of a little debugger to
12:27 help us animate or help us figure things
12:30 out
12:30 okay and this is what something called a
12:33 shape index and so what this does is
12:35 it's going to help us
12:37 figure out
12:39 where
12:40 the
12:41 points are and how to map them
12:43 so we're going to do is we're just going
12:44 to click through this
12:46 and we're going to get different
12:47 animations here
12:51 and once we find one that we like
12:54 oh that's not good we're getting we're
12:56 getting farther away
13:12 that's pretty close
13:18 all right we're going to go with shape
13:19 index zero
13:21 now if you remember it was
13:22 auto before shape index one
13:26 let's go with shape index zero okay so
13:29 let's go ahead and we're gonna go into
13:30 our morph svg
13:32 we're gonna just say define custom shape
13:35 index
13:36 and we're going to set that to be zero
13:41 so next up let's go to our origin
13:44 let's uh start debugging and figuring
13:46 out where our origin should be
13:50 all right
13:51 so right now the default is 50 50.
13:53 right
13:54 and
13:55 if we want to we can kind of take this
13:57 little
13:58 point
13:59 and drag that around
14:05 now what you'll notice is there there's
14:06 a point at each
14:08 each time it animates there's a point
14:10 for the star and there's a point for the
14:12 square
14:12 and it kind of changes based on
14:15 um you know what you're doing
14:18 so if it's going you can have different
14:20 points going from star
14:22 to
14:23 square and square to star
14:26 okay
14:27 so you'll notice that when the star is
14:28 red the point or when the star is active
14:32 the point is red when the square is
14:34 active the point is kind of a blue color
14:36 and if you click and hold you can kind
14:39 of move that point around
14:41 and then you can find the exact
14:43 point at which you want things to be
14:45 animated at
14:47 if he knows right below this is the
14:49 exact points
14:50 that you would then copy and paste
14:53 into your uh transform origin
14:56 okay
14:58 um so yeah i think for this one uh we're
15:01 going to stick with 5050
15:03 but i wanted to show you that
15:06 okay
15:08 so the last step here is to pre-compile
15:10 our morph and essentially what this does
15:14 is it
15:16 pre-compiles all of the calculations for
15:19 the animation
15:21 therefore
15:22 drift and green stock doesn't have to do
15:24 that on page load right so we're
15:27 pre-compiling all of this so we get
15:29 faster page loads and better smoother
15:31 animations
15:33 so how do we do that first off you turn
15:36 on the pre-compile morph setting
15:38 then you ensure this log path to browser
15:41 console is turned on
15:43 then all we need to do is preview in the
15:45 browser
15:47 when you open up the dev tools you will
15:50 see that inside there is this big string
15:53 of says pre-compile and a bunch of
15:56 svg paths
15:58 essentially what we're gonna do is we're
15:59 gonna copy that
16:02 we're gonna go back into our project and
16:05 then we're gonna paste it into
16:06 rapidweaver
16:08 now we are gonna have to make sure that
16:10 you
16:10 erase this pre-compile colon from the
16:14 very beginning
16:15 okay so it look it should look something
16:17 like this it should start and end with
16:20 square brackets then we're going to want
16:23 to turn off the log because we've
16:25 already done that part
16:27 we've pasted in our pre-compiled path
16:30 then if we preview our animation again
16:34 it's now a pre-compiled animation so
16:37 that now the morph plug-in doesn't need
16:39 to actually calculate all that again
16:41 it's
16:43 done
16:44 now you only want to do this step once
16:46 you are 100 sure that your animation is
16:49 done and complete and you don't want to
16:51 modify it any further
16:54 so if you remember when we created this
16:55 svg there were multiple shapes here
16:58 so what if i wanted to take that one svg
17:01 shape and then start animating it to all
17:03 of them and create a little animation
17:05 svg loop
17:10 so essentially all we're going to do is
17:12 we're going to build out a timeline of
17:14 morphs
17:18 so i'm going to do is i'm going to go
17:19 ahead and copy and paste this
17:21 and so here we're going
17:24 square
17:25 to star in the first one
17:27 on the second one
17:29 you'd think we want to go from
17:31 star
17:33 to heart
17:35 okay
17:36 and then you think okay well now i want
17:38 to go from heart
17:42 to
17:44 circle
17:46 and then lastly to finish the loop we'll
17:48 go from
17:50 circle
17:51 back to square
17:53 okay
17:55 this is probably what you would think
17:56 would happen let's show you what this
17:58 actually does
18:02 it
18:03 changes everything it doesn't do
18:05 anything which what i thought it was
18:07 gonna do joe
18:08 what's going on here well
18:11 okay
18:11 let's think about this
18:14 in step one we're telling morph svg to
18:17 hey take the square
18:20 and make it the shape of the star
18:23 and then in step two we're saying take
18:25 the star and make it the shape of a
18:27 heart
18:28 but that's not what we want
18:30 because the square is what we started
18:33 with and the square is now the shape of
18:35 a star
18:36 so what we want to do is even though the
18:39 square is the shape of a star we want
18:42 now the square to be the shape of a
18:44 heart
18:46 and then we want the square
18:50 to be the shape of a circle
18:52 and then we want the square to go back
18:55 to being a square
18:58 okay hopefully that makes sense so
19:00 you're going to be animating the same
19:02 thing you're just changing the shape of
19:04 it so let's go ahead and preview that
19:08 and there we go
19:09 we now have the one single shape
19:12 animating and morphing in between each
19:15 of the shapes in our svg
19:17 now you're probably going to want to go
19:18 through and do the pre-compiled path for
19:21 each individual step
19:23 okay that's going to be very important
19:25 to get the most performance out of this
19:28 and you might want to change you know
19:30 debug the custom shape index and the
19:32 origins and all that jazz
19:34 okay i'm not going to do that here but
19:37 as you see that is a great thing to do
19:39 okay i strongly urge you to do that now
19:42 one other thing um you know this
19:44 particular svg um actually had colors
19:46 into it i probably would recommend that
19:49 you not um put fill colors um in your
19:52 svg so i'm going to go ahead and let's
19:54 just remove these fill colors here
19:57 inside the svg
19:59 i mean they're nice so we can see things
20:02 but
20:03 i'm going to go ahead and remove this
20:05 style fill equals on
20:07 everything here
20:09 all right let's do that
20:11 and then at that point you can use if
20:13 you're using foundation 6 the svg stack
20:15 you can then use the fill color to
20:17 customize the actual color of everything
20:20 right so now we got you know
20:22 everything's purple
20:24 now this is obviously going very fast
20:26 another thing that you could do is you
20:28 know between each of these last three
20:30 steps add a delay so if we did like a
20:32 two second delay here
20:34 um we then preview that
20:40 much nicer right so now you get the
20:42 shape for a little bit and then it
20:43 delays and it morphs that heart to
20:45 circle is actually really cool and the
20:47 circle the square is very nice too i
20:49 like that so pretty cool i hope you
20:51 enjoy morph um it's very interesting the
20:55 only thing um kind of the only caveat
20:57 was these paths i think was um you know
21:00 getting these converted you know if
21:02 you're using the shape tools
21:03 um in affinity or you know other tools
21:06 to get the svg exported as path
21:10 um that would be really awesome
21:12 okay so after recording this um
21:16 i i couldn't stand it i i needed to fix
21:19 this and there were two things i wanted
21:21 to fix
21:22 um first exporting these as paths
21:25 i figured it out
21:27 the next thing is remember when we
21:29 animated this
21:31 square to star
21:32 i i was never happy with that initial
21:35 animation
21:37 um
21:38 so i wanted to make that better
21:42 so
21:45 first off let's go in back into affinity
21:48 designer so first off let's teach you
21:50 how you can get these to be
21:54 paths
21:55 so essentially just as before you do
21:57 want to right click and say convert to
21:59 curves
22:00 okay that's a requirement
22:02 next off if you double click
22:05 okay on it
22:06 you then
22:07 basically enter into curve editing mode
22:10 inside affinity designer and you can add
22:12 new points
22:14 so what affinity was doing is it's
22:16 noticed hey you have this path i see it
22:19 has four points it looks like a square
22:22 we're going to export this as a
22:24 rectangle okay but what i'm going to do
22:26 is i'm going to add a point along the
22:28 path
22:29 and i'm going to be very purposeful here
22:32 because i know i'm going to be
22:34 modifying or morphing this square
22:37 to be a tr uh star so what i'm going to
22:40 do is i'm going to add a point
22:42 along the path of this square
22:45 at the point of the star
22:51 and what that's going to allow me to do
22:53 is it's going to allow this to be the
22:56 origin point
22:57 to get a much nicer animation
23:00 now you could argue that maybe you can
23:02 add another point down here at the
23:04 middle
23:06 so this point will then nicely navigate
23:08 up to this point of the star
23:12 okay and then maybe if we were to add
23:14 another one here in the middle of the
23:15 square here
23:17 and maybe another point lastly over here
23:21 what's happening is i'm now adding more
23:24 points
23:25 to this square
23:26 which is going to give
23:28 g sap or green soccer drift less work on
23:32 animating so this point here let's go
23:34 ahead and hide this circle this point
23:36 here is going to maybe animate to the
23:38 here this one's going to maybe animate
23:40 to here so it just gives us a lot more
23:43 but the main point is our starting point
23:45 right
23:46 this starting point is a big one because
23:48 it doesn't need to create some animate
23:50 some artificial point over here which it
23:52 was doing earlier to animate to this
23:54 point it's gonna anchor off that right
23:57 there
23:58 okay so that's point number one then
24:00 we're gonna go to circle
24:02 okay and then i'm going to do the same
24:04 exact thing i'm just going to create
24:06 some arbitrary
24:07 point on the circle and i'm going to
24:09 click on it
24:10 okay i'm not going to move it because i
24:12 still want it to be a circle just
24:14 clicking on it keeps it to be a circle
24:17 okay but because it it has more points
24:20 than what affinity is
24:22 thinking
24:23 is going to be there
24:24 when i export this it's going to export
24:26 all of these as a path so let's give
24:29 that a shot we're going to go file
24:31 export
24:32 gonna export as an svg
24:36 call this morph two
24:39 place it
24:41 and victory
24:44 right
24:45 victory i have all my paths here um and
24:49 yeah let's go ahead and test this i'm
24:50 excited
24:52 so now i'm here inside my uh rap reaver
24:55 project
24:56 i'm going to paste in our newly
24:59 generated svg from affinity that has all
25:02 paths
25:04 and let's preview this
25:08 oh look at that
25:17 score i love it
25:19 if you notice that that transition of
25:21 here let's go ahead and um i'm going to
25:24 delete these other ones i'm just going
25:25 to focus on that square to star for
25:27 right now okay
25:28 and i'm also gonna make it hover so we
25:30 can make it go multiple times
25:35 all right
25:36 look that animation is
25:39 sweet and i think adding that point on
25:41 the bottom
25:42 really helped because it makes that one
25:44 point go up right
25:46 so it gives less guesswork
25:49 for drift um to calculate this animation
25:52 because we already have all the points
25:54 that we need and the automatic we don't
25:57 even need to use the shape index debug
25:59 tool because it automatically figured
26:02 out that that point we had is the
26:04 correct one to start with right
26:07 super stoked about that
26:11 cool well i hope you enjoy morph um this
26:14 is really awesome um you can do amazing
26:17 things with this and um yeah thanks for
26:19 sticking along go watch all the other um
26:23 drift videos we have tons of them maybe
26:25 i'll record more after this one but this
26:27 is the last one hang out um 45 minutes i
26:30 got a hangout guys make sure you join
26:32 the hangouts every fridays um super fun
26:36 a lot of time hopefully i'll see you
26:38 guys there take everyone enjoy drift
26:40 we'll see you later go out there and
26:41 make your websites great
26:52 you"}]
Search the page
0
