About Stacks Guru
Stacks Guru is born from the need to search the vast number of videos out there on stacks built for Stacks Pro and the Stacks 5 plugin for Rapidweaver.
We have scraped over 500 videos to get the transcripts for each in order to make the spoken word searchable.
Please use this free tool to help you learn and discover the awesome power that Stacks and the stacks made for Stacks have to offer.
Stacks Guru
Video Reference
Drift Pro - Timelines
05/19/2022
Transcript
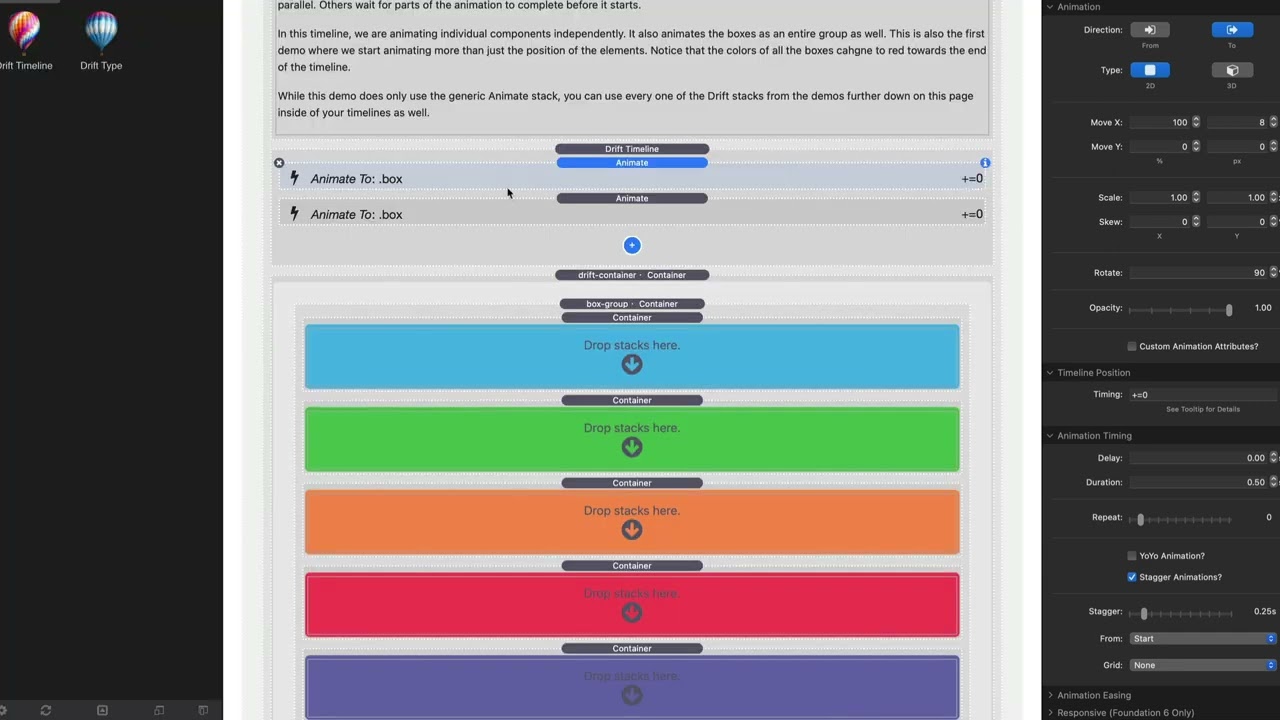
00:09 hey guys so in this video we're going to00:11 be learning how to build out our drift
00:13 timeline
00:15 so in this demo i have a bunch of five
00:18 boxes
00:20 and you'll notice when i hover right now
00:22 it's only hovering that one blue box
00:26 but let's say we wanted to continue
00:29 animating the other boxes in this demo
00:32 now for this setup if you'll notice each
00:34 of these boxes this is a similar
00:37 box setup that is inside the drift pro
00:40 demo project
00:42 you'll notice here i have each box here
00:44 has a
00:46 box class then it has a color class and
00:49 then it has
00:50 either box 1 box 2 box 3 box 4 or box 5.
00:55 so this last one has a box five class so
00:58 it allows me to easily target all of the
01:01 boxes with a box class
01:03 or an individual box with
01:06 the box and a number
01:08 so in this first one here we just
01:10 targeted box one okay and i animated it
01:15 so let's go ahead and add a second one
01:18 and i'm going to add i'm going to target
01:19 box 2 here
01:23 let's preview this
01:25 what you'll notice now is
01:27 one two
01:29 so now we animated box one and then
01:32 after
01:33 box one was finished
01:35 it animated box two
01:38 all right let's finish the sequence
01:46 box three
01:48 box four
01:51 box five
01:53 and let's preview
01:54 so now i go box one two three four five
01:59 and they all happen sequentially the
02:01 next animation by default the next
02:03 animation always starts
02:05 immediately after the previous animation
02:08 finishes
02:11 and let's go one step farther i'm going
02:13 to go ahead and let's
02:16 modify this one and we're going to
02:17 animate all the boxes because instead of
02:19 the single box we're going to animate
02:22 all boxes and we're going to reset some
02:24 of these animation values that we have
02:26 set here
02:29 okay
02:30 and let's go ahead and preview this now
02:32 so now what it's going to do is it's
02:33 going to go box 1 two three four five
02:37 all boxes go back
02:39 right so what i did here is
02:42 these particular boxes so
02:45 these ones animate 108 pixels and rotate
02:48 90 degrees same thing for box two three
02:51 four five
02:53 and at the end i change the class to
02:55 animate all boxes
02:59 and then we animate them back to zero
03:02 zero
03:04 right so but
03:06 the whole point here is to show you the
03:07 timeline how this animation finishes
03:10 then this animation starts then it
03:12 finishes and this one starts and so on
03:14 and so forth
03:16 okay now before i go any further i have
03:19 to be a good teacher and show you how
03:23 really quick how this would be a much a
03:26 much there is a much more efficient way
03:28 of doing this exact animation
03:30 just for fun okay i'm gonna go ahead and
03:34 delete all of those
03:36 and what i can do is i'm gonna
03:38 i'm gonna do this now i'm gonna use
03:40 staggers i have a separate video on
03:41 staggers but just to show you how to do
03:44 it what we're gonna do is um
03:46 i'm gonna go ahead and change this first
03:48 one to animate box but i don't wanna
03:50 animate them all at the same time so i'm
03:52 gonna go down to the animation timing
03:55 and go stagger
03:57 and we're gonna stagger them by one half
03:59 second
04:00 which is actually the same exact time as
04:02 our animation right
04:04 so let's go ahead and preview that
04:06 we're gonna go boop boop boop
04:09 boop
04:10 the same exact animation okay
04:12 but we only needed two animation stacks
04:15 okay and so after all of these were done
04:19 this particular one
04:21 triggered which animates them all back
04:22 at the same time right and if we can
04:25 adjust this stagger so it goes like 0.2
54:28 all right and then let's go ahead and
04:30 look at that
04:32 and before
04:35 if you look here
04:37 before the first
04:38 animation even finished of this blue box
04:41 the next one started right at 0.2
54:44 seconds
04:44 so um it's not necessarily the point of
04:47 this to video but i just kind of wanted
04:48 to show you um what's going on there and
04:51 how you can make that particular
04:53 animation just a little bit more
04:54 efficient okay so now we're back at my
04:58 longer slightly more inefficient
05:01 timeline but this shows us it you know
05:03 gives us a little bit more animations to
05:05 kind of play around with to really show
05:07 you what we can do with our timelines
05:13 so
05:13 the
05:14 by default there is a timeline position
05:18 and this timing setting is always set to
05:21 plus equals zero
05:22 that's a a really technical way of just
05:25 saying
05:26 immediately after the previous animation
05:30 now as you see here it says see tool tip
05:32 for details so if you hover over this
05:34 tool tip
05:35 you'll notice that there are a lot of
05:37 different options and i admit that this
05:40 is not the easiest most user-friendly
05:42 way to read this documentation
05:45 so
05:46 what i've done is we've added a cheat
05:48 sheet stack into drift timeline
05:51 and right here inside the cheat sheet we
05:53 have timeline position examples
05:56 so there are several things that we can
05:58 do here
05:59 um there's if you put just a number
06:03 if that is the absolute time in
06:05 in seconds so like for example
06:09 if i were to put instead of plus equals
06:11 zero if i were to put two
06:14 this would happen exactly at two seconds
06:17 after my my timeline has started so it
06:21 gives you an absolute time in seconds
06:23 you can also do decimals here so you can
06:25 do 2.5 so on and so forth
06:29 next is we can supply a label
06:33 now what is a label you might want to
06:34 ask
06:35 so labels are awesome they are a utility
06:39 stack that you can actually add so if we
06:41 go in here and say add timeline label
06:44 now timeline labels you can add as many
06:46 as them as you want and i recommend you
06:48 always add them to the top of your
06:50 timeline you should always define your
06:51 labels first
06:53 okay
06:54 and your timeline label allows you to
06:57 give it an actual name
07:00 and you can actually do the timeline
07:02 label position also supports all of
07:05 these syntaxes
07:06 okay so you can do you know um
07:14 you know call this
07:17 my place
07:19 okay and call this you know two seconds
07:22 in
07:22 so basically my label of my place is now
07:26 exactly two seconds in
07:29 so labels are a huge uh benefactor i'll
07:32 show you an example of how i used it in
07:34 the drift pro demos um so you can kind
07:37 of see how i did that okay but labels
07:39 are definitely a convenience to help you
07:42 label specific points in time uh within
07:45 your timeline
07:50 so if we go back to this cheat sheet
07:52 we'll notice that
07:53 there are a bunch of other options here
07:55 and read through these and play with
07:57 them uh the more you play with these the
07:58 more you will understand them
08:00 essentially the less than sign is a
08:03 pointer to the start of the previous
08:05 animation
08:06 the greater than sign
08:08 is the
08:10 point to the end of the previous
08:12 animation
08:13 then you can do simple things of plus
08:15 equals one such as that'll add a
08:18 basically a one second gap
08:20 um and then you can do
08:22 minus equals one that is a one second
08:25 before the end of the timeline right so
08:28 you can add things to the
08:30 start and end of your timelines
08:32 then here's an interesting one where you
08:34 can actually um do
08:37 time differences based on the label so
08:40 here we created a label called my place
08:43 we could do my place
08:45 plus equals 0.5 which would be
08:49 half a second after
08:51 this timeline label
08:53 and you can even create multiple
08:54 timeline labels so i can like have this
08:57 label
08:58 and let's call this
08:59 um
09:00 place
29:02 and place 2 is actually going to be my
09:04 place plus equal 0.
59:09 so that way
09:11 this label is always going to be half a
09:14 second after the other label and even if
09:16 i change this to be like from two
09:18 seconds to three seconds
09:20 this second label is always going to be
09:23 a half second after that one so this
09:26 gives us a lot of flexibility um because
09:28 then we can use these labels throughout
09:31 our timelines
09:33 so for example in this box 2 if i wanted
09:35 to start that
09:37 at my place i can go my place
09:41 and that this particular animation is
09:44 now going to start exactly
09:46 at this time
09:47 so let's have a look let's go ahead and
09:49 let's go and make this one two
09:51 and uh not quite sure what this is gonna
09:53 look at look like but uh let's have a
09:55 look
09:56 so here we're gonna go boop
10:01 and there we go
10:02 that's because i added that pause in
10:03 there
10:05 okay
10:06 so
10:08 so we animated box one and then box two
10:11 happened at two seconds
10:13 okay and then all the other animations
10:16 were reliant on box two being finished
10:19 because these ones are set to be
10:21 um to happen immediately after right
10:24 um
10:25 so if we wanted to we could we could
10:26 then um start let's say this one at
10:30 um you know place two right so let's go
10:33 ahead and do this one at place two
10:36 okay and preview that
10:43 there we go so you can kind of get a
10:44 different animation right
10:46 um so yeah learn these positions
10:49 um and play around with them the labels
10:52 are going to be a huge help because they
10:54 allow you to
10:55 create these places that you can then
10:57 anchor your times off of in your
11:00 timeline and of course by default
11:02 animations will always wait for the
11:03 previous one to launch and i think
11:06 that's fairly logical so i hope that
11:08 gives you some good tips and tricks for
11:10 building out your timelines and you know
11:13 helping you organize and you know
11:15 basically time your animation so they
11:17 happen exactly when you want them to
11:19 happen make sure you check out the video
11:21 on the dev tools the dev tools for
11:24 animation is going to be a huge help for
11:27 debugging your timelines and helping you
11:29 really fine tune exactly where you might
11:32 want those animations to happen
11:44 you"}]
Search the page
0
