About Stacks Guru
Stacks Guru is born from the need to search the vast number of videos out there on stacks built for Stacks Pro and the Stacks 5 plugin for Rapidweaver.
We have scraped over 500 videos to get the transcripts for each in order to make the spoken word searchable.
Please use this free tool to help you learn and discover the awesome power that Stacks and the stacks made for Stacks have to offer.
Stacks Guru
Video Reference
Foundation for RapidWeaver v1.1
02/03/2015
This video reviews some of the the awesome new features added to Foundation for RapidWeaver v1.1 For more info, head over to http://foundation.joeworkman.netThis video reviews some of the the awesome new features added to Foundation for RapidWeaver v1.1
Transcript
00:05 however when this is Joe workman and00:07 today we're going to go over the awesome
00:09 new foundation version 11 update that
00:12 was released now we're not going to go
00:14 over every single individual feature but
00:16 we're going to go over the major points
00:18 of some of the great things that were
00:20 added so let's get started site Styles
00:23 got a lot of really great new features
00:25 and one of these features is how covered
00:27 images are handled you'll notice when
00:29 you look at the cover image settings
00:31 within sight styles there's a few new
00:33 options we can now provide a cover
00:35 overlay as well as an opacity for that
00:38 overlay and then at a fade in animation
00:41 for the full scale covered background
00:44 let's see what this overlay does so as
00:47 we notice here we have a nice grainy
00:49 texture on top of our image and if you
00:52 notice on page load it actually faded in
00:54 as the image was loaded onto the page
00:57 gives a really great nice effect now
01:00 there are a lot of overlays that are
01:02 actually shipped with foundation now so
01:04 how do we choose those if you look
01:06 inside the stacks media library you
01:09 notice that there is a new group called
01:10 foundation background overlays and there
01:13 are 15 available overlays for you that
01:16 you can use here let's go ahead and
01:18 change one so you can see a different
01:20 effect so just take that image drag it
01:24 into the cover overlay setting now let's
01:27 go ahead and preview our page again if
01:32 you notice here we have a different kind
01:34 of overlay on top of the image the
01:36 overlays really allow you to add some
01:38 abstraction on top of your image
01:40 sometimes images can be a little bit
01:42 distracting so this overlay really gives
01:44 them a nice texture and kind of washes
01:46 them out or you know blends than then a
01:48 little bit more great options now these
01:51 new cover image settings are available
01:53 for the cover image type as well as the
01:55 cover image warehouse type now if you
01:57 notice we actually have a new option
01:59 available as well and this is called
02:01 slideshow and slideshow allows you to do
02:05 full scale background slideshows for
02:08 your entire website now it only supports
02:11 warehoused images
02:13 and you can add up to five different
02:15 images that would be cycled through for
02:17 your website background and you also
02:20 have that great overlay effect that we
02:22 had for cover images so let's go ahead
02:26 and preview this as we notice my
02:31 background on my site faded it nicely I
02:33 have my overlay and we are having nice
02:37 slideshow fading animation in between
02:39 each image now when you go into the
02:43 foundation text section inside site
02:45 styles you'll notice a new setting for
02:48 icon set now previously font awesome was
02:53 loaded inside the foundation theme that
02:55 has now been moved into site styles so
02:58 that we can provide a little bit more
02:59 flexibility if you don't want to load
03:02 any icons at all go ahead and select
03:04 none and 0 icon fonts will be loaded on
03:07 your web page this will make load times
03:10 a little bit faster now for font awesome
03:13 we've upgraded to font awesome 4.1 where
03:16 they added over 70 new icons now we also
03:19 have two different options we have the
03:22 default hosted option which is like we
03:24 had before where all of the font awesome
03:26 libraries are hosted externally on a CDN
03:29 for speed however we also have the
03:33 option to load font awesome locally so
03:36 that all of the font awesome files are
03:37 published locally to your web server and
03:40 all of the files will be published from
03:42 your server lastly we have a new icon
03:45 font set and this is the foundation icon
03:49 set now just like font awesome there are
03:52 tons of different icons available to you
03:54 so you see here there are a lot of very
03:56 similar icons to font awesome but maybe
03:59 the style pertains a little bit more to
04:01 your website and they're just as simple
04:03 to add as font awesome is simply add the
04:07 following code snippet to your website
04:10 where I the icon here is substitute for
04:13 the icon name and that icon will be
04:16 inserted directly into your web page now
04:19 there's one last new setting inside site
04:22 styles and at the very very bottom we
04:24 have a checkbox for custom CSS styles
04:27 when you check this it will open up a
04:29 new text area inside site styles in here
04:33 you can type any of your custom CSS
04:35 styles that you would like and those
04:38 styles will be be applied to the page
04:40 now if you're using these sites Styles
04:43 global template all of these styles will
04:45 be synced across all of your pages how
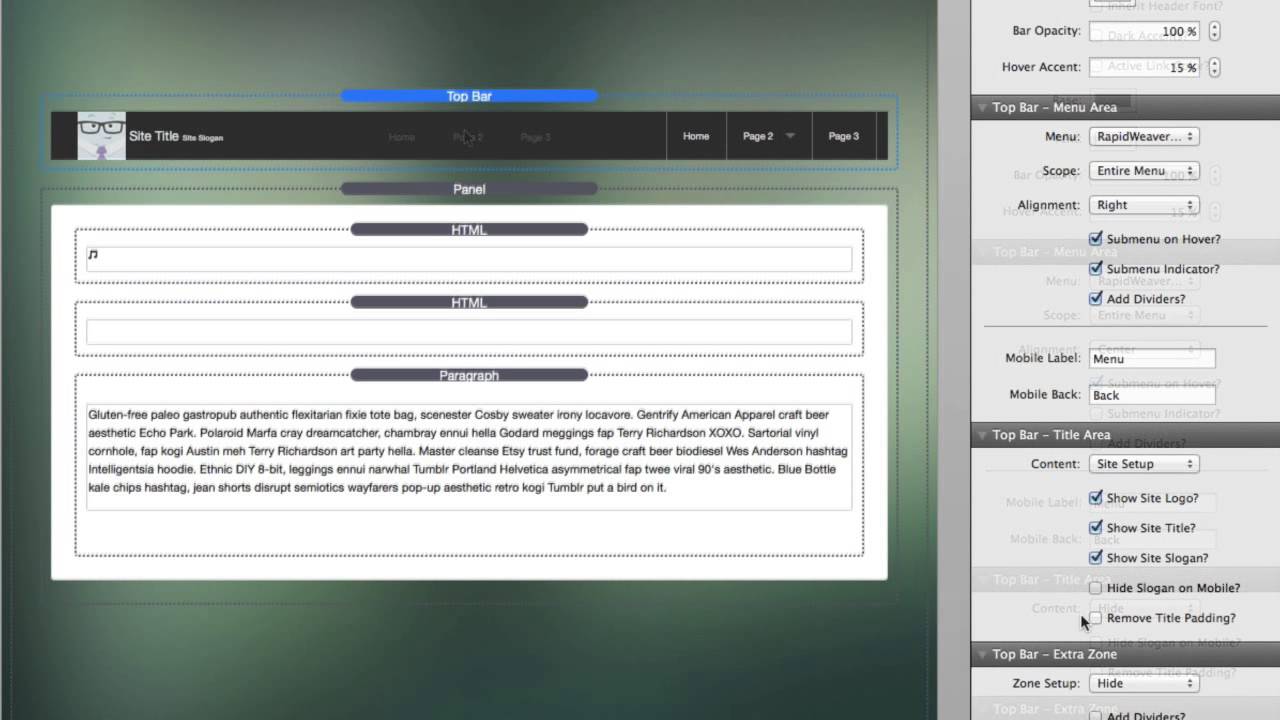
04:48 cool is that now let's move on the top
04:51 bar some of the most requested features
04:53 that are received is to actually Center
04:56 the menu items so obviously I added that
05:00 so to do this I recommend we actually
05:02 hide the title area because it kind of
05:04 doesn't make sense to have that any
05:05 longer if we're going to set the
05:07 alignment to be centered so now our menu
05:10 can be centered and we can if we want we
05:13 could remove the dividers and another
05:16 requested feature that I wanted that
05:18 users wanted was to remove the submenu
05:21 indicator so you can go ahead and
05:23 uncheck that and any sub menus will
05:25 actually will not have any indicators
05:27 however if you hover over the menu item
05:29 it will still be there now the rest of
05:32 our options for top bar allow us to
05:34 actually hide the slogan on mobile so if
05:38 you want to display the site slogan or
05:40 some other text in your title area you
05:44 can actually hide that now for mobile
05:47 devices this is so that if the text is
05:49 too long on mobile devices you can
05:51 actually hide that now other things if
05:55 you go into content custom data you not
05:59 have full control over the icon and you
06:01 can provide different icons for mobile
06:03 tablet and desktop now let's move on to
06:07 forms and seeing some of the great new
06:09 features added to our forms so if we go
06:11 into form base will notice that there is
06:13 a new setting to redirect on success and
06:16 what this is is once your form is
06:18 successfully submitted you can actually
06:20 redirect the user to a new web page now
06:24 this next feature is a little bit more
06:25 subtle but very powerful now you may
06:29 have known if you look at the subject
06:31 field that we can actually use templates
06:35 and we can actually use the field IDs of
06:38 field names in
06:40 side of our content so in this
06:43 particular subject we'd have message
06:44 from and then the name field from within
06:48 the form you can also now use these IDs
06:52 inside the to address and two fields how
06:57 is this powerful well if your user adds
07:00 an email address to one of the fields
07:03 instead of manually typing in a to
07:05 address what you could do is you can do
07:09 parentheses parentheses email or curly
07:12 brace email and then inside the name you
07:15 could inside curly braces you could put
07:17 name now these IDs email a name need to
07:24 match up with the actual field name that
07:28 is inside that field so whatever the
07:31 user puts in the name field will be
07:33 resolved inside the name template and if
07:36 we look at this second field I have the
07:38 field name is email right so in this
07:43 example here an email that we define
07:46 will get sent to this user of the email
07:50 address that they input as well as the
07:52 name of the input now you can also use a
07:54 second recipient and this supports the
07:57 templating as well or you can insert
08:00 your own email address and just in case
08:02 you forget I've added a footnote into
08:04 the settings to remind you that this is
08:06 possible now onto the accordion for some
08:10 reason when i launched foundation
08:12 accordion had hard-coded the background
08:15 was white and i thought it would be a
08:18 lot nicer if we actually set the
08:20 background of according to be
08:22 transparent so that it's the same
08:24 background of your website however if
08:26 you still like that same ability where
08:28 you can actually customize the
08:30 background color of accordion that's
08:32 really easy to do simply go to the
08:35 background color of accordion and then
08:38 change it to be whatever color you'd
08:40 like and that will make the background
08:43 of each panel area inside accordion to
08:46 be whatever color that you defined now
08:49 the last big change within this
08:50 foundation release was with pillar
08:53 and before pillar the pillar where's
08:56 actually hard coded to be positioned on
08:58 the left however now you can easily with
09:01 the setting change that to be positioned
09:03 on the right and that does it for the
09:07 foundation one dot one release I hope
09:08 you really enjoy we are working really
09:11 hard to make this really the best way to
09:13 design websites with rapidweaver as
09:15 always make sure you check out our
09:17 foundation user manual online it's
09:20 packed jammed packed full of tons of
09:23 great faq s and videos for you to learn
09:26 from and lastly i want to put a small
09:29 plug in for a new Google+ community that
09:32 we've created for rapidweaver previously
09:34 we're using class board and we decided
09:37 to migrate over to Google Plus and it's
09:39 been a really great rich experience
09:41 working with a lot of great customers so
09:43 I look forward to seeing you on the
09:45 communities thank you very much I hope
09:48 you enjoy this update and have a great
09:51 day go forth and make your websites
09:52 great bye-bye
10:00 you"}]
Search the page
0
