About Stacks Guru
Stacks Guru is born from the need to search the vast number of videos out there on stacks built for Stacks Pro and the Stacks 5 plugin for Rapidweaver.
We have scraped over 500 videos to get the transcripts for each in order to make the spoken word searchable.
Please use this free tool to help you learn and discover the awesome power that Stacks and the stacks made for Stacks have to offer.
Stacks Guru
Video Reference
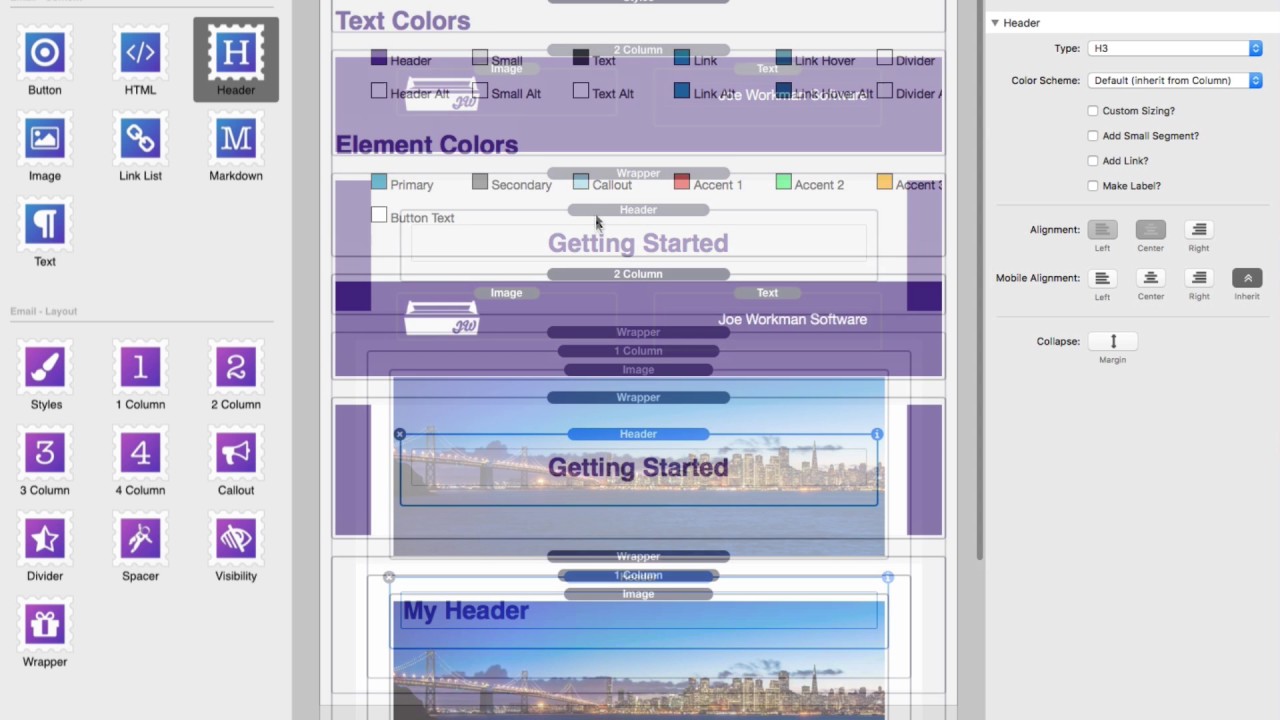
Getting Started with Building Email with RapidWeaver
06/01/2017
Transcript
00:00 so let's get you started building your00:02 first emails now
00:08 hey everybody so in this video we're
00:11 gonna be doing a quick overview and
00:12 building an email from scratch okay
00:15 now I'm not going to go into every
00:17 single stack and look at every single
00:20 setting okay look for more detailed
00:22 reviews and videos on you know each
00:25 individual stack and how everything is
00:27 more in-depth okay right now we just
00:30 want to get you started we want to
00:32 quickly show you how to build one of the
00:34 demo emails that is inside the demo
00:37 project that ships with the product okay
00:39 so what we're gonna do is we're going to
00:41 jump into wrap over right now review
00:43 this email and then we're going to build
00:45 it from scratch so without further ado
00:46 let's jump on in okay so here we are in
00:49 rapidweaver and this is the demo project
00:52 that ships with the email products okay
00:55 and here we are going to build the inset
00:58 heading demo right now and the reason I
01:00 chose this one is it's not the simplest
01:02 example here but it's also not maybe the
01:05 most complex okay but on top of it this
01:09 inset header where we see this white box
01:12 that kind of overlays on top of the
01:13 purple header okay is really tough to do
01:16 by hand but it is really simple to do
01:19 using the email stacks so first what
01:22 we're going to do here is we're going to
01:24 review kind of what the layout here is
01:27 inside rapid movers edit mode okay so we
01:30 can kind of get a feel of how things are
01:32 laid out and then we're gonna jump in
01:33 and build this completely from scratch
01:35 okay so first off inside the stacks
01:39 library you'll notice all of these
01:41 stacks that ship with the email product
01:43 okay we have in it split into two
01:45 different groups at the top here we have
01:47 kind of content based tax which is
01:49 buttons and headers and things that go
01:51 in the content area of your email okay
01:54 next is going to be layout sort of
01:57 layout stacks okay where we have columns
01:59 the email style stack call-out spacers
02:02 dividers a wrapper and visibility to
02:05 control whether or not something is
02:07 visible on desktop or mobile okay so we
02:11 quickly jump into the main area here
02:14 we'll see that we have the email style
02:17 stack right at the top and this controls
02:19 all the kind of global
02:21 Styles throughout our entire email this
02:23 has text color tech scene button and
02:27 element colors things of that nature the
02:29 size of the email okay it's so the width
02:31 of the email very important stack we
02:33 need this to have this once at the top
02:36 of every single email okay further down
02:39 you'll see it's really simple
02:41 I wanted it to column and then I added
02:42 an image and some text further down I
02:45 have a little wrapper that gives me an
02:47 outer column color okay and then a body
02:50 color and then I have another wrapper
02:52 that is uses the default coloring
02:55 defining in the email style stack and
02:57 then the rest of my book content so I've
03:00 had some images a header some text a
03:02 button a call-out which is kind of a
03:04 colored box to give us some accent and
03:07 then below this wrapper I have my list
03:11 of links that you know link to all my
03:14 various social accounts and then I have
03:16 some footer information with copyright
03:18 information and some thank you and price
03:20 and unsubscribe links and all that kind
03:21 of jazz okay so you kind of see how this
03:25 email is built out using some stacks and
03:27 what we're gonna do is we're going to
03:28 now jump into a blank project and build
03:31 it from scratch so here we are inside
03:33 rapidweaver and there's a few things
03:35 that we need to actually do before we
03:37 can start building out our email okay
03:40 first we need to go into the themes and
03:42 make sure that our project is set to be
03:44 the email theme okay so now that we've
03:48 done that that's simple
03:49 okay let's go ahead and add the style
03:52 stack to the page it's going to be there
03:54 a first stack that we add to the page
03:56 okay and let's go ahead and click on the
03:59 settings and open those up
04:00 okay and what we'll notice here is
04:03 inside the email style stack we have an
04:06 implementation checklist this is a
04:08 little checklist that as you see here we
04:10 have a little warning saying you have
04:12 not completed the implementation
04:14 checklist so in order for us to get that
04:17 alert away we need to actually make sure
04:20 that we complete this email
04:21 implementation checklist so we've
04:24 already set the email theme so check
04:26 we've gotten that done okay disabled
04:28 advanced general settings so let's go
04:31 ahead and go into general inside
04:33 rapidweaver
04:34 we're going to
04:34 scroll down and go down to advanced okay
04:37 and what we're going to do is we're
04:38 going to uncheck each and every single
04:40 one of these okay and click done okay
04:44 let's go back okay good we've done that
04:46 okay set the title to my email subject
04:50 ok there's multiple places you can do
04:52 this inside general you can set the
04:54 title right here or inside the page
04:56 specific page inspector settings we can
04:59 go ahead and set the browser title to
05:01 getting started okay now I know it's
05:05 also going to ask me to change the
05:06 slogan okay um so what we're news we're
05:08 gonna say getting started with email for
05:13 rapidweaver okay now more in-depth
05:17 information about what slogan is and
05:19 further emails but essentially it's
05:20 going to be um some a short description
05:22 of what your email is it gives us a
05:25 little bit help in some things like
05:27 Gmail and some other email apps so we've
05:29 set the title to the subject we set the
05:32 slogan to my description okay now we
05:34 need to set the web address now this
05:36 really only need to be done if we're
05:37 going to be publishing this email online
05:39 or using we want to use the drag and
05:42 drop image support and here is an
05:45 important checkbox make sure that we
05:48 only use email stacks you cannot use any
05:51 stack that you want when you're building
05:53 your email you can only use the stacks
05:56 that have been provided for you here
05:58 with the email product okay so with the
06:03 implementation checklist done we notice
06:04 that our warning is gone we are now good
06:06 to go and ready to start building our
06:08 email okay I'm gonna leave most of these
06:10 as the default I know that I wanted my
06:12 header colors to be purple so I'm going
06:14 to go ahead and select the purple color
06:16 that we wanted for headers okay great
06:20 now remember first at the very top we
06:22 had a two column stack okay and we had
06:26 inside there we had an image okay and
06:30 then we had some um header okay this
06:36 text was right aligned this column was
06:40 that purple color so I'm going to go
06:41 ahead and set the background color of
06:42 this to be purple okay now we also want
06:46 to set this text
06:48 actually be from the default scheme to
06:50 the alternate scheme because inside site
06:52 Styles you can set text color and
06:54 alternate text color so here we are
06:57 going to be using the alternate text
06:58 color then inside the image we're going
07:01 to go ahead I'm going to use a warehouse
07:02 to image because I already have this
07:03 image uploaded online so I'm going to
07:06 paste in the URL to my image ok then I
07:09 can go ahead and set the dimensions of
07:11 that image so that it scales properly
07:13 okay and there we go I have my nice two
07:17 column layout there now let's go ahead
07:19 and create that inset header directly
07:21 below it and what we're going to do is
07:23 we're going to use a wrapper okay and
07:25 what the wrapper does is it kind of
07:26 gives us a wrapper on the body of our
07:28 email however in this sense we want to
07:30 make sure that the content is set to
07:34 white okay so we're going to use white
07:36 and then on the body the background okay
07:40 we're going to make sure that this is
07:42 set to that same purple color that the
07:44 header is okay so it's kind of getting
07:46 to give us an optical illusion that
07:48 these are one uniform component when we
07:51 preview this okay and we also want to
07:53 make sure we just add a little bit of
07:54 padding here so I'm just going to
07:55 increase the padding on that wrapper and
07:57 set that to 20 okay we're going to add
08:00 in our header and what we're going to do
08:03 is where I should get a center that okay
08:04 cool so next below this we're going to
08:08 set another wrapper stack this time
08:10 we're going to keep the default colors
08:12 that are defined inside the Styles stack
08:14 okay which is a light gray background
08:16 and a white body colour so now inside
08:19 here I want to encapsulate all of my
08:21 content inside of Li one column which is
08:23 going to basically add a little bit of
08:25 gutter around the entire content area
08:28 okay and let's go ahead and add we had
08:31 an image I already had this image
08:33 warehouse are going to go ahead and
08:35 click warehouse image paste in my URL
08:38 okay and let's set up my dimensions I'm
08:40 going to do 600 by 200 is what this
08:43 image is set to and then below that we
08:46 had a header you know just keep that as
08:52 the default h3 actually further up an
08:55 header on this rat 1 in the wrapper
08:57 I forgot I wanted to make that our h
18:59 okay so if you notice
09:01 h1 style has a little bit of different
09:04 styling than our h3 s okay so something
09:07 I forgot to do earlier is setting that
09:09 to be an h1 we're good with this h
39:12 below that we want to have a little bit
09:14 of text and then below that we had a
09:21 button okay so let's go ahead and this
09:24 and the button was a little bit
09:26 different what we're going to do is
09:27 we're going to set this button it we're
09:28 going to say click this button we wanted
09:34 it to be centered and if you notice it
09:36 was a hollow button so let's go ahead
09:37 and click hollow button and what that
09:39 does is it gives us a nice kind of
09:40 transparent button kind of a modern
09:42 looking button okay and yeah I think
09:46 that looks good and then below that we
09:48 had a call-out so let's go ahead and add
09:50 a call-out below that go ahead and let's
09:55 grab the call-out okay and if you notice
09:57 the default color for call it was blue I
09:59 kind of wanted it a little bit less
10:02 in-your-face so I'm going to set it to
10:03 be primary and we're going to add some
10:05 text inside of there as well
10:07 okay let's go ahead and preview this so
10:09 we can kind of see how things are going
10:10 so you see things are looking pretty
10:13 good okay we have our header up top if
10:17 you notice it's hugging the top a little
10:18 bit we can fix that then we have our
10:21 getting started and then our image below
10:23 that and then we have our content which
10:25 is kind of a little tight maybe we want
10:26 to add a little bit of spacing between
10:28 our various components here so let's
10:31 tweak some of the spacing that we need
10:34 in this email so at the top we needed a
10:36 little bit of spacing here so what I'm
10:38 going to do here is I'm going to add
10:39 some custom spacing and what what
10:41 actually I want I wanted to be even at
10:43 the top and the bottom so I think 16
10:45 pixels at the top and 16 pixels at the
10:47 bottom is going to be just right okay
10:50 now further below again we have we
10:53 wanted some more spacing between maybe
10:55 the image and this header okay um so the
10:58 easiest way to do that is with the
11:00 spacer stack so I'm going to go ahead
11:02 and drag in that space our stack out
11:04 there and I think 25 pixels is probably
11:06 a good amount okay and let's go ahead
11:08 and option drag the spacer and we're
11:12 going to add the same pixel padding
11:14 above
11:15 and below this button okay so let's
11:17 preview this again and I think that is
11:21 really looking great I think this really
11:24 gives us enough spacing that we're
11:25 looking for in our email so if you
11:29 remember a little bit further down below
11:31 this wrapper we had some links to our
11:34 social media so let's go ahead and add
11:37 that so what we're gonna do is we're
11:39 going to add a one column below our
11:41 wrapper and then inside that column I'm
11:44 going to go ahead and add a link list
11:46 and inside the link item what I can do
11:48 is I going to set that to be a warehouse
11:49 image and my pixels width is 25 by 25
11:55 and I added my image URL and I add the
11:59 length where I want this to particularly
12:00 link to so what I've done is I've gone
12:02 ahead and added all four of these just
12:05 linking to different images you would go
12:07 ahead and change the URLs to where you
12:09 want those link to obviously okay now we
12:12 wanted to have a little bit of footer
12:14 below this right so what I can do is I'm
12:15 going to add a space beyond below this
12:18 okay and then we have some text that we
12:21 want to add below that and here is where
12:25 we would add in our copyright
12:26 information and we wanted that centered
12:29 maybe we want to have it custom sizing
12:31 and maybe shrink that down a little bit
12:34 so it's a little bit smaller than our
12:36 default content so there we have it we
12:39 have our custom footer information down
12:41 here with our link to social media and a
12:43 little copyright string that Center down
12:45 at the bottom below the wrapper of our
12:47 email now I breezed that really quickly
12:51 so hopefully you can go back and look at
12:54 how that email is built inside the demo
12:56 project because you did get that project
12:58 you have that email now I do suggest
13:00 that you go ahead and try to recreate it
13:03 on your own as you know it's really
13:05 simple if you've ever used any of my
13:07 other products such as my foundation for
13:09 websites product you'll really grasp
13:11 this quickly on how you can build and
13:13 layout your emails okay
13:16 so I hope this provided a great jump
13:19 start for you to start using the email
13:21 stacks now and please make sure you
13:25 check out our other videos um if you're
13:27 new to rap over make sure you check out
13:28 our
13:29 new to rapidweaver and stacks videos if
13:31 you want more in-depth tutorials on each
13:33 of the settings and the stacks make sure
13:35 you check out our YouTube channel and
13:36 also make sure that you join our user
13:39 community at Weaver space this is a
13:42 great community of users that is really
13:44 anxious to help each other out so we can
13:46 build better emails and improve
13:49 everybody so without further ado thank
13:52 you very much for watching this video
13:53 and until next time we'll see you later
13:55 bye
14:03 you"}]
Search the page
0
