About Stacks Guru
Stacks Guru is born from the need to search the vast number of videos out there on stacks built for Stacks Pro and the Stacks 5 plugin for Rapidweaver.
We have scraped over 500 videos to get the transcripts for each in order to make the spoken word searchable.
Please use this free tool to help you learn and discover the awesome power that Stacks and the stacks made for Stacks have to offer.
Stacks Guru
Video Reference
Getting Started with Easy and Total CMS for RapidWeaver
09/29/2015
This video will help you get started using Easy CMS and Total CMS for RapidWeaver. For more information, check out http://cms.joeworkman.netThis video will help you get started using Easy CMS and Total CMS for RapidWeaver. For more information, check out http://cms.joeworkman.net
Transcript
00:07 hey everybody Joe workman and in this00:09 video we're gonna be reviewing the
00:11 getting started for total CMS and easy
00:14 CMS now this is gonna be part one of a
00:16 two-part series and in this video we're
00:19 gonna go over all the core components of
00:21 the CMS and these are the components
00:23 that are broad across easy CMS and total
00:28 CMS so these are features that are
00:30 supported in both okay and in video two
00:33 we're gonna go over some stuff that is
00:35 additional some additional things that
00:37 we have as a part of total CMS okay but
00:40 this is the getting started on the core
00:42 components of the CMS essentially it's
00:45 text and images right because that is
00:48 what easy CMS is all about and it's the
00:51 core component that supports a lot of
00:52 the stuff for a total CMS as well
00:54 now I've already recorded videos for
00:58 managing individual text and images so
01:02 I've done a deep dive into both of those
01:04 categories so make sure you check out
01:06 those videos so here we're just gonna do
01:09 a quick getting started some overview of
01:11 some general concepts with the CMS and
01:14 hopefully you'll get a great handle on
01:16 how all of this works by the end of this
01:19 video so let's get started so here we
01:22 have the easy CMS demo project and what
01:25 we're gonna do is I've added two
01:26 completely new pages to this project
01:28 file so that we can actually start from
01:31 scratch and build out and match up an
01:34 admin to the content stacks so we're
01:37 gonna start by looking at the admin area
01:40 so if we go ahead and look at the stacks
01:43 that ship with the CMS we notice that
01:46 easy CMS is color coded in blue and
01:49 white and total CMS stacks are orange in
01:52 white
01:52 okay now that you'll also notice that
01:56 there's two different styles of icons
01:58 the solid icons with the colored
02:01 background okay those are all going to
02:04 be for your admin related purposes and
02:07 then the icons that have a white
02:09 background are to display the content on
02:13 you
02:13 content pages so as we see with easy CMS
02:17 we have a few different admin related
02:20 stacks and then an image and a text
02:22 content stack since there's more inside
02:26 total CMS there are actually more
02:29 content icons and they're broken out
02:30 into their individual group here so we
02:34 have files and feeds and images and text
02:36 and video okay so there's a lot more
02:38 going on with total CMS but for this
02:41 particular video we're gonna do
02:42 everything in easy CMS because all of
02:47 the features of easy CMS are supported
02:49 inside total CMS so from now on we're
02:52 gonna move forward
02:53 and use all of the easy CMS stacks for
02:56 this video so when I go to build out my
03:00 admin page first thing we're gonna want
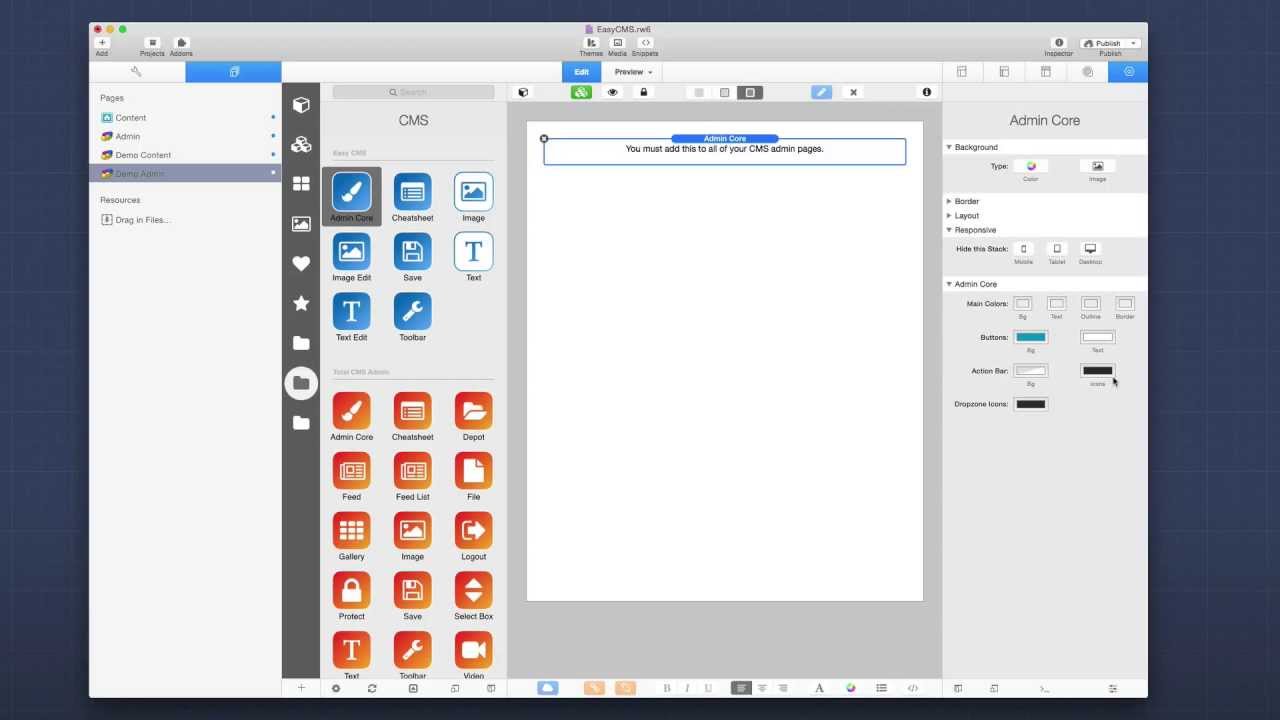
03:03 to add is an admin course stack and when
03:08 we add this admin course tactical page
03:10 you'll notice that there is some style
03:11 options for it
03:12 essentially the admin course stack
03:15 contains the actual CMS application that
03:18 gets deployed to your server as well as
03:20 a lot of central styles that are going
03:23 to be applied across all of your admin
03:25 page okay so the styles of your input
03:29 areas and the borders and the buttons
03:31 for the admin stacks now the first thing
03:35 that we're going to want to add to our
03:36 page is going to be a text stack because
03:40 we're gonna want to manage a text edit
03:43 area so you'll notice that this text
03:45 stack contains a CMS ID this is very
03:49 important because we're going to be
03:50 using this ID to tie that content to the
03:54 content I actually gets displayed on the
03:56 website so for this let's go ahead and
03:59 just call this demo video now I'm
04:03 actually gonna want to show a Save
04:04 button just so that we have it here
04:07 normally what you'd want to do is and
04:09 the reason this is off by default is
04:11 that you can actually have a Central
04:13 Save button for your page this way you
04:15 don't have a Save button for every
04:17 single text input you can have a
04:19 centralized Save button of course you
04:21 can always also use the keyboard
04:23 shortcuts command S or ctrl s if you're
04:26 on Windows
04:26 I'm going to go ahead and leave the rest
04:28 of the options as they are right now so
04:30 now if we go into the demo content page
04:33 I'm going to go ahead and add a Content
04:37 text stack to the page now by default
04:41 when you add a text act to the page it's
04:45 saying that you can place this anywhere
04:46 on the page and then you can actually
04:49 use macros to display the content in any
04:54 stack now for this purpose I'm going to
04:57 go ahead and inside the settings I'm
04:58 going to say insert text macro and then
05:02 I'm gonna use these settings to actually
05:05 define what I want to use instead so I'm
05:09 going to go ahead and do I'm going to
05:11 setup this this to be demo video because
05:13 that's what we set the ID to be on the
05:16 admin side and then I want to display
05:19 the plain text now you can also display
05:22 formatted markdown okay or alt tag
05:26 information from an image okay but right
05:29 now let's just do plain text and what
05:32 you'll notice is the IDMS ID was
05:35 actually updated in kind of preview of
05:38 what this macro would be and we'll see
05:39 how these macros are used later on but
05:43 if we preview this page we'll see an
05:46 error that were it's unable to find
05:48 Simas file with ID demo video well the
05:51 reason for this is that we actually
05:53 haven't saved any content to this CMS ID
05:56 yet so let's go ahead and do that now if
06:00 we go back to the demo admin page you
06:02 notice that I added a few foundation
06:04 stacks since we're using the foundation
06:05 theme just so that everything previews
06:08 properly now it's great about both easy
06:10 CMS and total CMS is that you can
06:13 actually have full control and display
06:15 abilities all within rapidweaver
06:17 now when I preview this admin page
06:19 you'll see that we don't have any text
06:21 in here currently let's go ahead and add
06:23 some filler text so I've added a little
06:26 bit of filler text in here and what
06:28 you'll notice is that the outer shell is
06:30 turned red the outline and the reason
06:33 for this is that it's telling us that we
06:34 have unsaved content in this text area
06:37 so let's go ahead and save that by
06:39 clicking
06:40 the Save button and magically all from
06:43 within rapidweaver the content was
06:45 actually saved to the server now in
06:49 order for you to be able to do this from
06:51 within rapidweaver you will have to have
06:53 published this project with the admin
06:56 course stack prior or else none of that
07:00 will actually work within rapidweaver
07:01 so the admin course that contains all of
07:04 the again the application for the CMS
07:06 and that will have to get deployed to
07:08 your server in order for you to save and
07:11 preview things from within rapidweaver
07:13 so now that we've actually saved content
07:16 to that demo area let's go ahead and
07:18 look at the content page so as we'll
07:21 notice now in this demo content page the
07:24 content that I just saved on my demo
07:26 page from inside rapidweaver I can now
07:29 preview inside rapidweaver as well now I
07:33 want to pause and make sure that you
07:34 understand exactly what we just did
07:36 because if you grasp what we just did
07:39 right now you'll understand how to use
07:42 the entire CMS right all we did was we
07:47 created an admin stack that is tied to a
07:51 CMS ID we then created a corresponding
07:55 content stack that is tied to the same
07:58 exact CMS ID now we as long as we have
08:04 published the admin course tacked to the
08:07 page it will all work inside rapidweaver
08:11 that's really great right that doesn't
08:14 mean that you need to actually go online
08:17 and you know edit the content online and
08:21 then create some ID online right and
08:24 then bring it into rapidweaver right
08:25 it's all done inside rapidweaver it's
08:29 exactly how you would expect it to
08:31 function you build it all within
08:34 rapidweaver it works all within
08:36 rapidweaver ok now obviously we can go
08:39 online and we can edit everything online
08:41 as well from your mobile device from you
08:44 know from a cruise ship wherever you are
08:47 in the world you can edit your content
08:49 online but by having the power of
08:52 viewing it all inside
08:53 rapidweaver we have a much more powerful
08:56 engine for building our sites because we
09:00 can actually preview the content as
09:03 we're building it right there's no
09:05 guesswork on let me insert this content
09:08 and I know it's gonna be there but I
09:10 have to publish it to be able to preview
09:11 no not anymore
09:13 you put the content in there and you
09:16 preview it as you're designing
09:18 everything right this is exactly how we
09:22 would all expect it to work right so now
09:25 what we're gonna do is we're gonna dive
09:27 in and look at some of the other great
09:28 things that we can do and what you'll
09:30 notice is that another benefit of the
09:34 CMS stacks is that you have control of
09:37 building out your admin area so we're
09:41 gonna go over through this easy CMS demo
09:43 file and we'll see how we have full
09:45 control over how we build the admin area
09:49 we don't need to rely on some UI that
09:53 another developer has made for us while
09:56 it could be very nice and pleasant
09:57 what's great about these CMS stacks is
10:00 that you have control over how
10:02 everything looks you can make it look
10:04 exactly how you want it you can make it
10:07 branded for your web design company you
10:11 can theme it so that it looks exactly
10:12 like the website that you're building
10:14 right it's all in your power on how you
10:17 want to build it and as you see it's
10:20 really simple it's just dragging and
10:22 dropping a few text things and matching
10:25 the IDs and you're done and it all works
10:28 in rapidweaver so let's jump in and see
10:30 some of the other powerful things that
10:32 the CMS can do for us so here I have the
10:35 easy CMS demo project that ships with
10:37 easy CMS and it's also available for
10:39 download from our documentation portal
10:42 now you see this is a pretty simple web
10:44 page I have a banner image that is
10:46 managed by the CMS as well as this
10:49 entire tab content area the images the
10:52 contents of each tab as well as the
10:55 titles of each tab now let's jump over
11:00 the admin area and see how that looks
11:04 so here in my admin area I've completely
11:07 built this out the way that I desired it
11:10 to be at the very top right I have a
11:13 centralized Save button across
11:15 everything I have my banner that you can
11:17 easily drag and drop a new image into
11:20 and then down here I have a two column
11:23 stack that contains the content for tab
11:25 one and the content from tab two and I
11:30 nicely have separated it out so that I
11:32 have my tab titles and then the images
11:35 and then the actual tab content is below
11:38 there now above here I have my
11:40 formatting toolbar and for more
11:42 information on how to use this toolbar
11:43 and this special mark towns syntax and
11:47 whatnot that is supported inside these
11:49 text areas make sure that you check out
11:51 the more in-depth tutorial that we did
11:54 on text inside the CMS okay now if we
11:57 scroll down this page a little bit more
11:59 we'll see that I have a little standout
12:01 panel that is for editing SEO data so
12:04 the actual page title and page
12:06 description and then further down after
12:08 that we have a formatting cheat sheet
12:10 that kind of gives a little cheat sheet
12:12 that we can show our customers for
12:14 markdown okay this is completely
12:16 customizable and editable for our users
12:19 and what's really great is that we built
12:23 all of this using stacks so if you see
12:28 here at the top this is just a simple
12:30 two column foundation stack and then
12:32 here I have a Save button and the save
12:34 stack allows you to add any button or
12:37 link inside of it and it will turn that
12:40 button or link into a Save button so you
12:43 can use any button stack that you want
12:45 just simply drag and drop that button
12:47 stack into the save stack and it will
12:50 automatically be your Save button okay
12:54 if you go down a little bit we see that
12:56 I have an image stack that allows us to
12:58 control the banner okay and I know that
13:02 because if I look at the actual contents
13:04 will see that the CMS ID for this image
13:07 is banner right and obviously if I look
13:11 at the content side the CMS ID is going
13:13 to be tied to banner to display that
13:16 image right
13:18 same exact concept as we just saw for
13:19 the text it's just for images we tie the
13:23 CMS ID for this image on the admin side
13:26 to the CMS ID on the content side and
13:29 everything works seamlessly throughout
13:32 not only online but all within
13:33 rapidweaver as well now for more
13:36 information on images go ahead and make
13:38 sure you check out the in-depth tutorial
13:40 on managing images inside the CMS it's a
13:43 lot of really great stuff shows you how
13:45 to integrate images into third-party
13:47 stacks and warehouse scene images and
13:49 all that fancy stuff so if we go to
13:53 further down the page we'll see that
13:55 this is the toolbar stack and if we
13:57 added this to the page you know you can
13:58 add this wherever you want you can also
14:00 customize which buttons you actually
14:02 want to display because maybe you don't
14:04 want to have a list or things of that
14:06 nature right or you don't want the
14:07 ability to have you know some code view
14:10 or block quotes or whatever you like
14:12 right but it allows you some customized
14:15 ability for exactly what is going to be
14:17 displayed for your users and then you
14:21 see here I now have a two column stack
14:23 that contains all of the things that we
14:24 had here we have our you know text
14:27 inputs that we set to a height of row 1
14:29 so that there was just a single input
14:31 value and it's the same exact stack as
14:33 this one it's just this one's made to be
14:35 taller right and then we have an image
14:38 stack below that right as you see here
14:41 I'm just I'm using these stacks to build
14:43 out my admin page and obviously we have
14:46 that cheat sheet on the bottom that if
14:48 you double click on it you can actually
14:50 edit that cheat sheet so if you want to
14:52 add or remove some things you can
14:54 definitely fully customize this to what
14:57 you want to show your customers so just
15:00 a quick review of the stacks here we
15:02 have the admin course stack which is
15:04 added is it must be added to every
15:07 single admin page because it contains
15:08 all of the essential libraries that make
15:10 everything work on that page even on the
15:13 server so you're gonna have to deploy
15:15 this admin course back to your server
15:17 before things will start fully
15:19 functioning all within rapidweaver next
15:22 is the cheat sheet this allows us to as
15:24 you saw it's a formatting cheat sheet
15:26 for markdown to give your customers a
15:27 little tool tip or hint in terms of
15:31 but we'll be supported when they want to
15:34 use markdown inside their text areas the
15:37 image edit allows us to administer and
15:40 drag-and-drop new images we have this
15:43 save stack which allows us to have a
15:45 centralized Save button we have the text
15:49 edit box which allows us to edit a
15:51 centralized text within our CMS and then
15:55 we have the toolbar which gives us a
15:57 formatting toolbar for the text areas
15:59 now let's jump over to the content side
16:02 now let's look at some of the content
16:04 stacks and really for easy CMS the core
16:07 is just two things we have image and we
16:09 have text and if we look at this content
16:11 page we'll notice that I have an image
16:14 stack at the top which if we look at the
16:16 ID right that's tied to the CMS ID of
16:19 banner which is what we set it to on the
16:22 admin side and of course we set it to
16:25 it's going to be a JPEG and we want the
16:28 original sized image and you know we can
16:31 add a link and you can do other fancy
16:32 things inside here and if we look
16:35 further down the page you'll notice that
16:36 we have a easy text stack that is set to
16:39 have the content 1 ID that's tied to
16:41 this same Content ID in admin mode and
16:44 we're actually gonna format that text
16:46 okay because it's actually gonna process
16:48 the markdown but you'll notice something
16:51 new here is that we can actually use
16:53 text macros inside the tabs or any text
16:57 area within your page and this is what
17:00 allows us to actually integrate text
17:04 parsing for third-party stacks so if you
17:07 looked at the admin side I'd created a
17:09 text area that had a CMS ID of title one
17:12 and another one for CMS idea of title 2
17:15 and if you look here if I inside this
17:19 title for my tabs if I just use this
17:22 little syntax here of percent the CMS ID
17:25 and then percent the CMS will now
17:29 replace that macro with the actual
17:33 content that's managed by the CMS so in
17:37 this instance it's going to be the title
17:38 that we had for tab 1 and the title that
17:41 we had for tab 2
17:43 this is very powerful because this
17:46 allows us to actually use any
17:48 third-party stack and have it integrated
17:51 directly with the CMS now it's portieres
17:55 I'm just using my run-of-the-mill stacks
17:57 right now I am using a CMS image stack
18:01 here and if I want to insert formatted
18:03 text there is a text stack specifically
18:06 for the CMS right but you can use all of
18:09 your other favorite stacks and then
18:11 integrate the CMS with all of those
18:14 using these text macros now you can also
18:20 integrate images into third-party stacks
18:22 as well using warehoused images and to
18:25 do that look at the in depth image
18:28 tutorial that we did for the CMS and
18:30 you'll see exactly how that's
18:31 accomplished hey everybody so that about
18:34 covers it for the basics right we
18:37 reviewed everything as possible within
18:39 easy CMS and therefore everything as
18:42 possible within the core of total CMS we
18:46 managed our text and our images we built
18:50 the interface all on our own right
18:52 that means we can customize it to how
18:54 we're liking now other things to think
18:58 about what the admin area is is that you
19:01 can use them as ways to not only just
19:04 administer the content but maybe
19:06 communicate with your customers right
19:08 you can theme this and add whatever you
19:11 want these admin areas and the concept
19:14 that all of this is done within
19:16 rapidweaver is very powerful right
19:18 there's no going off into some external
19:21 third-party admin area creating some ID
19:24 and then bringing that back in assigning
19:26 that ID into rapid Eva right it's all
19:29 built within wrapper reverts all inside
19:31 that little ecosystem and it works
19:34 exactly like every other stack you just
19:37 add it you publish it and you go there's
19:40 no database there's no setup you just
19:43 create your stacks page publish it and
19:46 you're done right full online editing
19:50 capabilities it is the CMS built just
19:54 for rapidweaver so I hope
19:57 you take this and really make it
19:59 powerful make it your own do something
20:01 special with it right I am very excited
20:04 about this product I think it will do
20:07 immense things for you your websites
20:09 your customers websites and beyond so
20:12 thank you very much everybody I hope you
20:14 enjoy this again check out video too if
20:17 you want to go ahead and look at total
20:19 CMS and some of the specific new
20:21 features that it brings on top of what
20:24 we learned in this video it is a 30 day
20:26 free trial you could download it and use
20:28 it for 30 days as much as you want so go
20:32 ahead and check it out
20:33 thanks everybody bye
20:41 you"}]
Search the page
0
