About Stacks Guru
Stacks Guru is born from the need to search the vast number of videos out there on stacks built for Stacks Pro and the Stacks 5 plugin for Rapidweaver.
We have scraped over 500 videos to get the transcripts for each in order to make the spoken word searchable.
Please use this free tool to help you learn and discover the awesome power that Stacks and the stacks made for Stacks have to offer.
Stacks Guru
Video Reference
Manage Galleries & Slideshows with Total CMS for RapidWeaver
11/05/2015
Transcript
00:07 hey everybody joe workman here and in00:09 this video we're going to be looking
00:10 over the gallery solution inside total
00:13 cms
00:14 now we're going to look at the gallery
00:16 and the slideshows since they're very
00:17 tightly coupled right
00:19 now galleries are very powerful because
00:22 a lot of times our users want to be able
00:24 to upload images to their websites right
00:27 and there are a lot of solutions out
00:28 there that allow us to upload things
00:30 from flickr and you know use those sorts
00:33 of things right but total cms gives us a
00:35 centralized place on their website to
00:38 manage images
00:40 so this is very powerful and not only
00:43 can we display things as a gallery but
00:45 also slide shows it and we'll see that
00:47 and look out in the future we're gonna
00:49 have further integrations uh with other
00:51 stacks such as our impact stack that
00:54 really fully integrates in
00:56 to the galleries in in total cms and you
01:00 can display the galleries
01:02 completely inside uh impact so it's
01:05 really cool check out that integration
01:07 we have a video on that but without
01:09 further ado let's go ahead and jump in
01:11 and look at what galleries in total cms
01:13 can do for us
01:16 so here we have the total cms demo file
01:18 that shipped to a total cms and you can
01:20 download anytime from our documentation
01:21 portal
01:22 and what you'll notice here is inside
01:24 the demo file we already have some
01:26 galleries set up
01:28 now here in the gallery on the content
01:29 side if you notice we have thumbnails
01:31 and then we can click on that thumbnail
01:33 and navigate through all of the images
01:36 uh inside of our gallery okay
01:39 um we can also display our galleries as
01:42 slideshows now administering these
01:45 slideshows is really simple if we go
01:47 onto our admin page here we'll see that
01:49 we have a grid on our admin page that
01:51 has all of the images that are within
01:53 our gallery
01:54 if we want to add images to the gallery
01:57 all we need to do is drag and drop as
01:59 many images as we want
02:01 and then the cmus will take care of
02:03 uploading all those images
02:04 creating the thumbnails for us
02:07 and you know adding them to our gallery
02:10 now what you'll notice inside the admin
02:12 areas when you hover over the images we
02:14 have a few options right obviously the
02:16 trash can can delete an image
02:19 okay
02:20 the copy image path this allows us to
02:22 get the warehouse to urls to all three
02:26 images the full resolution as well as
02:28 the thumbnails for every image in our
02:30 gallery okay and then you can use these
02:33 uh urls in and really any stack that you
02:35 want
02:36 okay
02:38 and then also lastly is the tag button
02:40 and this allows us to update the alt tag
02:43 information
02:44 uh for that particular image
02:46 now what's cool is if you were to add
02:48 alt tags to an image you could actually
02:51 display those alt tags
02:53 as a caption
02:55 okay inside the gallery lightbox so
02:58 that's really cool
03:02 so let's go ahead and jump into edit
03:04 mode and see how to create these
03:06 galleries and administer them
03:08 so here we are in edit mode for our
03:10 admin page
03:11 and the setup for this is pretty simple
03:13 okay uh we have uh our cms id like we
03:17 have for every single cms stack okay and
03:19 this is going to be the id for our
03:20 gallery
03:22 you have a placeholder which allows is
03:24 the filler text that tells people what
03:26 you want them to do you know drag and
03:27 drop your image here
03:30 next we have gallery alt
03:33 now this is a default alt tag
03:36 that can be added to new images in the
03:38 gallery
03:39 so if you put in you know my gallery
03:41 image
03:42 every new image that gets uploaded will
03:45 get this default alt tag
03:47 okay if you have one defined
03:52 next is max height and what this is is
03:54 the max height of the gallery in the
03:57 admin area
03:59 so if you look we have this currently
04:00 set to 500 pixels
04:03 and if we preview this page you'll
04:05 notice that the gallery is actually
04:07 inside of a fixed container
04:10 okay
04:11 this is done so that when the gallery
04:12 grows past that that defined max height
04:16 it will actually create this little
04:18 static height container so users can
04:20 scroll through and see all of their
04:23 images okay this is great when you don't
04:25 necessarily want the gallery to take up
04:28 like tons of space if there are you know
04:31 100 images inside the gallery
04:34 now the next setting here is for resize
04:36 logic and i'm going to revisit this in
04:38 just a minute um we're going to skip
04:40 this and let's go to the next one
04:42 the next settings here are for defining
04:45 the image quality and how the cms is
04:48 actually going to resize images for you
04:50 okay
04:51 so you'll notice that we have image
04:53 quality and this is going to be your
04:55 jpeg compression okay so when an image
04:57 is uploaded what sort of compression is
05:00 the cms gonna give the image
05:02 um you know so that it actually reduces
05:05 the file size down okay
05:08 now we can also define the actual width
05:11 or the sizes of our image for the image
05:14 the thumbnail and the square thumbnail
05:17 okay
05:18 so this defines the actual width
05:21 or height depending on your resize logic
05:23 which we're going to get to
05:25 so the actual size is defined here
05:28 now i don't recommend that you set image
05:30 quality to be 100 because this is going
05:32 to give you the biggest
05:35 largest file size for your image
05:38 and really for web we want to have
05:40 smaller images so that our sites
05:42 download faster okay
05:44 so the lower that you have the
05:46 percentage for image quality the lower
05:48 quality your image is going to be
05:51 so depending on your use case and what
05:53 images you're using you probably want to
05:55 play with this setting to get it exactly
05:58 right for you know image quality that
06:00 you can visually see
06:02 versus the file size okay because the
06:05 higher the quality the larger the file
06:08 size as well and a lot of times the
06:10 difference between 9
06:12 and 10
06:13 is very minimal in terms of the image
06:16 visual image quality
06:18 but it has a drastic difference
06:20 for file size
06:23 now i skipped over resize logic and
06:25 let's go over this now
06:27 so
06:28 there are three options for resize logic
06:30 we have auto portrait and landscape now
06:34 auto which is the default will take the
06:36 sizes that we've defined as our maximum
06:38 sizes
06:39 and it will apply it to the width on
06:42 landscape images and to the height on
06:45 portrait images
06:46 okay
06:47 now if you want to make sure that you
06:49 always apply the sizing to the width of
06:51 an image you can set the resize logic to
06:54 be landscape
06:56 and conversely if you wanna make sure
06:58 that you always make the image sizes
07:01 apply to the height of the image you're
07:03 going to want to set the resize logic to
07:05 portrait
07:07 so now we're going to jump over into the
07:08 edit mode for our content side and let's
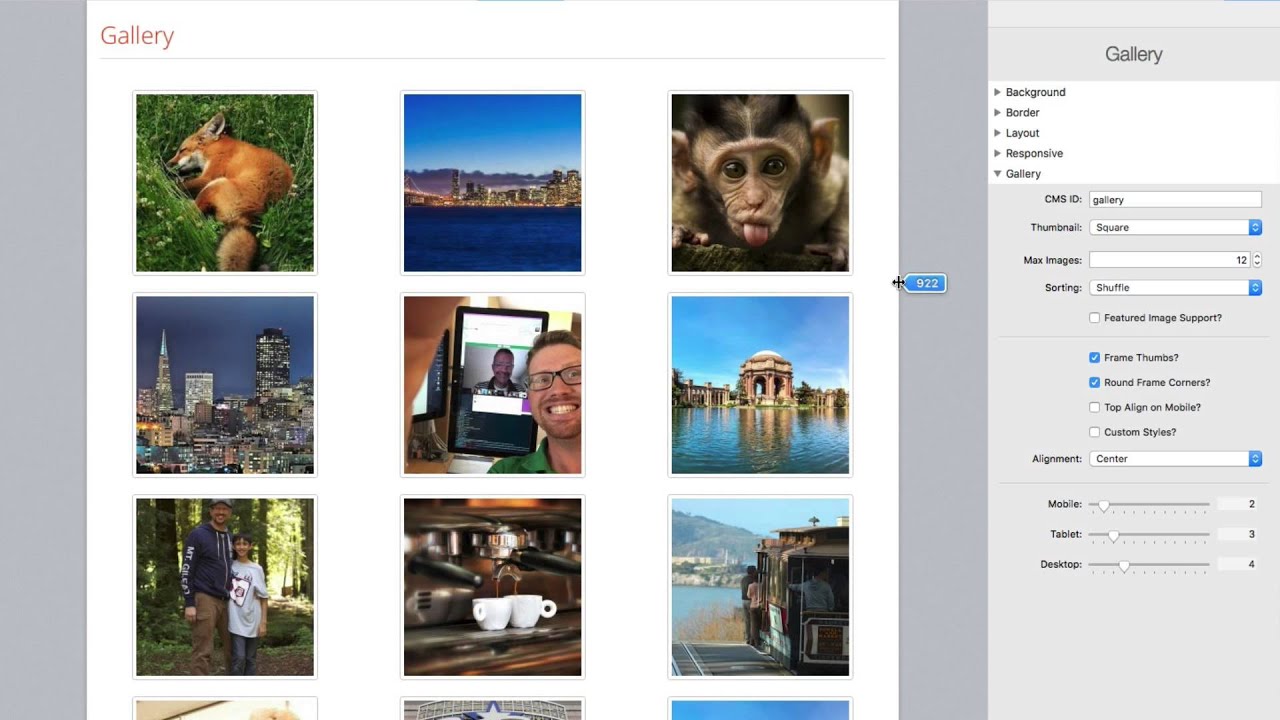
07:12 look at the gallery content stack
07:16 just like every other cms stack we have
07:18 a gallery id a cms id that we want to
07:20 tie to uh the same id on the admin side
07:23 okay
07:24 now for the thumbnail for the gallery
07:26 you can choose whether or not you want a
07:28 proportional thumbnails so basically the
07:30 actual thumbnail the full thumbnail or
07:33 the square thumbnail
07:35 i personally prefer the square thumbnail
07:37 because it gives your
07:38 galleries a very uniform look and feel
07:41 but depending on on what you're going
07:43 for you may want to have the actual
07:46 full-blown thumbnail displayed
07:49 max images defines the number of images
07:52 that will be displayed
07:54 inside the gallery okay so here i have
07:57 it set to 1
07:58 and if i have 40 images in my gallery it
08:02 will only display 1
08:04 okay
08:05 and for sorting purposes you can display
08:07 which 10 right so newest first will
08:10 obviously display the 10 newest images
08:13 okay oldest will display the oldest
08:15 images
08:16 and shuffle will basically choose 1
08:19 images at random okay
08:22 so that's nice
08:25 um next we have featured image support
08:28 and i'm going to jump into that in a
08:29 little bit we're going to skip over that
08:30 for right now
08:32 the next option we have is framing our
08:33 thumbnail so do you want to actually
08:34 have frames around all of our thumbnails
08:37 okay and do you want to round those
08:38 frame corners
08:41 top of line on mobile is gives you
08:43 ability to
08:44 when the
08:46 light box opens for your gallery on
08:49 mobile
08:50 will everything be aligned to the top of
08:52 the device or do you want it centered
08:53 and things of that nature okay
08:55 um custom styles allows us to define
08:58 some custom colors uh for our light
09:00 boxed gallery okay
09:02 um and then the alignment gives us the
09:04 ability to where do we want to align our
09:07 images in the gallery left right or do
09:09 you want to center them okay
09:12 next the
09:14 sliders here define the number of images
09:18 that are displayed
09:19 per
09:21 row okay for desktop tablet and mobile
09:25 so what you'll notice when i preview
09:26 this page is that i have four images in
09:30 a row
09:32 for desktop and if i shrink this down
09:34 it's going to go to three images per row
09:37 and if i go further down to the mobile
09:39 it'll display two images per row
09:42 okay but it always displays 12 images
09:46 now let's go ahead and go back and look
09:48 at this featured image support
09:51 okay
09:52 what if i only wanted to display four
09:55 images on my page
09:57 but yet i wanted users to see all images
10:00 in a gallery
10:01 so if i turn on featured image support
10:04 what you will notice is that my gallery
10:07 is now only showing four images
10:12 okay so basically it's now gonna obey
10:15 the
10:16 uh sizing that we see here four images
10:19 on
10:20 desktop
10:21 three images on tablet and two images on
10:25 mobile
10:26 however when we open up the gallery
10:30 what you will notice is that we have
10:32 access to every image inside the gallery
10:35 not just the ones that are displayed on
10:37 the page
10:39 this allows us to give a snippet of what
10:42 is inside the gallery but then when the
10:44 user actually enters into the gallery
10:46 they see everything
10:49 i have to say this is one of my favorite
10:50 features of the gallery because it gives
10:52 you a lot of flexibility in terms of
10:55 i only want to display you know five or
10:58 ten images or maybe even one image okay
11:02 and then you know lightbox the entire
11:04 gallery only when
11:06 the user clicks on the thumbnail very
11:09 powerful
11:10 so now let's jump down and look at the
11:12 actual slideshow stack and this is very
11:15 powerful and easy to use as well now as
11:18 i said the slideshows are very tightly
11:20 coupled to galleries because
11:22 it does use the gallery
11:25 it just displays it in a different way
11:27 in a slideshow
11:28 so if we look at the settings for our
11:30 slideshow we see that we have our cms id
11:32 uh of gallery you can define what image
11:35 you want to display see do you want to
11:37 display a thumbnail or a square or the
11:39 full resolution image okay max images is
11:43 obviously um how many images and sorting
11:45 is just like we saw with the gallery you
11:47 know we have newest oldest or shuffle
11:50 images okay
11:52 um the theme is dark and light this is
11:55 basically the theme of the slideshow
11:57 controls so do you want light colored or
11:59 dark colored controls
12:02 and basically a lot of the the remaining
12:04 settings here are to control the actual
12:06 slideshow right so do we want full width
12:08 images do you want arrows or bullets or
12:11 caption boxes okay
12:14 and the caption box will actually pull
12:16 in the alt tag information from the
12:18 image and display that as a caption
12:21 on top of the slideshow so that's a
12:23 really nice option
12:25 and then we have animation effects for
12:27 fading or do you want sliding and of
12:29 course the animation speeds and whatnot
12:31 so as you see here
12:33 total cms galleries are very powerful
12:35 because they're so flexible right
12:39 the cms can display the contents as an
12:42 actual you know traditional gallery
12:44 along with that featured image support
12:45 which is really nice and then we also
12:47 have the ability to do a slideshow
12:50 and like i said earlier you also have
12:52 the ability to integrate with external
12:53 stacks that support for total cms
12:56 galleries okay the first one that we've
12:58 done right now is our impact stack and
13:01 it supports beautiful slideshows and
13:04 banners and headers and integrates
13:06 directly into the
13:08 cms
13:09 galleries so it's very powerful now one
13:12 thing i want you to think of
13:14 is in the admin area
13:16 as you notice we had a gallery of images
13:19 that we can manage
13:21 now just because you have the ability to
13:24 display those galleries as a gallery
13:28 okay you could just use them as a
13:30 generic image depot
13:33 so let's say you just wanted a way for a
13:35 customer to upload images as easy as pie
13:39 all day long and then they can quickly
13:41 get the url to that image
13:43 you can do that so easily with a gallery
13:47 okay just create an admin gallery
13:50 okay on the admin page they can upload
13:52 as many images as they want and maybe
13:55 you use those to insert them into a news
13:58 feed or into text areas right so again
14:02 just drag and drop an image they'll then
14:04 click and get the url copy the url to
14:07 the image that they can then use in
14:08 things like their text boxes or in a
14:11 news feed right so there's a lot of
14:14 other uses for galleries outside of just
14:17 a gallery it could be used as just a
14:19 generic image depot
14:21 as well so very powerful and again the
14:24 url images or the warehouse urls that
14:27 the images have
14:29 should never change okay
14:32 obviously if you delete the image from
14:33 the gallery
14:35 you are deleting it and then those urls
14:37 will obviously become obsolete okay but
14:40 as long as the image exists in the cms
14:42 the urls that those uh that are given to
14:46 you via the admin interface okay will
14:48 never change
14:50 so i hope you enjoy galleries i hope you
14:52 use them i hope you love them i can't
14:54 wait to see what you do with them and
14:56 build them and can't wait to see your
14:58 feedback so thanks everybody i'll talk
15:00 to you later bye
15:14 you"}]
Search the page
0
