About Stacks Guru
Stacks Guru is born from the need to search the vast number of videos out there on stacks built for Stacks Pro and the Stacks 5 plugin for Rapidweaver.
We have scraped over 500 videos to get the transcripts for each in order to make the spoken word searchable.
Please use this free tool to help you learn and discover the awesome power that Stacks and the stacks made for Stacks have to offer.
Stacks Guru
Video Reference
Managing Images with Easy and Total CMS for RapidWeaver
09/30/2015
This video reviews how we can manage images in our RapidWeaver website with Easy and Total CMS online. For more info, visit http://cms.joeworkman.netThis video reviews how we can manage images in our RapidWeaver website with Easy and Total CMS online.
Transcript
00:06 hey everybody this is Joe workman and in00:08 this video we're gonna be reviewing how
00:10 to manage images using our CMS now the
00:14 video that we are what gonna do now is
00:17 actually gonna apply to both easy CMS
00:19 and total CMS everything works exactly
00:21 the same in both of them so without
00:24 further ado let's jump in and see all
00:26 the powerful things we can do to edit
00:28 our images with the CMS so here I have
00:33 the easy CMS page that we've seen before
00:36 in other videos and this is the demo
00:39 project that ships with easy CMS and you
00:42 can also download it anytime from our
00:44 documentation portal now in this video
00:47 we're gonna show you a few things we're
00:49 gonna see this banner image here we're
00:51 gonna actually edit and change that and
00:53 we also notice that further down inside
00:55 the tab we have an image but it's a
00:58 square cropped thumbnail image and
01:01 you'll notice if I click on that I will
01:03 then see the full resolution image
01:06 opened up in a lightbox let's see how we
01:09 can do this with the CMS image stacks so
01:14 here we have my admin page and we'll
01:16 notice that I have set up an area to
01:18 edit this image on my admin page now
01:21 let's show you how simple it is to
01:23 replace this image with another one now
01:26 unfortunately this doesn't work with in
01:28 rapidweaver
01:29 because it doesn't actually allow you to
01:30 drag and drop images onto it so we're
01:33 just gonna preview locally in Safari and
01:38 here I've just previewed a you know my
01:41 admin page locally in Safari and I can
01:44 go ahead and just drag and drop a new
01:47 image on to this one
01:54 and like magic my image is immediately
01:59 replaced on the actual project now if
02:02 you miss that let's do that again and go
02:04 ahead and put the original image back in
02:08 drag and drop my image it uploads it
02:11 it's processing the image and it is
02:15 immediately saved ok now whoa that was
02:20 really cool did you see how he just
02:22 dragged and dropped the image onto the
02:24 browser it automatically uploaded okay
02:27 now if that wasn't cool enough there is
02:31 a lot of stuff going on in the
02:32 background when I drag and drop that
02:35 image it not only got uploaded okay but
02:40 that image got resized down to a defined
02:43 maximum size this makes sure that our
02:47 customers are not uploading 10 megapixel
02:50 images to their websites it's gonna
02:52 rescale the image down to what you as
02:55 the designer has does has defined it to
02:57 be so in this instance I've defined my
03:00 maximum size to be 2,000 pixels wide it
03:03 doesn't matter how big the image I'm
03:05 gonna upload it's gonna resize that
03:07 image down to 2,000 pixels wide this is
03:11 gonna ensure that your customers don't
03:13 take those 15 20 megapixel images off
03:16 their camera and upload them to their
03:18 website now if that's not cool enough
03:21 it's done to other things amazing things
03:24 is it's also created two thumbnails for
03:28 us a proportionally scaled thumbnail as
03:31 well as a square cropped thumbnail for
03:35 the image whoa hold on got popped myself
03:39 on the back for that one okay that's
03:41 really cool we uploaded an image once
03:44 and we have three versions of the same
03:48 image immediately available on our web
03:51 sites and that's exactly what we've done
03:54 here with this cropped image if we
03:57 notice I uploaded one image of this
03:59 Golden Gate Bridge the CMAs created the
04:02 square cropped thumbnail and then can
04:05 automatically create a lightbox
04:08 version to the full resolution image
04:11 this really couldn't be easier let's see
04:13 how it gets done so here we are with an
04:16 edit mode on my content page and we'll
04:19 notice that this particular image is set
04:21 to be my banner image now you're
04:25 probably familiar with the CMS and I've
04:27 set up my CMS ID - for this particular
04:29 image to be a banner I've defined this
04:32 particular image type its hard-coded to
04:35 be a JPEG so I want to make sure that
04:37 the JPEG image is called
04:39 and then we define what image do we want
04:43 to display we can set the original image
04:47 which is the full you know the full
04:49 resolution image we can do a thumbnail
04:52 which is the proportionally scaled-down
04:54 thumbnail or we can display the square
04:57 thumbnail we can also have the ability
05:02 to actually have an action if an image
05:04 isn't available so let's say customers
05:07 accidentally deleted an image from the
05:10 you know the CMS you can actually say
05:12 when the image is missing what do we
05:15 want to do you can hide it you can do
05:17 nothing which is the default or you can
05:20 actually show a default image and allows
05:21 you to actually define a default image
05:24 for this particular area we could define
05:29 the alt tag and we'll go over that in a
05:32 little bit you can either import the alt
05:33 tag from easy CMS or you can hard code a
05:37 alt tag directly in the stack then we
05:41 have the auto lightbox feature and then
05:44 lastly we can make the image grow to the
05:46 container no matter what the width is
05:48 and add a link to our image now let's go
05:51 ahead and scroll down and we'll look at
05:53 the image that we added to the tab and
05:55 if we look here I set the size to be a
05:58 square thumbnail and then I checked the
06:01 auto lightbox feature and what this does
06:05 is it will insert the square thumbnail
06:08 and then when I click on it it auto
06:10 light boxes to the full resolution image
06:14 now all of this is extremely easy to
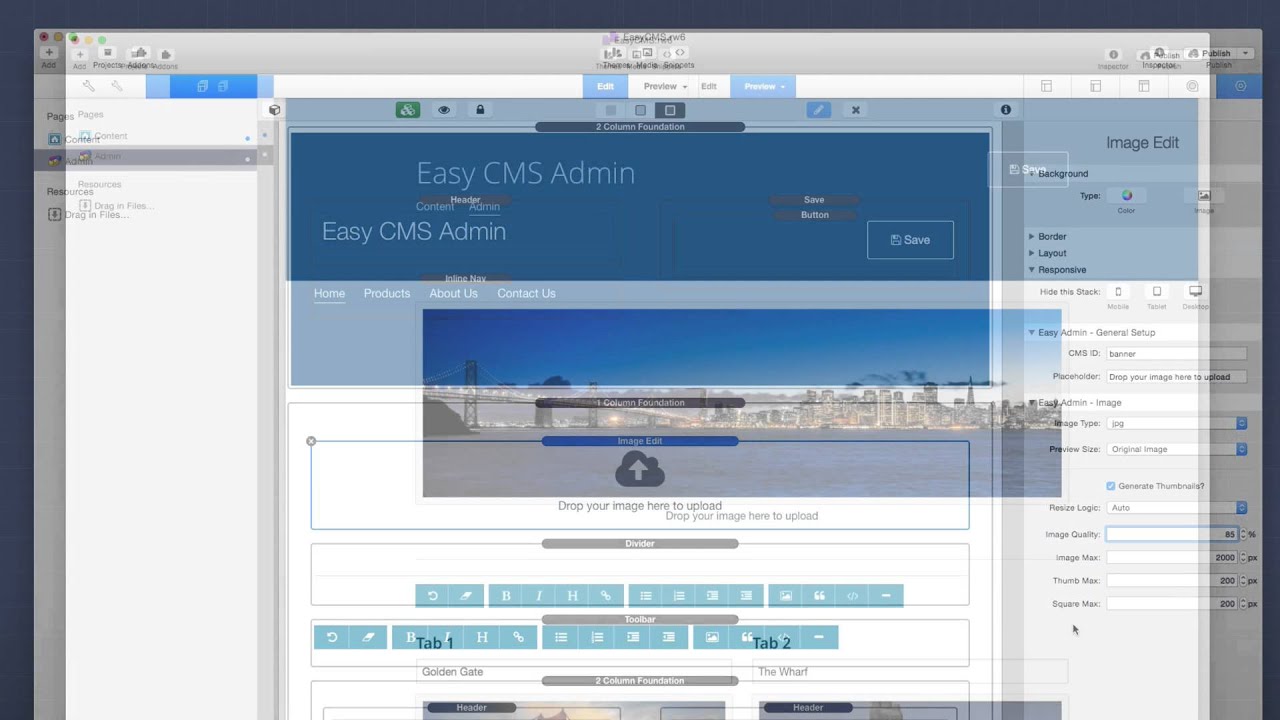
06:17 administer if we look at the easy admin
06:20 page here
06:20 let's go and we'll see the first image
06:22 edit stack that's on the page is used to
06:25 control the image banner we know that
06:28 because if we select it we'll see that
06:29 we have a CMS id of banner and that ties
06:33 to the CMS ID of the content of the
06:35 image okay next we'll see that we want
06:39 to ensure that this image is going to be
06:41 a JPEG and you can also choose PNG now a
06:45 little bit of warning most of the time
06:48 you're going to want to have the image
06:50 type set to jpg because this will give
06:52 us the best image compression and
06:54 whatnot for our websites now however if
06:57 a customer drags a PNG onto the image
07:00 upload it will be converted to a jpg and
07:04 what that means is because JPEG doesn't
07:08 support transparency like PNG does if
07:11 that PNG image that the customer tries
07:14 to add contains any transparent pixels
07:17 those pixels will turn black next we
07:21 have preview size and this just simply
07:24 defines what you'll sweat size you'll
07:26 see when you preview the image inside
07:28 the admin page okay next this is where
07:33 we can control the actual generation and
07:35 sizes of our image as well as the
07:38 thumbnails so by default the image stack
07:42 will actually create two thumbnails for
07:45 you you can turn that off of you are
07:47 sure that you don't want to use the
07:48 thumbnail feature just by simply
07:50 unchecking that box
07:53 next is the resize logic now most of the
07:58 time you're going to want to set this to
07:59 auto and what that's gonna do is that
08:02 will automatically determine if the
08:04 image is a landscape image or a portrait
08:07 image and scale the maximum size that
08:10 you define here to be height on portrait
08:13 and width on landscaped images now if
08:18 you want to ensure that the width is
08:20 always going to be whatever is defined
08:22 here you could set the resize logic to
08:24 be landscape conversely if you want to
08:28 make sure that the sizes that you define
08:29 in this stack are always the height you
08:32 can set the resize logic to be
08:34 or tree however like I said most of the
08:39 time you're gonna want to set this to
08:40 auto because that's going to work best
08:42 in most of the situations the image
08:46 quality is the percentage of compression
08:49 that you have for your image so for
08:53 instance most of the time you're not
08:55 going to want to set this to 100%
08:57 because it's going to produce the most
08:59 maximum sized file size for that
09:03 particular image now I've noticed for
09:06 most images setting it from 85 to 95% is
09:10 really the sweet spot so you can play
09:13 around with it to see exactly you know
09:16 the image quality to size that you might
09:19 like next is going to be the maximum
09:24 pixel size for the full full resolution
09:27 image the thumbnail image and the square
09:30 thumbnail image and as you see you have
09:32 individual controls for each of these
09:34 and this is what defines the size that
09:38 the image will be proportionally scaled
09:40 down to when a customer uploads a very
09:44 large image now earlier I said we were
09:48 going to learn how to manage alt tags
09:50 for every single image and if when you
09:53 go to the admin page and you hover over
09:55 an image you'll notice that there is a
09:57 tool bar that is displayed at the top of
09:59 the image along with a few buttons now
10:03 the button here on the right is
10:05 obviously a trash button and if you do
10:07 if you click on that you'll get a
10:09 confirmation box saying are you sure you
10:11 want to delete this image and that
10:13 delete button will delete the image from
10:16 the CMS now if we saw earlier we
10:19 actually have the ability to you know
10:21 customize the action when an image is
10:23 not available so you know we could have
10:26 it so if the customer doesn't want a
10:28 particular image to be shown at all they
10:30 could just delete that image and then we
10:32 could set the action to hide on the
10:34 content side now the buttons on the Left
10:36 allow us to do some other things
10:38 the first button on the Left allows us
10:40 to define our alt tag in this particular
10:44 instance this alt tag is incorrect
10:45 because this isn't the Golden Gate
10:47 Bridge that we're looking at
10:48 this is downtown San Francisco if you
10:53 notice just like the textbox is when we
10:56 edit text inside the CMS when I change
10:58 the alt tag the box turns red to tell me
11:01 that I actually haven't saved this yet
11:03 then I can go ahead and just click the
11:05 Save button and that will actually save
11:07 the alt tag and if I were to preview
11:09 this inside my web browser will notice
11:12 that the alt tag is actually changed for
11:14 that image now this last button if you
11:19 click on it you'll notice that it
11:20 provides you with three different image
11:23 URLs and this is very powerful because
11:26 this is how we can integrate CMS images
11:30 into third-party stacks now what's great
11:35 about these URLs is that I can actually
11:37 ensure that this URL to this image will
11:41 never change whatever image I upload via
11:44 the CMS it will always resolved to these
11:48 URLs now for you to load these URLs
11:51 directly into the browser we'll see that
11:53 in this instance I have the full
11:55 resolution image I can see the
11:58 proportionally scaled thumbnail as well
12:02 as the square cropped thumbnail for the
12:05 image now I remember that all three of
12:07 these images are dynamically created
12:10 whenever the customer uploads this
12:12 single image to the CMS so that really
12:17 does it for image management inside the
12:19 CMS as you see it's dead simple all you
12:23 need to do is drag and drop your images
12:25 onto the admin area and the stack and
12:29 the CMS do all the work for you
12:31 it creates scaled-down versions to make
12:35 sure that you don't have customers
12:36 uploading large files it dynamically
12:39 creates thumbnails proportional
12:42 thumbnails and square cropped thumbnails
12:44 and it auto it can create an auto
12:48 lightbox for you if you use the CMS
12:50 image stack and if you want to integrate
12:53 it with third-party image stacks you can
12:56 do that very easily as long as it
12:58 supports warehoused images
13:01 that's because you can simply copy the
13:03 URL to the image whether that be the
13:06 full scale thumber you know full scaled
13:08 image or the proportional thumbnail or
13:10 the square thumbnail they all have
13:12 warehouse to image URLs that will always
13:15 be you can always ensure that they're up
13:18 to date whenever the customer uploads a
13:20 new image right now here's some examples
13:23 of what you could do you could actually
13:25 use this to maybe you know manage a
13:28 background image using eclipse or
13:31 background images of your site using
13:34 Jack right
13:35 all of these can be warehoused and
13:37 supported and managed through the CMS
13:41 maybe you're using my point stack to
13:43 have an image map and your customer can
13:46 manage that image behind they're using
13:49 the CMS and then you can actually use
13:53 the custom login screen with page safe
13:56 and that allows your customer to
13:58 actually manage the warehouse image that
14:01 controls the background of their login
14:03 screen so as you see we have a lot of
14:06 options here you can have the CMS manage
14:10 images and use them everywhere it is
14:13 very very powerful and you know we all
14:16 want images and I don't think that it's
14:19 could be any easier to manage images
14:22 with then it is with total and easy CMS
14:25 so I hope you use it I hope you enjoy it
14:27 I hope you love it I hope you really use
14:30 it to make your websites great and to
14:33 make your customers happy so thank you
14:36 very much for watching everybody I hope
14:38 you enjoy it and happy weaving bye"}]
Search the page
0
