About Stacks Guru
Stacks Guru is born from the need to search the vast number of videos out there on stacks built for Stacks Pro and the Stacks 5 plugin for Rapidweaver.
We have scraped over 500 videos to get the transcripts for each in order to make the spoken word searchable.
Please use this free tool to help you learn and discover the awesome power that Stacks and the stacks made for Stacks have to offer.
Stacks Guru
Video Reference
Managing Text with Easy and Total CMS for RapidWeaver
09/30/2015
This video reviews the ins and outs of managing text editing of your RapidWeaver websites online. For more info, visit http://cms.joeworkman.netThis video reviews the ins and outs of managing text editing of your RapidWeaver websites online. For more info, visit http://cms.joeworkman.net
Transcript
00:07 hey everybody joe workman here and in00:09 this video we're going to be reviewing
00:11 how to edit text with our rapidweaver
00:15 cms
00:16 now most of this video will actually be
00:18 covering
00:19 easy cms because all of those features
00:21 actually work inside total cms as well
00:24 however at the very end we're going to
00:26 go over some specific features that have
00:28 been added to total cms
00:30 just for text processing now
00:33 text processing inside this cms is
00:36 deceptively powerful
00:38 because you can do more than just
00:40 editing a paragraph of text
00:43 what we'll see here is that we can edit
00:45 not only a paragraph of text
00:47 but text within any stack that we want
00:52 essentially if there is text on your web
00:54 page
00:55 the cms can edit it how awesome is that
00:59 so let's jump in and see how really easy
01:01 and powerful it is to set up
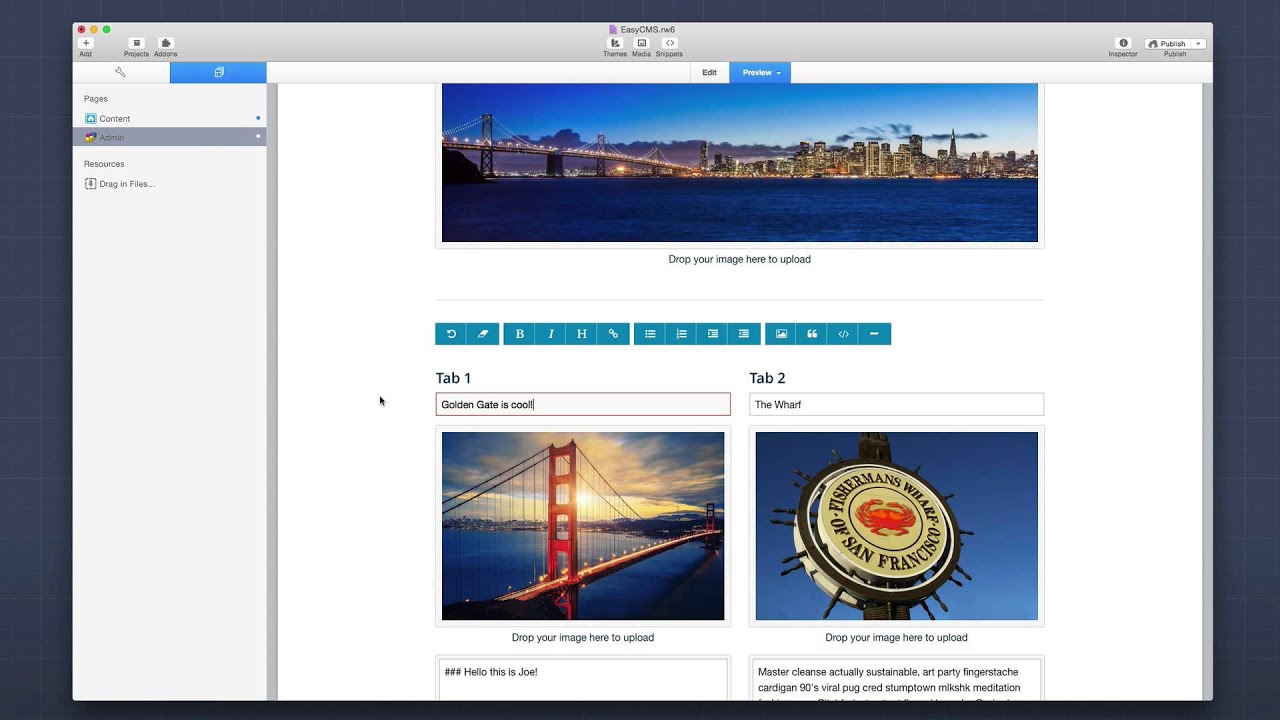
01:05 so here we have the easy cms demo
01:07 project that ships with easy cms
01:09 and you can also download it anytime
01:11 from our documentation portal
01:14 and as you see this is a very simple
01:16 project we have two pages we have a
01:17 content page
01:18 and an admin page in this example here
01:22 what we're going to do is we're going to
01:23 edit the
01:24 text of these tabs so you see in tab 1 i
01:28 have some text here
01:30 and then in tab 2 i have some other text
01:33 now later on in the video we're going to
01:34 get into actually editing the
01:36 names of these tabs as well but just to
01:39 get started let's go ahead and
01:41 figure out how to actually edit the
01:43 content of these tabs
01:48 okay so here's the admin page that i
01:50 built to manage the content page that we
01:52 were just looking at
01:55 and what you'll notice is i have a few
01:56 areas to edit images which we're not
01:58 going to really go over right now we're
01:59 going to go over
02:00 editing the text content within the tabs
02:05 and those areas are defined by these two
02:07 boxes here
02:08 below the two images as you see if i set
02:11 up a column
02:12 um for each tab okay and what's great is
02:15 with the admin area you can you know
02:17 set your own layout so this is all up to
02:19 you on how you wanna to
02:21 lay all of the admin pages out now to
02:24 easily start off
02:26 let's just go ahead and add some text
02:28 into this box
02:29 okay so i've added a little bit of text
02:31 into this box and what you'll notice
02:32 first off
02:34 is that the outline around that box has
02:36 turned
02:37 red and the reason for that is because
02:40 it's indicating that
02:41 this particular text box has changes
02:44 that have not been saved to the cms
02:48 so this gives you a great indication on
02:50 what things you
02:51 might have changed on the page but have
02:53 not yet saved them
02:55 now in this particular instance i
02:57 actually hid the save buttons below
02:59 each text area because i
03:02 integrated two things first at the very
03:05 top
03:06 i have a centralized save button that my
03:08 users can use
03:09 and if i were to click that it would
03:11 save all saved text areas
03:13 on this particular page
03:16 another thing that i can do is i could
03:18 just simply hit command s
03:20 on my keyboard or control s on windows
03:24 and as you notice when i did that the
03:27 text quickly saved to my cms
03:29 and we have confirmation via the green
03:31 check mark that everything went okay
03:34 now what you may notice is right now i'm
03:36 doing all of this from within
03:37 rapidweaver
03:40 this is pretty awesome this means that
03:42 we can actually edit
03:43 and control our content all within
03:45 rapidweaver
03:47 we don't need to actually go online to
03:49 edit our content if you don't want to
03:52 you can publish this page and access it
03:54 online
03:55 100 however it is very convenient at
03:59 times if you're
04:00 already inside rapidweaver and you want
04:02 to change some of the content
04:03 just simply go ahead and change the text
04:05 content straight from your rapidweaver
04:07 project
04:09 now obviously we don't always want to
04:11 have plain text
04:12 right a lot of times we want to give our
04:14 users control to maybe
04:15 add some bold words or a link or add a
04:19 header
04:20 or some bullet lists and easy cms and
04:23 total cms
04:24 allow you to use markdown to actually
04:27 mark
04:27 up your plain text so you can provide a
04:30 richer data set to their users
04:34 for instance let's say i'd like to make
04:36 this first
04:37 set of words bold now as you notice
04:40 after i selected this text a small tool
04:42 tick came up
04:43 with the most used tools that you might
04:47 want so i can make this text bold
04:51 or i can make it italic i can change it
04:54 to be a header
04:55 i can add a link or i can erase the
04:58 formatting that is there
05:01 so for instance if i make this text bold
05:04 you'll see that what is done is it
05:06 actually adds the markdown syntax that
05:08 we would need
05:09 to make this text bold now you may
05:11 notice there is also a toolbar that we
05:13 can use
05:15 and this toolbar gives us more options
05:17 than what is in the quick little tool
05:19 tip
05:19 so for instance we'll notice that we
05:22 have a rewind button
05:24 and what this will do is on the
05:26 currently active
05:27 text box if i were to click this it will
05:30 revert that text box
05:31 to the last saved state so as you see
05:35 that bold formatting that i added but
05:36 didn't save
05:38 is now reverted to my last saved state
05:41 now let's go ahead and add a bullet list
05:43 to
05:44 our paragraphs here so let's say i want
05:47 to add a bullet list here
05:48 i can go ahead and click on the list
05:51 item
05:52 and i can then start typing this is my
05:54 list
05:55 right and if you notice i can just
05:57 straight type once your users get used
05:59 to it they can actually just see the
06:00 syntax and it's just an asterisk
06:08 and you can do the same thing for
06:09 numbers you can indent and de-dent your
06:11 lists
06:12 you can add images or block quotes um
06:15 and lines right horizontal lines so to
06:19 see if i want to go ahead and save this
06:21 actually let's go ahead and make um this
06:23 a header
06:24 so i'm going to select this text here
06:27 and i'm going to make that a header
06:29 okay and what you'll notice is it
06:31 actually added the markdown syntax that
06:33 we would need
06:34 to make that a header so let's go ahead
06:37 and save this
06:39 and let's preview this what it looks
06:41 like on a live page
06:43 so here i preview my content page and
06:45 you'll notice that
06:46 all of that markdown syntax that i added
06:49 into the text box
06:51 is now displayed nicely inside the first
06:54 tab
06:55 i have my header a sentence and my
06:58 bullet list
06:59 all properly formatted nicely exactly
07:02 where i wanted it
07:04 so let's have a peek behind the scenes
07:06 and see how all of this was set up
07:08 so let's look at our admin page and if i
07:10 scroll down and
07:11 look at the text box that we were just
07:13 editing you'll see that there
07:15 the settings here are very simple right
07:19 as you know we tie everything together
07:21 with this cms id
07:23 so i've assigned this particular content
07:25 area
07:26 an id of content one now i explained
07:29 earlier why
07:30 it didn't show a save button because i
07:33 wanted to have a centralized save button
07:35 or i think it's very easy for the users
07:37 just to hit command s
07:39 or control s on windows and then we can
07:42 have our placeholder text for insert
07:44 text here
07:45 um and then in our text editor this is
07:47 really where
07:48 things get um some interesting stuff so
07:51 if we look at the admin text editor
07:53 options we'll see that we have a
07:55 markdown formatting checkbox
07:58 and what this setting does is that it
08:00 allows the toolbar to function
08:02 as well as the tooltip inside that text
08:05 box
08:06 we'll see an example on how we can
08:08 actually disable that in a little bit
08:11 next we can do strip html on save
08:14 this is convenient if you want to make
08:16 sure that your users don't actually type
08:18 in
08:19 any html or paste it off the web and try
08:21 to
08:22 save it to their website this will strip
08:24 any html that is typed into the text box
08:28 and lastly is the form height right this
08:30 controls the height of the form
08:32 which actually when you are on the
08:34 publish page you can actually
08:36 dynamically adjust the height
08:37 on the fly so if as you're editing you
08:40 want more space you could just simply
08:41 drag the box down
08:42 and make it taller now on the content
08:45 page things really couldn't be simpler
08:48 so you notice i've added a easy text
08:50 stack to this page here
08:52 and i've gone ahead and checked the
08:53 insert text macro
08:55 option and i set the cms
08:58 id to match this cms id from the admin
09:02 area so basically we're tying those two
09:04 things together
09:05 via this cms id so in this instance i
09:07 wanted content
09:08 one now in the display
09:12 we have a few different options here
09:14 first
09:15 is plain text and what that will do is
09:17 it will
09:18 purely put in the raw text that was
09:21 actually inserted into the text area
09:25 if the user has typed in any markdown
09:27 formatting
09:28 that markdown formatting will actually
09:30 be displayed
09:31 on the live web page okay so that's why
09:34 it's important to potentially disable
09:36 markdown formatting if it's not
09:38 supported for that text area
09:40 okay but in this instance i wanted to
09:43 actually have formatted markdown
09:46 because we actually wanted that syntax
09:49 to be converted into html
09:51 so that it shows the nice headers and
09:53 links and so on and so forth
09:56 so that really does it for the basics of
09:58 editing text inside the cms
10:01 right you have a content editor
10:04 that is on the admin page and you have a
10:06 text block that you add to your content
10:08 page
10:09 you match those up with the same id okay
10:13 and you can add some markdown if you
10:15 want some fancy formatting such as
10:17 headers and
10:18 links and lists and things of that
10:20 nature right
10:21 or if you just want some plain text we
10:23 can do that too
10:25 so now we're going to jump into
10:26 something a little bit more advanced
10:28 and we're going to show you how to edit
10:31 the content
10:32 from third-party stacks this is editing
10:36 actual content from stacks that don't
10:39 ship with the cms
10:40 this is really really powerful so now
10:43 what we're gonna do is we're gonna
10:44 actually going to target the
10:46 titles of these tabs and edit those with
10:49 the cms
10:50 so here i am on the admin page and we'll
10:52 see that i have two
10:54 text inputs that are used to edit those
10:56 tab titles
10:58 now just as you would think before i can
11:00 go ahead and
11:01 edit this and you'll notice just as we
11:05 saw before that the outline of the text
11:07 box is set to red
11:08 because i have not edited this content
11:12 but let's go ahead and try to add some
11:14 markdown to this right
11:16 let's say i wanted to add this is cool
11:19 as bold and let's go ahead and save that
11:22 what we'll notice inside the content
11:24 page is that markdown came
11:26 through and the reason for this is that
11:29 i want to ensure that
11:30 the text inside these tabs
11:34 is fully controlled by the tab stack
11:37 itself
11:39 so i don't want to inject any markdown
11:40 or html in there
11:42 because it couldn't mess with the styles
11:44 of my tabs
11:45 so if we were to look at this inside the
11:48 edit mode for the admin page
11:50 we'll notice that in this particular box
11:52 is where i'm editing my titles
11:54 and we'll see i set my cms id to be
11:56 title one
11:57 okay i don't have a save button and i
12:00 have markdown formatting
12:01 unchecked okay and when i have this
12:05 unchecked we'll notice that when i
12:07 select this text
12:09 i don't get that tool tip if or if i
12:11 select this and click on the bold button
12:14 i can't make it bold because
12:17 i've disabled markdown formatting for
12:20 this particular box
12:23 so now it's time to see how the magic
12:25 happens how
12:26 does the content that we save on the
12:28 admin side
12:29 actually make it into this tab stack
12:33 it's really really really simple if we
12:36 notice here this is the foundation
12:38 tab stack it is doesn't have any sort of
12:41 support added specifically for the cms
12:44 it's just a normal run-of-the-mill tab
12:46 stack
12:48 but you'll notice inside where i would
12:50 normally add my tab titles
12:52 i have a macro that may look familiar to
12:55 you
12:56 total cms uses the same macro syntax
12:59 that is used
13:00 in many other rapidweaver add-ons and
13:03 it is a percent the id of the macro that
13:06 you want to use
13:08 and then a percent a closing percent
13:11 in this instance remember i added a cms
13:14 id
13:15 of title 1 to my tab title
13:18 so if i wanted to insert title 1 into
13:21 this tab
13:22 i simply do percent title 1 percent
13:26 and if you look at tab 2 i made that
13:29 percent
13:29 title 2 percent and so on and so forth
13:34 this can be done with any text in
13:38 any stack as long as that text resides
13:42 inside the main web page and what we'll
13:45 notice is we can actually do this
13:47 outside of stacks as well so for
13:50 instance if i go into my page inspector
13:53 and look at my browser title we'll see
13:56 that i have my browser title set to
13:58 content
13:58 dash percent site title percent
14:02 in this particular instance i have a cms
14:05 id on my admin page
14:07 set to site title now
14:10 my cms is controlling the browser title
14:14 of my website if we go ahead and look at
14:17 the site-wide code region
14:19 i have a meta tag that's said to have a
14:20 name of description
14:22 and then the content of that meta tag is
14:25 a macro where the id is set to
14:28 site description and then all i need to
14:31 do to edit that inside the cms
14:34 is create a text box that has a cms id
14:36 of site description
14:39 how could this get any easier now in
14:42 order for these macros to work
14:44 properly you will need to ensure that
14:46 you have at least
14:47 one total text or easy text stack on the
14:50 page
14:51 in this instance i have them because i
14:53 was controlling the
14:55 content of our tabs using the easy text
14:57 stack
14:59 but if my page consisted of only macros
15:03 i would simply add a total text stack or
15:06 easy text stack
15:08 to the bottom of my page
15:11 so if we look here i've added a text
15:13 stack to the bottom of the page
15:16 and you'll notice that it actually gives
15:17 you some tips on how you can use your
15:20 various
15:21 macros if you wanted to have a macro
15:25 that was set to format markdown
15:28 you would simply use percent the id
15:32 space dash format and then close percent
15:36 and you'll notice inside the easy text
15:38 stacks that where we specify
15:40 that that's exactly what these stacks
15:42 are doing
15:43 all it is is it's actually putting the
15:44 macro for you
15:46 inside the page
15:49 now we can also access alt tags for
15:52 images
15:53 which we won't really go into this
15:55 particular
15:56 demonstration right now but if you have
15:58 an alt tag
15:59 set for an image you can actually access
16:02 that alt tag
16:02 as a text snippet via these macros
16:07 so that reviews every nook and cranny of
16:09 processing
16:10 text within easy cms right
16:13 now we have a few additional features
16:15 that we can actually have access to
16:17 with total cms and we're going to review
16:20 those in a little bit
16:21 but i just want to reflect on the power
16:24 that we have
16:25 with what we just reviewed
16:28 we can not only edit just paragraphs of
16:31 text
16:32 but we can actually edit the content of
16:35 third-party stacks
16:37 as we saw we edited the tab titles
16:40 we controlled the browser title and
16:44 meta tag descriptions of our web page
16:46 with the cms
16:49 all with just this great simple powerful
16:53 text editing feature in easy and total
16:56 cms
16:57 now let's go ahead and jump into some of
17:00 the additional features that we have
17:02 with total cms so here we have our total
17:05 cms demo file that ships with this cms
17:09 as well as you can download anytime from
17:11 our doc portal
17:12 and what you'll notice is this page
17:14 looks pretty much identical to the one
17:16 that we built with easy cms
17:18 with a few slight improvements
17:22 so here we have the content area that is
17:25 used to edit the contents of tab one
17:28 and you'll notice it supports markdown
17:30 just as we saw before i can highlight
17:32 text
17:32 i can add markdown or i can use the
17:35 toolbar above
17:36 just as we saw earlier but what you'll
17:39 also notice is there's
17:40 a full screen button here and if i click
17:43 on that
17:44 i can enter into full screen edit mode
17:48 and what you'll notice is this is split
17:50 into two where i have my content editing
17:52 and a live preview of my content on the
17:55 right
17:56 so if i were to go and add a header
18:04 what we'll notice is that i have a live
18:07 instantaneous preview
18:09 of my content on the right hand side
18:13 now we also have themeable so you can
18:15 actually toggle if you want
18:16 dark mode you can go ahead and toggle
18:18 dark mode um
18:20 and this entire full screen edit mode
18:22 works beautifully
18:24 on an ipad now if we look at the content
18:27 editor
18:28 for tab 2 we'll notice that it doesn't
18:31 have a full screen button
18:33 and this is because it's using a new
18:35 editor that's specific
18:37 just for total cms
18:40 so if you don't want to use markdown you
18:43 can
18:43 actually select the text in this one and
18:46 what we'll notice is we have a slightly
18:48 different thing in here
18:49 and what this is is our hip wig editor
18:53 and this is our version of a wysiwyg
18:55 editor where you can
18:56 simply click and add your content
19:00 and you will see it live right there on
19:02 the page
19:04 the formatting that you wanted
19:07 now in this example i'm only showing a
19:08 very few basic controls
19:10 but there are over 20 items that we can
19:12 actually add to the formatting bar
19:14 such as headers colors inserting images
19:18 or videos
19:19 and things of that nature it's very
19:21 powerful
19:22 and it is featured in just total cms
19:25 now if we look at this in edit mode
19:28 we'll notice that
19:29 uh inside the text editor options there
19:32 is a new option here that we didn't have
19:34 an easy cms
19:35 for the editor and we can toggle between
19:38 the markdown editor
19:39 which has the same options as we saw in
19:41 easy cms
19:42 or we can choose the hipwig editor which
19:45 allows us to define a height
19:47 of our editor here
19:50 now as i said earlier we can actually
19:52 add additional buttons
19:53 to that uh hipwig editor toolbar
19:58 and we do that inside the admin core
20:00 stack
20:01 so if we look at the admin core stack
20:04 you'll notice that we have an
20:06 admin core hip wig and this allows us to
20:09 toggle
20:09 on and off any of the buttons that we'd
20:12 want
20:12 inside that menu and there we have it
20:14 everybody that is some of the
20:16 really nice little enhancements that
20:18 total cms
20:19 has for editing text on your sites on
20:22 top of what
20:23 the power that we have inside easy cms
20:26 right now i know this video went
20:30 a little long right and i hope you're
20:32 still with me but
20:33 this editing text inside of our websites
20:36 is extremely vital i mean all texts have
20:39 websites
20:40 and i think the way that the cms both
20:42 easy and total cms
20:44 edit our text content on our sites is
20:47 exactly what we need
20:49 it allows us not only to edit a
20:51 paragraph
20:52 but there are so many amazing stacks
20:56 out there that we want to be able to
20:58 edit them
20:59 via a cms and
21:02 easy cms and this text processing that
21:05 we have
21:06 allows us to do that and this
21:09 really takes building and managing
21:12 rapidweaver sites
21:14 to a whole new level so i hope you enjoy
21:18 this
21:18 go ahead and check out the other videos
21:20 that we have for the cms
21:21 but this one really is vital to
21:23 understanding how to process
21:25 text on our websites using easy and
21:28 total cms
21:29 so thank you very much everybody i hope
21:31 you enjoy the cms i can't wait to see
21:33 what you use with it
21:35 i'm really really excited um this is
21:37 exciting times for the rap river
21:38 community
21:39 and we are just gonna keep making better
21:41 and better things
21:43 and i can't wait for you to do that so
21:45 thanks very much everybody have a great
21:47 day bye
22:02 you"}]
Search the page
0
