About Stacks Guru
Stacks Guru is born from the need to search the vast number of videos out there on stacks built for Stacks Pro and the Stacks 5 plugin for Rapidweaver.
We have scraped over 500 videos to get the transcripts for each in order to make the spoken word searchable.
Please use this free tool to help you learn and discover the awesome power that Stacks and the stacks made for Stacks have to offer.
Stacks Guru
Video Reference
Mask 2 Stack for Rapidweaver
07/25/2016
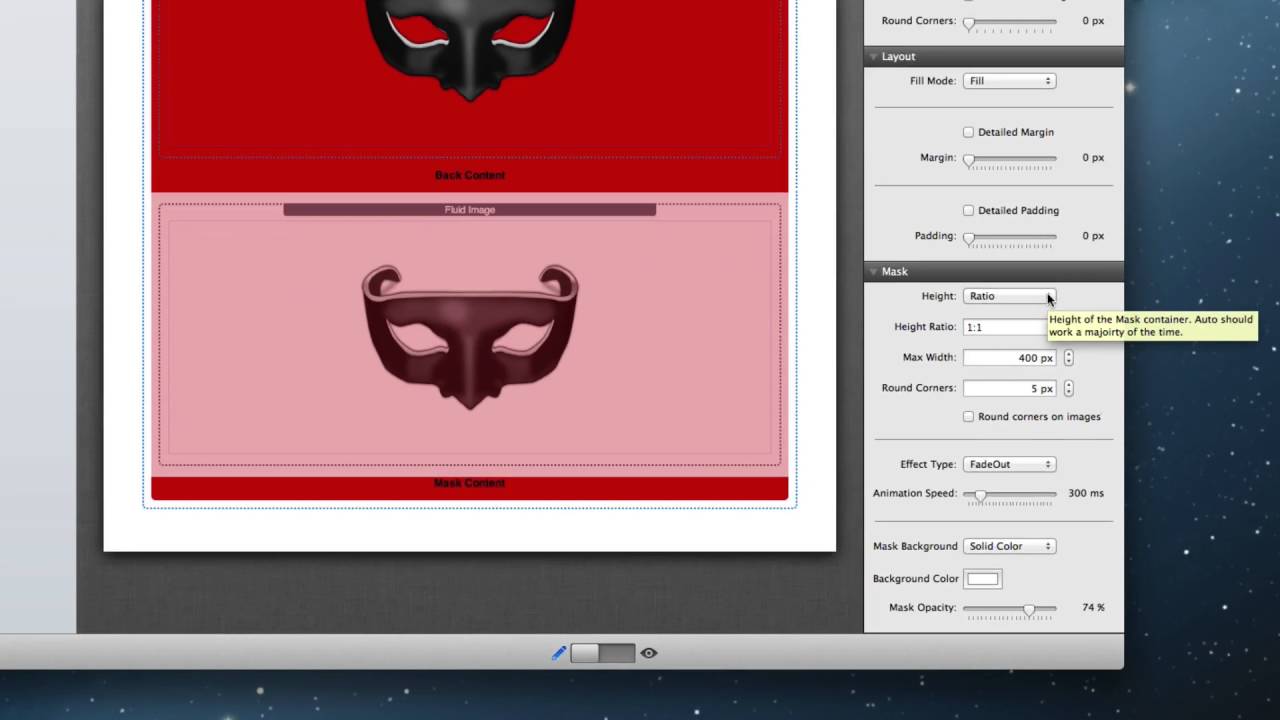
Check out the Mask Stack at https://weavers.space/rapidweaver/sta... Mask allows you layer two different stack containers on top of each other. These containers can contain just about anything that you want. You can add effects that will animate the top layer away to unveil the background contents. There are 13 effects to chose from. Mask does support responsive based designs.Check out the Mask Stack at https://weavers.space/rapidweaver/sta... Mask allows you layer two different stack containers on top of each other. These contai
Transcript
00:06 hello everyone this is Joe workman and00:09 today I would like to introduce you to
00:10 mask mask is a great general purpose
00:13 layout utility that allows you to
00:15 overlay stack content on top of each
00:18 other so let's look at some examples of
00:21 some of the great ways that we can use
00:23 masks so as we look at this top row
00:26 you'll notice as we hover over we have a
00:29 very simple yet elegant fading effect we
00:34 can see some of the other similar
00:35 animations however instead of a fade we
00:38 actually have the top cover or the mask
00:40 actually unveiling content beneath it or
00:43 if we see the in the instance of this
00:46 far left we actually have a static mask
00:49 that there is no hover effect and
00:52 finally if we just want to do a nice
00:55 beautiful fade effect between images one
00:58 of us that we can go from a
00:59 black-and-white or a quasi
01:01 black-and-white image and fade that into
01:04 a full colored image these are just a
01:07 few examples of what you can do with
01:09 masks since you could put whatever stack
01:12 content you would like inside mask
01:14 really your imagination is the limit
01:17 what's great is that mask is fully
01:20 responsive so you can use your favorite
01:22 responsive stacks within mask and it
01:25 will behave beautifully so let's see how
01:30 easy it is to actually configure mask
01:32 when you add mass to your page you'll
01:34 have to drop zone areas the top drop
01:37 area is where you add the content that
01:38 will be in the back of mask and then the
01:42 bottom drop area is where the actual
01:44 mask content the content that is
01:46 overlaid on top so let's go ahead and
01:50 add some effects here so in this example
01:53 will be seen exactly how we accomplished
01:56 one of the examples from the demo we
01:58 looked at earlier I have a red
02:00 background with my mask icon and then in
02:05 the front I have also added my mask icon
02:08 and then I made the background white and
02:10 turn the opacity down
02:13 uh so that it actually you see through
02:15 into the background now because I've
02:18 overlaid the exact same image on top of
02:21 each other it actually looks opaque so
02:24 it is a visual trick this way when we
02:27 hover over it the background content
02:29 will be unveiled so let's dive into the
02:33 settings to show you how easy this was
02:35 to accomplish so the first setting here
02:39 determines how the height of your mask
02:41 stack is calculated by default it is set
02:45 to auto and this works great for static
02:48 with websites and it will automatically
02:51 calculate the height of the mask
02:54 container ratio is really great for
02:59 responsive websites where you want to
03:02 define a ratio such as 16 by 9 or 4 by
33:05 so the actual ratio of width to height
03:09 for your particular content you could
03:14 also define a max width so that it
03:17 doesn't expand too far and potentially
03:20 make your content look too large on your
03:22 website and finally the last height
03:26 setting is fixed height this is all
03:28 obviously great for fixed with websites
03:31 as well so that you have your height
03:33 content is a fixed size however since
03:36 this demo is responsive we're going to
03:38 use the ratio height algorithm and we're
03:41 going to define a ratio of one to one
03:43 therefore we want to square we always
03:45 want our content to be a square now this
03:48 ratio should be defined as with colon
03:51 and then your height no units simply put
03:54 in numbers and this will ensure your
03:56 content always looks proportional a
03:58 little further down we have rounded
04:00 corners and you can also if the only
04:03 content within your mast is an image you
04:06 can also apply that round corner to the
04:09 image within the stack next your effect
04:13 type you can choose from over 13 FX here
04:17 the default is none so it will actually
04:19 have no hover effect then if you can
04:22 obviously choose your animation speed
04:24 and then lastly we can define the actual
04:26 background color and opacity for our
04:29 cover default is transparent which is no
04:32 background at all however you can add a
04:34 solid colored background and then change
04:37 the opacity of the entire cover content
04:40 and that is the mask stack I hope you
04:45 all enjoy this great new stack and I
04:46 can't wait to see what you do with it
04:48 have a great day everybody bye-bye"}]
Search the page
0
