About Stacks Guru
Stacks Guru is born from the need to search the vast number of videos out there on stacks built for Stacks Pro and the Stacks 5 plugin for Rapidweaver.
We have scraped over 500 videos to get the transcripts for each in order to make the spoken word searchable.
Please use this free tool to help you learn and discover the awesome power that Stacks and the stacks made for Stacks have to offer.
Stacks Guru
Video Reference
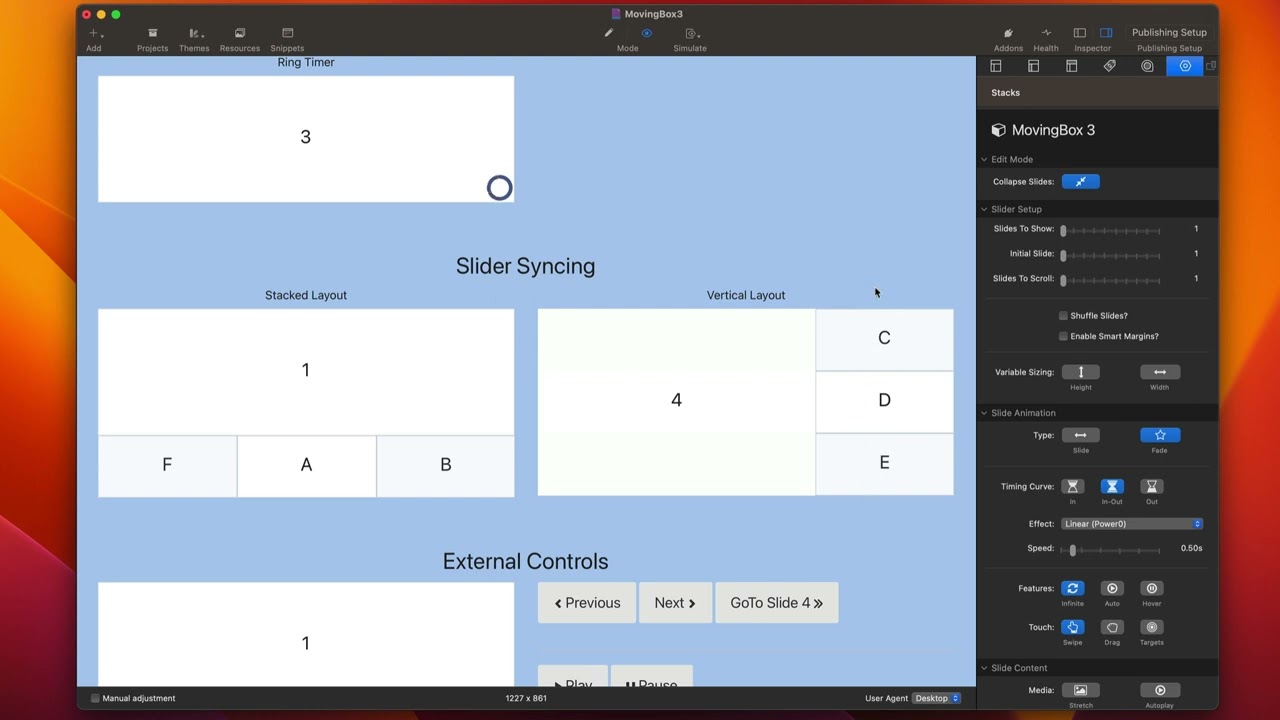
MovingBox 3 Stacks - Slider Sync and External Controls
08/16/2023
For more information about MovingBox, head over to https://www.weavers.space/stacks/movingbox

Transcript
00:00 come on00:10 so in this video we're going to be
00:11 looking at a feature inside moving box
00:14 called slider syncing and essentially
00:17 what that allows us to do is it allows
00:19 us to keep multiple instances of moving
00:22 box in sync with each other
00:25 so in the next example here I have a
00:28 slider and a different instance of
00:31 moving box below it now this instance
00:34 below is showing three slides at a time
00:36 and this instance up here is only
00:38 showing one slide
00:40 but if you notice right now they behave
00:42 very differently
00:43 same thing over here I'd like to keep
00:45 this instance in sync with this instance
00:50 so this couldn't be easier to do
00:52 essentially all we need to do is we need
00:54 to go inside moving box
00:57 and what you do is you find the settings
00:59 for slider sync you enable that
01:02 and all you need to do is you need to
01:04 give it a class in this case I give it a
01:07 class of MB stacked
01:10 and then you go to your second instance
01:12 of moving box
01:13 and we can go ahead and enable that and
01:16 all you need to do is make sure that
01:18 that sync class is the same so just make
01:21 sure that that is the same within both
01:23 sliders
01:25 and it magically will keep those both of
01:27 those Sliders in sync so you'll notice
01:29 when I change this slider down here
01:32 that number changes as well so they are
01:35 perfectly kept in sync
01:41 now in this second example let's go
01:43 ahead and enable slider sync now I have
01:45 a different class than I had on the
01:47 other ones if I gave it the same class
01:49 then we all of them would be kept in
01:52 sync
01:53 uh but we don't want to do that right
01:55 now we want to keep these two separate
01:57 now one thing you'll notice is
01:59 um on this first instance I have sync
02:02 height enabled
02:04 let me show you why that is
02:06 so in this instance here we'll notice
02:09 that now these two sliders are kept in
02:11 sync
02:12 however
02:13 I wanted to make sure that the height of
02:16 this slide
02:17 matched the height of this entire slide
02:21 so this particular this second instance
02:23 of moving box that's on the right side
02:25 contains three slides
02:27 now I wanted the height of this one
02:30 slide moving box to match the height of
02:33 these three that's what that check box
02:35 does
02:36 so on the on the moving box move so on
02:40 the moving box instance where we wanted
02:42 the height to actually be set taller so
02:44 that it sinks we check that box
02:49 now in this implementation you are not
02:51 limited to just two moving boxes that
02:54 are synced you can actually sync as many
02:56 instances as you want on the same page
02:59 so over here
03:01 each we're going to review today is the
03:03 external controls
03:04 and this allows us to add buttons or
03:07 links to our web page that allow us to
03:10 go to previous next navigate to a
03:13 particular slide number and then we can
03:15 also play and pause the slideshows
03:20 so inside moving box if we scroll all
03:22 the way down to the bottom of the
03:23 settings you'll see that we have a bunch
03:25 of classes that we have the ability to
03:27 customize
03:29 so we here I've set the play class the
03:31 pause previous next and go to class to
03:35 be these particular values so MB demo
03:37 play MB demo pause so on and so forth
03:42 and what I've done here is I have a
03:44 button and all I did is added the class
03:47 for the action that I want to that
03:50 button
03:51 and that's all you need to do
03:53 you can either add this class to a link
03:55 or any button and it will magically turn
03:58 it into that particular action
04:00 so here all I had to do is copy the
04:02 mbdemo previous class and I magically
04:05 made this button into a previous
04:08 action that is tied to this particular
04:11 moving box instance
04:14 same thing for next same thing for play
04:17 same thing for pause
04:19 now the one that could be a little bit
04:21 different is the go to slide number
04:25 so what we need to do is here yes we
04:28 need to add the class
04:30 but then we also need to add a data
04:32 attribute
04:34 now this is it in this button stack we
04:36 have the ability to add our own custom
04:38 attributes we can do data go to and at
04:41 that point you need to put the name of
04:43 the slide
04:46 now if you aren't aware inside of moving
04:49 box you inside the slide you can
04:51 actually provide a custom name
04:55 so every slide you can cust you supply
04:58 your own custom name
05:00 and then if you would link to that name
05:02 inside of the button
05:05 so in this instance I'm linking to the
05:07 slide number four and if we go ahead and
05:10 look at that slide we'll see that I have
05:13 given it the name of four
05:17 now if you don't want to provide custom
05:19 names for every single slide you can
05:21 reference them with the numbers one two
05:24 three four with it actually not the word
05:26 the actual number
05:28 so your slides by default will be given
05:31 names of the number they are inside your
05:34 slide deck the order number so it is the
05:37 number one or the number two
05:39 um here I just wrote out that uh
05:41 particular name because this was slide
05:42 number four so I give it a name of four
05:46 now if you are using a button stack or
05:48 some sort of text link those might not
05:51 have the ability to add your custom data
05:54 attributes so how would you do that with
05:56 a normal link
05:58 so first off we're going to go ahead and
06:00 we're going to get the class that we
06:01 need so mbdemo go to
06:03 let's go ahead and I'm going to edit
06:05 this link
06:06 and I'm going to show custom attributes
06:08 and what I'm going to do is I'm going to
06:10 add a class here
06:12 and I'm going to paste in that value
06:16 and then what I do is I'm going to go
06:18 here and we need data go to and then
06:21 four okay so we're going to go ahead and
06:23 here I'm going to go edit my link again
06:27 I'm going to click Plus
06:29 and we're going to do data go to and the
06:32 value is 4.
06:36 so now if I click this button it should
06:38 take us to slide four let's check it out
06:41 so here's my button I can go ahead and
06:43 click change me and it navigates
06:45 directly to slide number four
Search the page
0
