About Stacks Guru
Stacks Guru is born from the need to search the vast number of videos out there on stacks built for Stacks Pro and the Stacks 5 plugin for Rapidweaver.
We have scraped over 500 videos to get the transcripts for each in order to make the spoken word searchable.
Please use this free tool to help you learn and discover the awesome power that Stacks and the stacks made for Stacks have to offer.
Stacks Guru
Video Reference
Popup Caption 4 stack - Tutorial
08/23/2024
For more information about Popup Caption stacks, head over to https://www.weavers.space/stacks/popup-caption
Transcript
00:06 [Music]00:09 so in this video we're going to be
00:10 talking about how to implement the popup
00:13 caption stack this is the stack that
00:15 you'd probably utilize within your
00:16 existing layouts um and why you would
00:20 use this versus pop-up grid um so let's
00:23 go ahead in here I just have a simple
00:25 kind of two column layouts just a very
00:27 simple basic layout for my web page and
00:30 inside each of these columns I have a
00:32 single pop-up caption stack now with
00:35 pop-up caption basically all of the
00:38 settings that you need are baked into it
00:40 so each of these can actually have their
00:42 own settings now if you want to have
00:45 your own you know kind of a centralized
00:47 settings to kind of save some time um
00:49 check out the popup grid stack uh we W
00:52 we're going to look at that in a
00:53 different video but for now let's go
00:55 ahead and dive into all the individual
00:57 settings and uh this video will be
00:59 important if you want to learn these
01:00 settings because I'm not going to rehash
01:02 all of those in the popup grid Stack
01:05 video okay so here we go when we let's
01:08 go ahead and just add a I'm going to
01:09 delete this let's just go ahead and add
01:11 a new instance to the page so here we
01:13 have a new instance and by default we
01:15 just drag and drop an image directly
01:17 into pop-up caption right so let's go
01:19 ahead and find an image and voila okay
01:23 now obviously you're going to want to
01:24 have alt tag um put in the sizing
01:27 information okay um now also
01:30 check out that we have Warehouse image
01:33 functionality as well as video
01:35 functionality so for video you're going
01:36 to have to give it a URL to uh the video
01:39 file and the poster uh image um now
01:42 these video files they are they are
01:44 going to autoplay um and they cannot
01:46 have sound so if they do have sound the
01:49 sound will be muted okay um that is just
01:52 a requirement in order to autoplay video
01:54 in any web browser is the video has to
01:57 be muted so even if your video file has
02:00 audio it will be muted by popup caption
02:02 in order for it to
02:06 autoplay now here we also have link so
02:09 basically this will make the entire
02:11 pop-up caption one big link so if you
02:13 want it to link to let's say a blog post
02:15 or a web page or something else um go
02:18 ahead and click add link and it will
02:20 turn the entire thing into one big
02:25 link next is we can uh size to aspect
02:28 ratio this is very convenient if you
02:30 let's say um you don't want it to be the
02:32 size of the image let's say maybe have
02:33 multiple images and you want to make
02:35 sure that they're all square okay so in
02:37 this case um you just set if you want it
02:39 to be square which is the default uh
02:41 just do 1: one you can also do like 16
02:44 by9 or 4 4x3 um some common ratios out
02:48 there for various um layouts um and then
02:51 here you can position the image so by
02:53 the default it's Center Middle you can
02:55 change it let's say I want it to be left
02:57 top and you can see the actual image
02:59 shift maybe we'll do like right bottom
03:02 there you go so you see you kind of get
03:03 a different um positioning of that image
03:07 uh based on the settings here so that's
03:09 everything for background content um
03:11 let's go ahead and look at some of the
03:13 settings that we have for the overlay
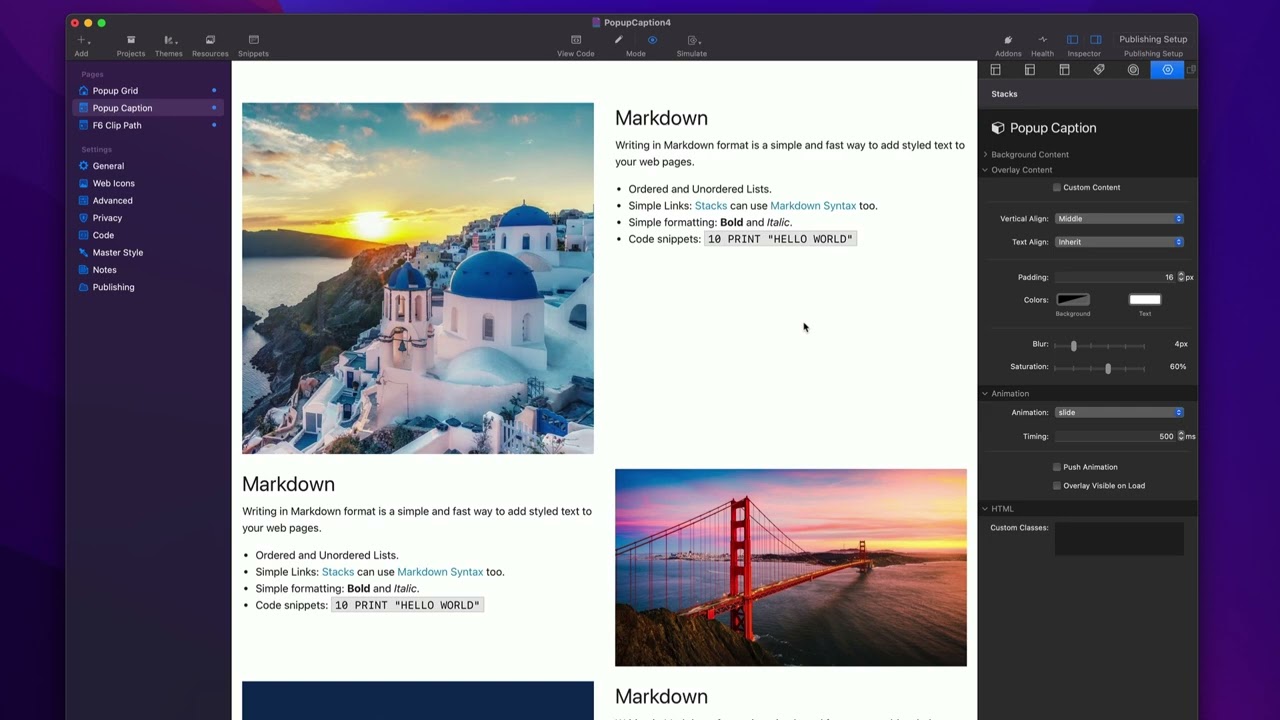
03:15 content now the first setting here is
03:17 custom content by default you can go
03:19 ahead and type in markdown um just you
03:22 know text into here now you can use your
03:25 own stack content just click on this
03:26 button and you'll notice is a stack drop
03:29 zone and at this point you can add in
03:31 whatever Stacks you would like um any
03:34 even images let's say you want to have a
03:35 small logo in there I could see that
03:37 being possibility right you have some
03:38 text and maybe a small logo um could be
03:41 nice for this demo I'm just going to go
03:43 ahead and turn off custom content so we
03:44 have our text um then we have vertical
03:47 alignment so do you want your text to be
03:48 at the top the middle bottom or stretch
03:51 okay um stretch probably makes more
03:53 sense if you're using custom stack
03:54 content but most time you're probably
03:56 going to want middle by default um I
03:58 don't know top could be good too and
03:59 then text alignment um so is it left is
04:02 it Center is it text align right is it
04:04 Justified so on and so forth okay um
04:07 then we have padding this is going to be
04:09 the padding around the outside now if
04:12 you have it vertical line at the middle
04:13 the padding probably doesn't matter too
04:15 much but it will definitely matter if
04:17 you set it to top or bottom okay um now
04:20 if your content is actually larger than
04:23 the image it will autoc scroll so it
04:26 will allow the content to scroll within
04:28 the overlay
04:30 um if it is larger than what the image U
04:33 the dimensions are on the page um then
04:36 we have the ability to change the
04:37 background colors as well as the text
04:38 colors inside of the overlay um and then
04:41 here we can adjust a blur now you'll
04:44 notice that um this doesn't actually
04:46 blur the image itself it only blurs the
04:50 image when the overlay is covering the
04:52 image and we could do something very
04:55 subtle like one or two pixels or we can
04:57 go really abstract and do like 20 pixels
04:59 which pretty much completely obfuscates
05:01 the image but it let some of the colors
05:03 bleed
05:04 through now speaking of colors um we
05:08 also have the ability to control
05:10 saturation and this allows us to also um
05:13 desaturate the image when we hover so
05:15 let's go all the way down to zero and
05:17 what you can see is it kind of makes the
05:18 image black and white and this can add
05:21 enough contrast depending on your image
05:23 to help make the text more readable
05:25 right and you can use a combination so
05:27 let's say I want to have like saturation
05:29 60%
05:30 um and then blur is at four right so
05:33 this kind of you know we we can still
05:35 see the image but the the colors are
05:37 desaturated now um in a live web page
05:40 let's go ahead and preview this on the
05:42 live web page what you'll notice is the
05:43 image is perfectly sharp just as usual
05:46 but then when I go ahead and actually
05:48 apply the
05:49 overlay that is when the filters are
05:53 applied the blur and the
05:54 saturation all right now moving on to
05:57 the animation there are several
05:58 different animations that we have
06:00 available from Fade to flip to roll out
06:03 um and then we have the timing so how
06:05 fast is that animation and then we have
06:07 things such as push and overlay um I'm
06:10 going to switch the animation here to be
06:12 slide because both of these work really
06:14 well with
06:16 slide and U now I do have to say you can
06:19 add any combination of these check boxes
06:22 with these to create kind of a unique
06:24 animation however not everything works
06:27 great together okay for example if you
06:30 do swing plus push animation just
06:32 doesn't work too great or actually swing
06:34 with even overlay visible on load
06:36 doesn't work well either okay so swing
06:39 works great it's the default animation
06:41 and works absolutely beautifully on its
06:43 own but if you turn on push and overlay
06:46 visible on load it doesn't work too
06:48 great so play around with the
06:49 combination of these to kind of get
06:51 something that you like let's go ahead
06:53 and look at
06:54 slide so as we saw this was the uh
06:57 animation that we had earlier where I
06:58 just slide in and uh it shows the uh
07:01 image underneath let's go and do a push
07:03 animation and that what that does is it
07:06 pushes the image instead of overlaying
07:08 on top of the
07:09 image when we set overlay visible on
07:12 load you'll notice that the overlay is
07:14 there on page load and then it animates
07:17 out on
07:20 Hover now I should note it's most of the
07:23 time it's going to be and uh an either
07:25 or of these checkboxes most animations
07:28 won't work with them both both enabled
07:30 or probably won't do what you expect so
07:33 there we have it that pretty much does
07:34 it for pop-up caption now a couple kind
07:36 of stacks related things let's say I
07:39 wanted to um make the same changes on
07:41 multiple of these let's say I wanted to
07:43 change the background color on all three
07:45 of these um for the overlay instead of
07:48 having to go into each individual stack
07:49 and changing the background color what I
07:52 can do is I can hold down the command
07:53 key and I can actually select all of my
07:56 pop-up caption stacks and what you'll
07:58 notice up here in the settings
07:59 is it says we have three popup caption
08:01 Stacks selected and whatever changes I
08:04 make from now on will actually um affect
08:09 all three stacks so I can go ahead and
08:10 uncheck them if I want to make all of
08:12 them Square I can make all of them
08:14 square and let's say I want to make I
08:16 want to change the background color
08:17 let's go ahead and do like a let's do
08:19 like a dark blue or a blue like
08:23 50% right so there we go I changed all
08:27 three of them let's go ahead and preview
08:29 the change
08:30 so now all of them are squares even the
08:33 video and when I hover over each one
08:35 you'll notice that the the actual color
08:37 of the overlay has changed as well
08:45 [Music]
Search the page
0
