About Stacks Guru
Stacks Guru is born from the need to search the vast number of videos out there on stacks built for Stacks Pro and the Stacks 5 plugin for Rapidweaver.
We have scraped over 500 videos to get the transcripts for each in order to make the spoken word searchable.
Please use this free tool to help you learn and discover the awesome power that Stacks and the stacks made for Stacks have to offer.
Stacks Guru
Video Reference
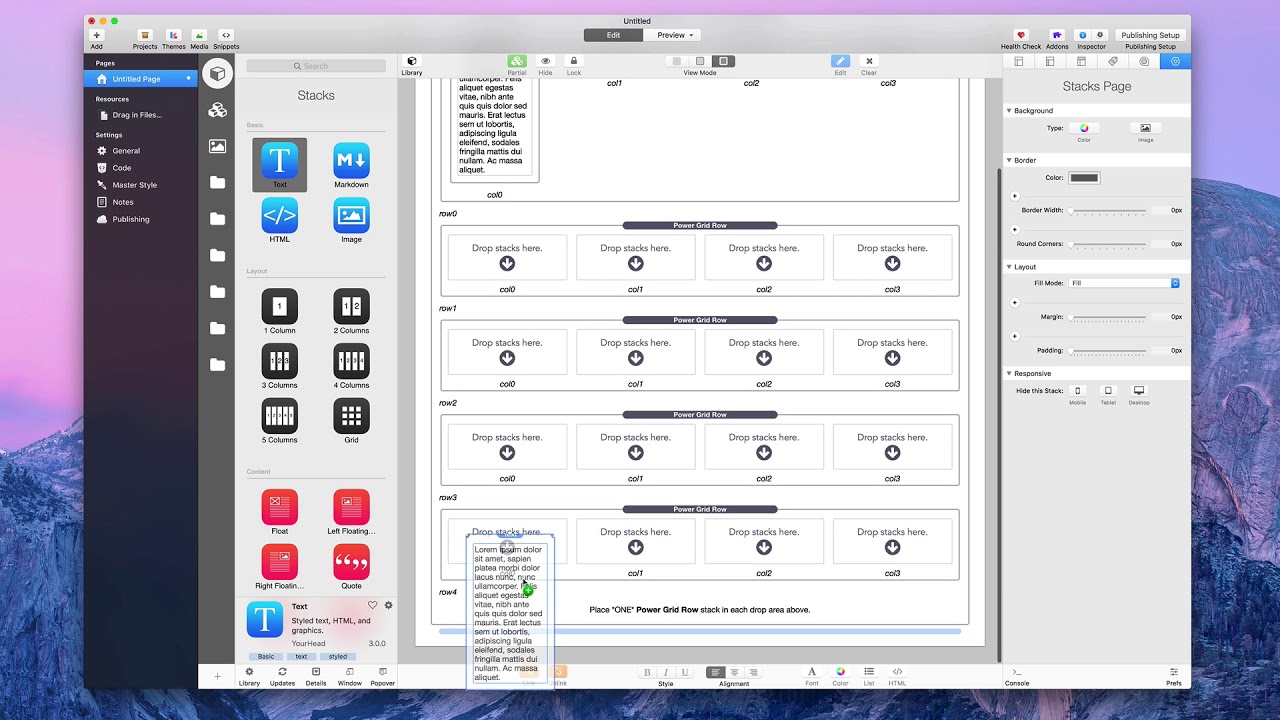
Power Grid Basic Setup
04/17/2018
A basic setup of the Power Grid stack.A basic setup of the Power Grid stack.
Transcript
00:06 hi this is Rob from the Weaver space and00:09 today I'm going to do a basic overview
00:11 of the power grid stack so first thing
00:16 I'm gonna do is add a stacks page to my
00:19 rapid e of a project and I'm gonna
00:21 search for the power grid stack now I'm
00:24 gonna show you that Joe makes two
00:27 different types of power grids there's
00:28 the blue stacks which is the actual
00:30 power grid stack and the red icons which
00:33 are the power grid CSV stacks we're
00:37 going to be talking about the the blue
00:39 ones today
00:39 it comes with to the power grid stack
00:41 and the power grid rows stack we're not
00:45 gonna be talking about the other two
00:46 though that's a different product
00:47 so you'll notice when you drop the power
00:52 grid stack on your page it does have a
00:54 warning here that says place one power
00:57 grid row stack in each drop area above
00:59 now it's kind of weird to say that when
01:03 there's only one drop zone but you'll
01:05 notice as I add more rows that it will
01:08 say it for all of the different rows
01:10 okay
01:11 you also notice that the first row here
01:13 is row zero now let's dive into the
01:16 stack settings and you can change the
01:19 number of rows with the first stack
01:21 setting of the power grid stack you just
01:23 drag this little thing left and right
01:26 and you get more rows you can also go in
01:29 there and double click and then change
01:32 the number of rows by typing any number
01:34 and hitting return and I'm going to type
01:36 in five to get five different rows again
01:39 you'll notice it's row zero through row
01:41 four one two three four five different
01:44 rows again this only says at one time
01:46 please one the power the row stack and
01:48 each drops on above so I'm going to grab
01:50 the power grid row stack and put it in
01:52 the first one if I would accidentally go
01:55 to put a second one in the second row
01:56 and put it there by accident that does
01:59 not mean it's in row number one it's
02:01 still in row zero and there's two of
02:03 them there so you'll want to make sure
02:04 you either move it down out of the way
02:06 or just delete it
02:08 now the power grid row settings there's
02:11 only a couple of them one if you want to
02:14 make this a header row or not and two is
02:16 the slider type settings before that's
02:19 for the number of
02:20 by default it has three columns column
02:22 column 1 and column 2 we are gonna slide
02:26 this slider left and right and you'll
02:29 notice that the columns get more or less
02:30 now we're gonna make this a 5 row by
62:34 columns now let's make it a 5 row by
42:36 that's it might be a little easier
52:39 rows by 4 columns in the columns in
02:41 column 0 1 2 3 okay the reason I did
02:46 this before I went through an added one
02:48 to each area is because once you have
02:50 one power grids power grid rows set up
02:54 you can easily copy them to the other
02:58 drop zones and you do that by clicking
03:00 and dragging now if you would do that
03:02 just by itself it would just move it but
03:05 there's a little trick pad your head
03:07 puts into the stacks plug-in that if you
03:09 hold the option key down and drag you'll
03:11 notice a plus symbol appears and if you
03:14 let go in the drop zone it copies that
03:16 stack completely the same settings and
03:19 everything that's why they all have
43:20 columns into the area you're dropping so
03:24 holding down the option key and dragging
03:26 is a great way to copy a stack now that
03:29 only works inside of a stacks page
03:31 itself if I had two pages and wanted to
03:33 copy this to another page that would not
03:36 work and if you accidentally start
03:40 dragging and realize oh I fill them all
03:41 up you can just actually let go of the
03:44 option stack and the plus symbol
03:46 disappears put it back where it was and
03:49 it doesn't copy anything but copying
03:53 that way is the only inside of the stack
03:56 page I cannot do that from page to page
03:58 ok so we have our column setup we have
04:03 our row setup let's add some content so
04:05 I'm going to delete my search here and
04:06 just for ease I'm gonna add a text stack
04:10 and I'm just gonna use my nice little
04:13 thing and I'm gonna actually come down
04:15 here and start from the bottom and the
04:18 only reason I'm starting from the bottom
04:20 is because I'm using the same content
04:21 you probably wouldn't want to start from
04:23 the bottom with different content
04:24 although it wouldn't hurt if you did
04:27 either and the reason I do this is
04:28 you'll notice as I add more content in
04:31 the
04:31 rose above the bottom roll scroll down
04:34 so if I would have started up on top I
04:37 would have had to scroll down to fill in
04:39 all the spots here I have to scroll up a
04:42 little bit but at least that only had to
04:44 do that at one time the about has
04:46 started from the top and gone down and I
04:47 probably have had a scroll a lot because
04:49 as the content fills it pushes the
04:51 content down now let's preview this page
04:55 and see how it looks now the power grid
04:59 stack has a nice feature that even rose
05:02 wooden since this is a row 0 have one
05:05 color and odd rows have a different
05:07 color makes it very easy for you to
05:08 differentiate between the different rows
05:10 now I'm gonna go into edit real quick
05:13 click on the power grid here's another
05:14 nice little tip if you are in the stack
05:17 that you want to change settings on and
05:19 go into preview and you still have the
05:21 inspector up you can change the settings
05:23 and we're gonna do that right now so
05:26 let's say I don't want this blue color
05:27 well we find the settings for that down
05:30 here it's called even row color and I'm
05:32 gonna change that to this orange color
05:35 it's a nice little orange color now if I
05:38 wanted to change the text inside power
05:40 grid you're gonna have to change that on
05:42 your theme okay you can use some CSS but
05:46 I'm not gonna get into that this is a
05:47 basic overview not you know advanced
05:50 overview I'm not gonna show you how to
05:53 change the text color with CSS but you
05:56 want to do that you have to use the
05:57 theme settings I'm not gonna change it I
05:59 don't want the even or the odd road
06:02 colors to be white I'm gonna make them
06:04 this nice little teal color and you'll
06:08 notice some other colors settings in
06:10 settings in here so first let's look at
06:13 the border size we're gonna skip the
06:14 header row right now that's more of an
06:16 advanced feature and there'll be another
06:17 video on how to use in a header row
06:19 coming up but let's look at border size
06:22 so if you wanted a border between every
06:24 segment so means between each row and
06:26 each column you just adjust the setting
06:29 here to 1 and there's a thinner line it
06:31 can go all the way up to 10 and you can
06:34 get a nice thick line now I'm not sure
06:35 if you can go above 10 I'm just gonna
06:37 add a zero to make it a hundred no looks
06:41 like 10 is the highest setting that Joel
06:42 allows
06:43 so you can't make the border higher than
06:45 10 I'm gonna actually I'm making a tube
06:47 and you'll notice that when I type in a
06:50 stack setting here for the size of the
06:53 border like let's change 3 you put free
06:55 in hasn't changed it yet
06:57 that's because 4 that's setting to take
07:00 effect you have to either click out of
07:01 it like about and click on a color I'd
07:04 be clicking out of it or hit the return
07:06 key and that will set that setting okay
07:09 so make sure that if you're going into
07:12 the the settings this way by clicking on
07:14 them you are hitting return or going to
07:17 a different setting before you think
07:18 you're going to see changes so there's
07:21 different types of border styles and if
07:25 I clicked on this so I can't really show
07:28 it to you but let's I think if I just
07:29 type in dashed it'll be a dashed border
07:33 again I have to hit return there we go
07:36 let's just hover over this and see if we
07:39 can type they didn't say this the style
07:41 of borders I'll make a FAQ for that so
07:44 it'll tell you the different types of
07:45 borders you can type in there you can
07:47 change and let's just redo this and
07:50 leave it solid you can change the border
07:53 color if you want let's make it a purple
07:54 just to make it ugly ok and you can only
07:58 you can also only have a bottom border
08:00 so I'll only be in the bottom of each
08:02 roll ok so if you only want to split up
08:06 the rows and not the columns you can do
08:07 it that way I'm gonna turn that off
08:10 right now I mean in fact gonna turn off
08:11 borders altogether now no background
08:15 color if you turn that on the background
08:17 itself disappears ok
08:19 it still has two different colors a
08:21 white and a grey but it pretty much
08:25 disappears and it's really hard to tell
08:26 ok
08:27 I'm gonna turn that back on though now
08:31 we've gone over the roll colors but
08:33 there is a hover color too and for that
08:35 to work if make sure no hover is
08:37 unchecked now if I hover over something
08:40 you'll notice this blue color highlights
08:43 the row and the text turns a gray well
08:47 that's kind of hard on this one so let's
08:49 make it let's make it a red make it dark
08:53 red and let's make our hover text white
08:58 so now as we hover over each one the
09:02 text changes to white and the background
09:05 color changes to red now if you turn off
09:08 background color you will not see the
09:11 background color change as I hover but
09:13 you will notice that the text changes
09:15 color it changes to white which on most
09:19 of them is very on all of them it's very
09:21 hard to see so if you do have no
09:23 background color on or checked you want
09:26 to make sure you do not have the hover
09:28 text white let's change this to black
09:30 for this instance and now as I hover
09:34 nope I didn't change it sorry there we
09:37 go
09:38 now as I hover over each one the text
09:44 well let's make it a different color
09:45 since it's kind of hard to see black on
09:47 black let's make it a dark red okay I
09:51 can change it again make it a dark red
09:53 there we go
09:54 now as I hover over each area you will
09:56 see the text change to red okay so if
10:00 you have no background color on make
10:02 sure your hover text is not white and
10:06 then show sizing tips if you turn that
10:09 on and this will actually only work in
10:12 edit mode it comes down here and we'll
10:17 show you some sizing tips to use with
10:19 CSS now again I'm not going to get into
10:21 how to use CSS with this deck it's a
10:24 very basic overview here hopefully I'll
10:27 get into another video teaching you how
10:29 to use CSS with the power and good stack
10:31 but not today
10:32 so that's pretty much it for the power
10:34 good stack it's a very powerful stack to
10:37 make beautiful tables in your your rapid
10:40 Reaper sites we hope you enjoyed
10:42 learning about it and have a great day
10:44 thanks
10:47 "}]
Search the page
0
