About Stacks Guru
Stacks Guru is born from the need to search the vast number of videos out there on stacks built for Stacks Pro and the Stacks 5 plugin for Rapidweaver.
We have scraped over 500 videos to get the transcripts for each in order to make the spoken word searchable.
Please use this free tool to help you learn and discover the awesome power that Stacks and the stacks made for Stacks have to offer.
Stacks Guru
Video Reference
Site Styles Swatch Selectors in Foundation 6 Stacks
01/27/2020
\
Transcript
00:08 so in this video today we're going to be00:11 going over the swatch selector settings
00:14 and how we can leverage those so the
00:18 default is obviously class that is
00:20 really simple and we use that a lot
00:22 throughout all of the tutorials videos
00:24 here right and it's simple if you just
00:26 type in a class here all you need to do
00:28 is paste that or type in that
00:31 corresponding class inside of a stack
00:32 and that swatch gets applied super
00:36 simple however there are some other more
00:39 advanced things that we can do with
00:41 swatches if you notice inside this mode
00:44 we have a couple other options here the
00:46 next component from class is component
00:48 and inside components you'll notice that
00:51 we've actually created a drop-down of
00:54 tons of pre-made components basically
00:57 every single component within foundation
01:00 six is here
01:01 so if you want to style a menu or if you
01:03 wanted to style a button or if you want
01:05 to style table or table headers right um
01:08 we allow you to really easily target all
01:11 of those components so if you wanted to
01:13 target all buttons on a page just simply
01:16 type button right or choose the button
01:19 component or if you wanted to style all
01:23 table headers right or table rows or
01:26 even rows or odd rows so as you see
01:30 there are a ton of options here within
01:33 components to really hone in and target
01:38 a specific foundation six component now
01:42 if you wanted to limit this for example
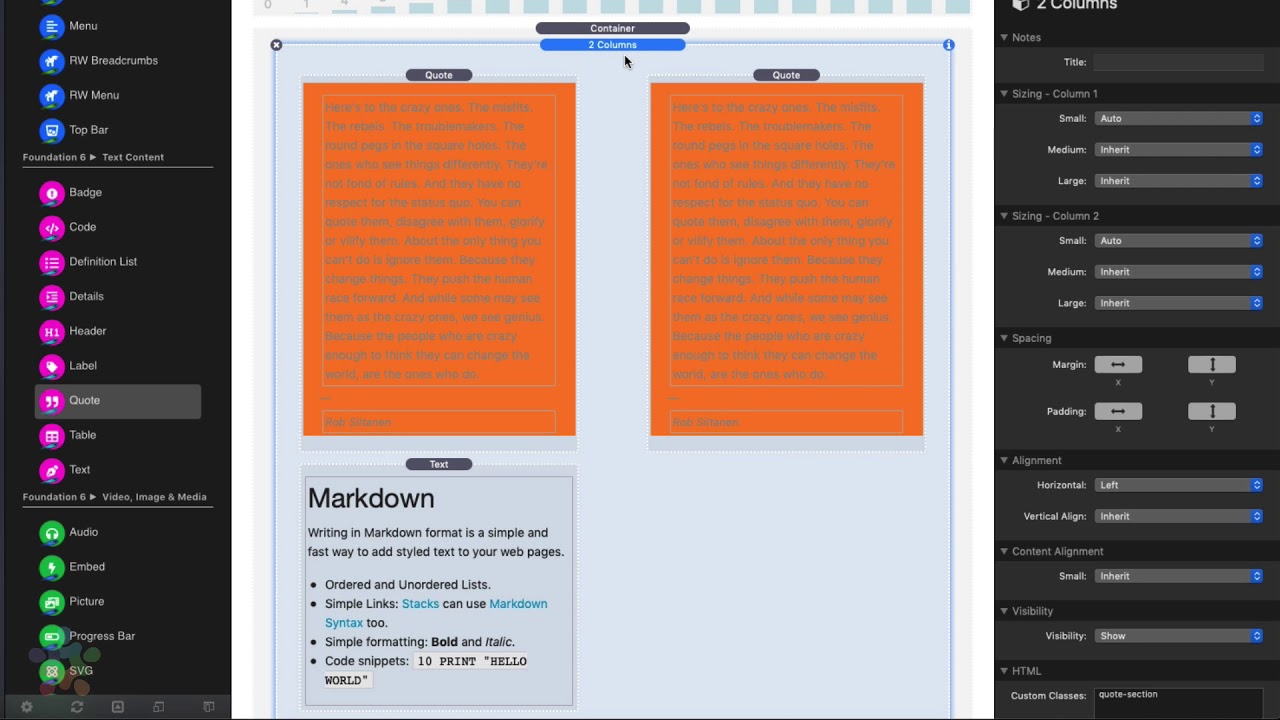
01:44 let's take a block quote for example
01:48 if we wanted to limit a blockquote to a
01:51 particular section we can do that as
01:53 well and that's where this parent class
01:55 comes in so I've added a block quote
01:59 here and let's say inside I wanted to
02:03 style this block quote and we wanted to
02:05 do a orange background okay that looks
02:11 horrible but bear with me let's say I
02:15 wanted to target this quote but not this
02:17 quote okay what I could do is I'm gonna
02:21 put a parent class of I don't know I'm
02:24 gonna call this quote section for lack
02:26 of imagination
02:27 okay so right now what this is gonna say
02:31 is when I have something called quote
02:34 section and all block quotes inside
02:36 quote section are going to be have an
02:39 orange background so now if I add a
02:44 class to this two column right if I do
02:48 quote - section here what you'll notice
02:52 is this quote since it's inside of a
02:57 quote section it is getting that style
03:00 but since this quote is not it's not
03:03 getting this style but what you'll
03:05 notice is if I immediately drag this in
03:07 there it then gets that particular style
03:10 all right so that's how we can use these
03:12 components and use the parent class
03:14 along with them to really hone down and
03:18 target in you know precisely qualify
03:22 what our styles is select our style
03:26 now the next mode in here is called CSS
03:28 selector and this is for the real
03:30 Cowboys out there because this is an
03:33 actual CSS selector so this you have to
03:36 actually know your CSS selector I have
03:40 videos on how to find that out if you're
03:42 familiar with a dev inspector but if you
03:45 are a cowboy you can go ahead and type
03:47 in your own CSS selector in here and
03:49 these Styles will be applied to to that
03:54 now below the modes you'll notice that
03:57 there is an on state and this has a lot
04:00 of use cases here um but the primary use
04:03 case is going to be here for hover
04:04 elements make sure you check out our
04:06 tutorial on how to use hover States
04:09 um and apply specific styles on hover
04:12 we're not gonna go that into that in
04:15 this particular video but we do have a
04:17 video on hover and but there are a lot
04:19 of other styles in here such as if you
04:22 wanted to maybe style every other thing
04:25 or style a the first element of
04:27 something right these are kind of more
04:29 advanced use cases you know if you want
04:32 to target all required form fields or
04:35 something like that you can do that so
04:37 these are kind of very edge case
04:39 scenarios hover is going to be the
04:41 biggest use case here
04:45 now next thing here is what a breakpoint
04:47 and this is for if you want to apply
04:48 particular styles to a specific
04:51 breakpoint right so maybe a background
04:54 this doesn't make much sense but if we
04:57 were to do padding or text size or
04:59 something you know maybe you will only
05:00 wanted to apply that particular style
05:02 you know margins and padding are
05:04 probably a big one where you only wanted
05:06 to apply that style to a particular
05:08 device right so only small devices or
05:11 you wanted to apply this style to only
05:13 small and medium devices right or large
05:15 only um so this is really powerful it
05:19 allows you to really customize where
05:21 those Styles are being applied now you
05:25 might notice that inside the font
05:27 swatches we do have a few other options
05:31 available as on top of the ones we just
05:33 discussed and these are the give you the
05:35 ability to have page wide elements right
05:38 so if you want to apply styles to all
05:40 paragraph elements or all h1 or h2 tags
05:43 and we have some convenient buttons here
05:45 specific to fonts that we felt were
05:49 easier to add these directly to font
05:52 styles right now if you wanted to apply
05:55 these will give you maybe a little a
05:58 little tip here let's say we wanted to
06:00 use some of those Styles inside the
06:03 normal swatches so let's say I wanted to
06:06 apply this to all paragraph tags I could
06:09 just simply put a P in here in the
06:11 custom selector and guess what this
06:14 swatch will now be applied to all
06:16 paragraph elements we want to apply all
06:19 h3 elements inside the custom selector
06:22 just put h3 now you can do more so if I
06:26 do comma H for comma h5 I can do
06:31 multiple if you notice it actually
06:32 applied those styles to some of these
06:34 because I believe these are h4 s right
06:36 here in edit mode so it'll you know you
06:38 can apply styles on you know to all of a
06:42 particular type of element using this
06:44 custom selector just by typing in the
06:47 elements here there's a little bit of
06:49 custom CSS for you I hope you enjoyed
06:51 this video go out and make something
06:53 right
07:00 "}]
Search the page
0
