About Stacks Guru
Stacks Guru is born from the need to search the vast number of videos out there on stacks built for Stacks Pro and the Stacks 5 plugin for Rapidweaver.
We have scraped over 500 videos to get the transcripts for each in order to make the spoken word searchable.
Please use this free tool to help you learn and discover the awesome power that Stacks and the stacks made for Stacks have to offer.
Stacks Guru
Video Reference
Traffic Control - Getting Started
07/28/2022
For more information about feeds, head over to https://www.weavers.space/stacks/traf...For more information about feeds, head over to https://www.weavers.space/stacks/traf... Key moments View all Page Setup Page Setup 0:39 Page Setup 0:39 Http Method Http Method 2:51 Http Method 2:51 Redirects Redirects 3:33 Redirects 3:33 Destination Destination 4:03 Destination 4:03 Route Expiration Route Expiration 4:58 Route Expiration 4:58 Featured playlist 6 videos Traffic Control Weaver's Space by Joe Workman
Transcript
00:09 so let's dive in and see how to00:10 implement traffic control here we have
00:12 the traffic control demo file that ships
00:15 with traffic control
00:17 i have a dummy home page here just to
00:19 show you that you're not going to put
00:20 router anywhere on any other home page
00:24 now if we look at the router page this
00:27 is what we need
00:29 so we're gonna have a dedicated page
00:31 just for traffic control
00:33 now you'll see the implementation steps
00:35 directly in the traffic control stack
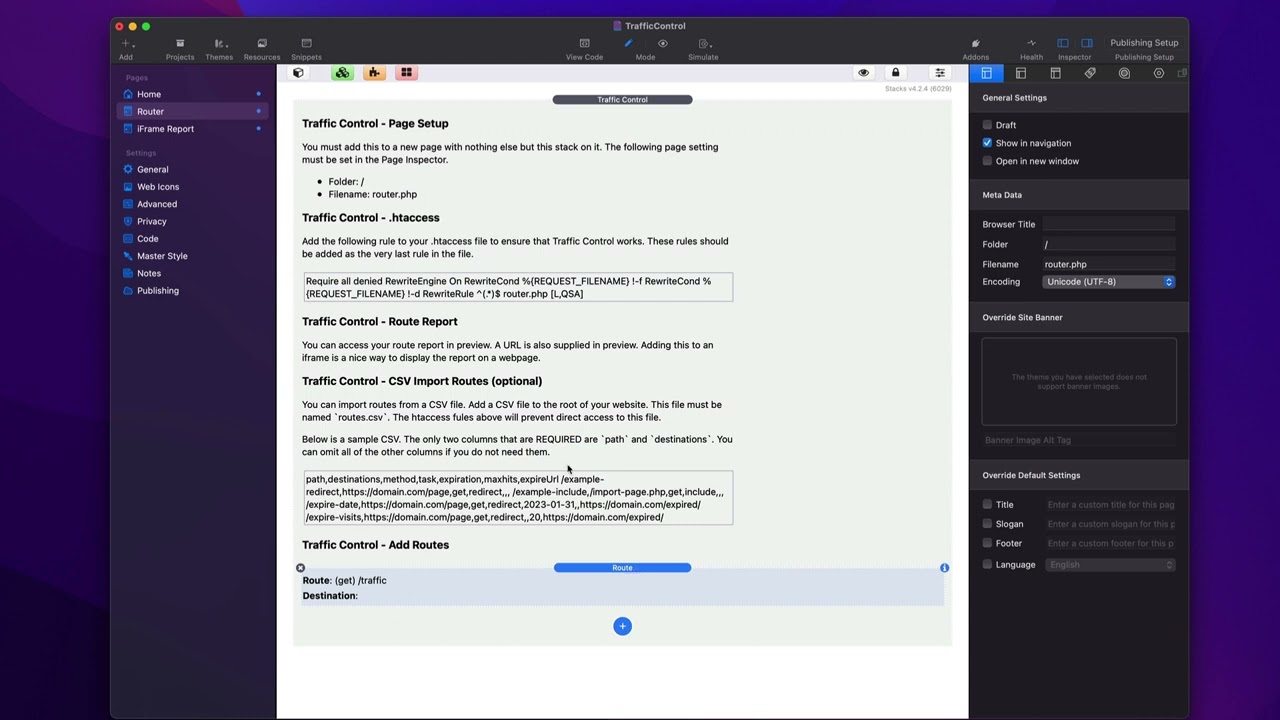
00:38 and first up is the page setup
00:41 in order to get traffic control we have
00:43 to name our folder slash and the file
00:46 name has to be router.php
00:50 at this time there is no other supported
00:52 configuration for this
00:54 next is you need to
00:56 add a couple lines into your htaccess
00:59 file
01:00 so here i already have this snippet
01:02 already set up for you all you need to
01:04 do is copy this and paste it at the very
01:07 end of your ht access file
01:10 so my favorite way to edit the htaccess
01:12 file is simply go through your favorite
01:13 ftp app so you're going to open up this
01:16 htaccess in your favor text editor and
01:19 basically what you're going to do is
01:19 you're going to paste that snippet at
01:21 the very end this needs to be the very
01:24 last rule in your htaccess file it could
01:27 be many conflicts if you put it before
01:29 and it could break some other
01:30 configurations so make sure that this is
01:32 the very last thing inside your htaccess
01:36 file
01:37 now inside the traffic control stack
01:38 there's two important settings the first
01:41 is your 404 page
01:43 so you should create a 404 page on your
01:46 website and this is important for if
01:49 traffic control cannot find a url
01:53 within your routes it will redirect all
01:56 of those to your 404 page
02:00 next is the report key this is very
02:02 important for security of your route
02:05 report
02:06 make sure you check out the video that
02:07 we have on uh traffic controls reporting
02:10 capabilities uh for more information
02:12 about that
02:14 then all you need to do is configure the
02:16 routes that you want
02:17 publish and you're done now we'll have a
02:20 different uh video on how to import
02:22 routes via a csv file so make sure you
02:24 check that if that's something you might
02:25 want to do
02:27 so now let's dive into the individual
02:29 route configurations
02:31 at the very top
02:33 you define your actual route this is the
02:36 the actual path that you will put in the
02:38 url
02:40 so for this example i have slash traffic
02:44 so when i go to mydomain.com
02:46 traffic this will trigger this route
02:50 now for the http method um you're
02:54 probably going to want to set this to
02:55 get like 99.9
92:57 of the time if you know what an http
03:00 method is
03:01 then you'll know when and when not to
03:04 use this okay but a vast majority of the
03:06 time you're going to want to set this to
03:08 get
03:10 next is you're going to set up your
03:11 destination now first is going to be
03:13 your task
03:15 and by most time you're going to want to
03:17 redirect because you want to hit this
03:18 url and then that's going to redirect
03:21 you to a different url
03:23 but you can also import
03:26 so for
03:27 information on importing pages make sure
03:29 you check out our video on imports
03:33 so for redirects there are multiple
03:34 types of redirects you can do 301 30
23:37 and 307 so
03:39 if you you know want to actually do
03:42 let's say you're reorganizing your
03:44 website and you've moved the url here's
03:46 the old url and you want to redirect
03:48 that to the new url and that's a
03:50 permanent change you probably want to
03:52 change that to 301 okay um and if it's
03:55 just a temporary thing you can set that
03:57 to be a 307 temporary redirect as well
04:03 next is your destination now most time
04:05 you're probably going to only set one
04:07 destination
04:08 and this will be a url whether that is a
04:11 url on your website or a url on a
04:14 completely external domain
04:17 but you can supply more than one
04:20 when you supply more than one
04:22 destination
04:23 this turns traffic control this route
04:26 into a very powerful a b testing tool
04:29 because it will dynamically pick
04:32 one of the routes that you supply
04:35 to redirect to
04:37 let's say for example i want to test two
04:38 different landing pages
04:40 and with my analytics on there i can
04:42 test whether or not someone's clicking
04:43 on this button versus this button um
04:46 right and so
04:48 this allows you to redirect users to two
04:51 different tools all with the same
04:54 url and last but not least
04:57 we have the route expiration
05:00 and you can either expire by date
05:03 by number of visits
05:05 or number of visits per a time period
05:09 now you can use these in conjunction
05:11 with each other or just enable one
05:13 so for example if i have all three
05:16 enabled probably doesn't make sense
05:17 you're probably either going to have
05:18 visits or per days set it's either one
05:21 or the other there right
05:22 so you can say i want to have um
05:26 it's going to expire on july 26th or
05:30 after 10 visits
05:32 okay
05:33 and the per days is going to be let's
05:35 say i want to expire this
05:38 10 times per day so
05:40 every day essentially the count resets
05:43 or you can say every if we set this to
75:46 it'll be
05:47 10 visits per week
05:49 right so this allows you to do a certain
05:51 number of visits
05:53 per a particular number of days
05:56 now by default if a route has expired it
06:00 will actually the user will get passed
06:01 to the 404 page
06:03 but we also give you the ability to
06:06 redirect to a you are a different url
06:10 when the route has expired maybe you
06:12 want to say hey check back tomorrow um
06:16 for your chance to win or something like
06:18 that right maybe the url is to win some
06:20 contest or to enter right
06:22 and so if you do you know 20 entries per
06:25 day
06:26 um this can allow you to say hey this
06:29 expired um come back tomorrow or
06:31 something like that right so this gives
06:33 you the ability a little bit more
06:34 flexibility so when a route has expired
06:37 um you can redirect that to a particular
06:40 url
06:41 now lastly you can just add as many
06:43 routes as you want
06:45 and when you add your route you go ahead
06:47 and publish and those routes will be
06:50 immediately available on your website
07:02 you"}]
Search the page
0
