About Stacks Guru
Stacks Guru is born from the need to search the vast number of videos out there on stacks built for Stacks Pro and the Stacks 5 plugin for Rapidweaver.
We have scraped over 500 videos to get the transcripts for each in order to make the spoken word searchable.
Please use this free tool to help you learn and discover the awesome power that Stacks and the stacks made for Stacks have to offer.
Stacks Guru
Video Reference
Using Block Grid in Foundation 6 Stacks
01/28/2020
Transcript
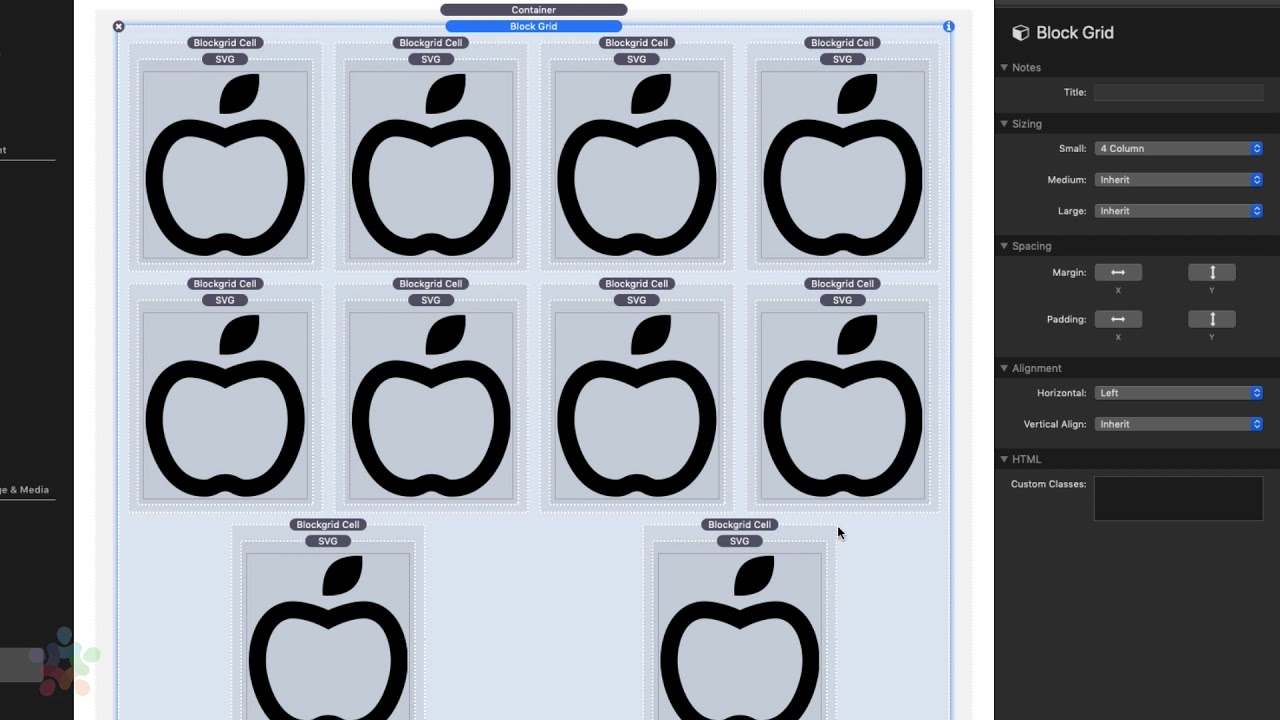
00:09 so block grids are really useful when we00:12 want to create basically grids of things
00:15 they're not really columns because they
00:18 behave a little bit differently and I'll
00:20 show you an example so here I've just
00:22 quickly built out a grid of SVG's and
00:26 simply add a new grid cell you just
00:29 click on the plus button or you can just
00:31 copy paste existing grid cells now if we
00:34 go to the main block grid settings here
00:36 we'll notice that we have the sizing is
00:39 very similar to the columns where you
00:43 can you can define how many items you
00:46 want within a row so this allows us to
00:51 say you know by default I want five if I
00:54 wanted for what that does is that evenly
00:56 spaces out so I have four items in every
01:00 single row and what you'll notice is it
01:03 actually has some interesting alignment
01:05 options down here on the bottom and then
01:07 you can also you can also obviously
01:09 customize that based on the size so if
01:12 on small I wanted it for wide medium I
01:15 wanted six and large you wanted eight
01:17 you could definitely do that okay um and
01:20 then also for these you can add margins
01:22 and padding's to every single grid cell
01:24 as well now the alignment options are
01:26 very interesting now you won't see it
01:28 here in edit mode in edit mode they're
01:30 always going to be kind of centered and
01:31 the last two the trailing ones you'll
01:34 notice they're kind of justified um and
01:36 that's just a limitation of this layout
01:39 in edit mode but if we preview this you
01:41 will notice that the horizontal was set
01:42 to left so what you notice is because
01:45 the horizontal alignment is set to left
01:48 the trailing items the grid cells are
01:51 actually aligned to the left and we can
01:53 change that we have full control so we
01:55 can Center them so it essentially means
01:57 they're now in the centered we can align
02:00 them to the right we can justify them
02:02 which means one on each side and then we
02:05 can evenly space them out which is this
02:07 is the layout that we're seeing inside
02:09 edit mode okay so there's a lot of
02:11 really great things I know a lot of
02:13 people wanted
02:14 centered option and it's really awesome
02:16 um you'll notice that all the trailing
02:18 ones even if we add one we did one that
02:23 one would be centered as well now the
02:25 vertical alignment is good when you're
02:27 when you're block grid cells have
02:29 different size content so for example
02:32 here in this particular cell I actually
02:34 made it so there was two in here um so
02:37 if we go ahead and say middle here what
02:40 you'll notice is when we've preview this
02:42 page um the content is aligned to the
02:45 middle right um so that's really nice
02:47 it's very convenient especially for you
02:49 doing like you know maybe in a collage
02:51 of images and you want to make sure all
02:53 those images are aligned to the middle
02:55 this is a really great way to do that
02:57 now if we look at the individual block
03:00 grid cells you'll notice that we have a
03:02 visibility setting here this is really
03:04 convenient cuz maybe on mobile you don't
03:07 want to display everything right so um
03:09 maybe on mobile you want to
03:11 items or um you want to hide some things
03:14 so that it doesn't take up so much space
03:15 we can now easily do that because the
03:18 visibility is integrated directly inside
03:21 each block grid cell and of course we
03:24 have classes here that you can integrate
03:25 with any swatch
03:33 "}]
Search the page
0
