About Stacks Guru
Stacks Guru is born from the need to search the vast number of videos out there on stacks built for Stacks Pro and the Stacks 5 plugin for Rapidweaver.
We have scraped over 500 videos to get the transcripts for each in order to make the spoken word searchable.
Please use this free tool to help you learn and discover the awesome power that Stacks and the stacks made for Stacks have to offer.
Stacks Guru
Video Reference
Amazing web borders using Jack for RapidWeaver
01/27/2015
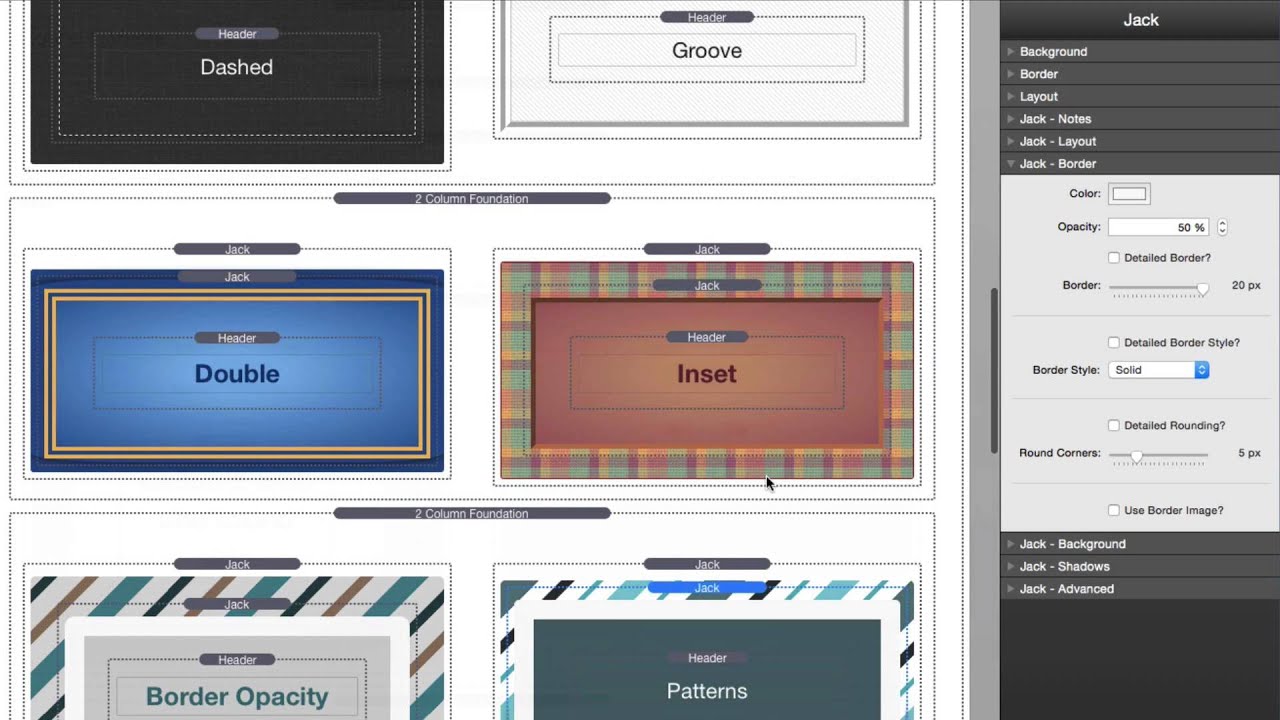
Jack Product Page: http://joeworkman.net/rapidweaver/sta... Jack is a very powerful tool to have inside your RapidWeaver toolbox. This video reviews all of the way that you can use Jack to help you use border to really make a difference in your webpages. You never knew borders could be so cool! Be sure to check out the other video tutorials on all the other things that we can do with Jack.Jack Product Page: http://joeworkman.net/rapidweaver/sta... Jack is a very powerful tool to have inside your RapidWeaver toolbox.
Transcript
00:06 hey so I assume you've watched the jack00:09 overview video and in this video we're
00:12 going to go over all of the awesome
00:14 things you can do with Jack borders so
00:16 without further ado let's go ahead and
00:18 jump on in on that okay so here we are
00:22 inside the borders page inside the jack
00:25 demo project which you can get anywhere
00:29 you want on my doc portal on the disk
00:31 image where you originally purchase jack
00:32 okay so the first thing we're going to
00:35 look at is border styles and there are
00:39 eight default border styles that you can
00:41 configure with Jack okay and they're
00:44 really easy to give figure the border
00:47 style option is directly in the middle
00:49 of the border section where you can
00:51 obviously set one of any of these border
00:54 styles now if you really wanted to get
00:57 crazy you can actually do a detail
00:59 border style and actually have different
01:01 styles for each side of the stack this
01:05 could be interesting maybe if you wanted
01:07 like a you know solid borders on the top
01:09 and bottom and maybe dashed on the sides
01:12 I don't know I can't think of a good use
01:14 case for it but I'm sure some people
01:16 will think of one now towards the top
01:20 obviously you can configure the color of
01:21 that the opacity of the border and then
01:25 the border size okay um and just as with
01:29 the border style you can do a detailed
01:31 border size and then you can choose the
01:34 size for each top bottom left and right
01:36 now you can even do a little bit further
01:39 and use some responsive sizing as well
01:41 so you can try doing you know a rem
01:44 border where it will actually be a
01:46 little bit smaller on mobile than it
01:48 will be on desktop right so you can play
01:52 around with those to see if it gets the
01:54 effect that you're looking for now with
01:59 transparent borders I kind of recommend
02:02 I personally feel that solid borders
02:05 really make the best transparent borders
02:07 now if we look at these examples here
02:09 that I've built you'll notice that I've
02:11 done a few things so
02:13 for this kind of this stitched look on
02:15 this particular example I have to jack
02:18 stacks I have one that has a background
02:20 um that I added some padding to and then
02:23 I have a second one that actually has
02:26 the stitched around it that has no
02:29 background so this is how we can
02:31 actually get kind of that you know
02:32 fabric stitch look where we have a
02:34 background and then further in inside
02:37 where the borders are all the way on the
02:39 outside um you know we have a nice
02:41 border look uh so that's accomplished by
02:44 layering multiple jacks and we'll see
02:48 similar effects that we've gotten here
02:50 like in the this inset example here it
02:53 kind of looks great if I have the inset
02:57 on top of something where it actually we
03:00 notice that this inner jack stack looks
03:02 like it's in set inside the other one
03:05 right in this example with the double
03:08 its allows us to actually have some
03:12 color definition inside of the double
03:16 border when we have a constant content
03:20 behind it right otherwise it the color
03:23 of whatever's behind it is going to
03:25 bleed through in this example it's kind
03:30 of hard to see in edit mode well notice
03:32 that we um you know we can have a
03:34 pattern border and it's a little it's a
03:38 little fib right it's not really adding
03:40 a pattern to the border but what it's
03:43 doing is we have a jack stack in the
03:46 background that has zero padding and
03:48 margins with a background then we have a
03:51 jack stack inside of it that has
03:53 transparent borders that and then
03:57 because the borders are transparent on
03:58 the inner jack stack the background is
04:01 bleeding through on just the borders
04:04 because the background inside the inner
04:06 jack stack is a hundred percent opaque
04:10 so as you see if you play around with
04:13 layering Jack's um you can really get
04:16 some great effects now next up is
04:20 rounding corners now the easy
04:23 implementation of this is just to set
04:24 rounded corners to a particular
04:26 percentage or pixels and then it just
04:29 gets nice smooth round corners right but
04:33 we can do some more elaborate things
04:35 here and if we look at this particular
04:37 stack we notice that the left side
04:41 doesn't have any rounded corners but the
04:44 right side does and this is accomplished
04:48 by using the detailed rounding and
04:51 allows us to actually define a pixel
04:56 width or you know we're doing a hundred
04:58 percent pixel radius on both the top
05:01 right and the bottom right corner now
05:05 you also know is that we allow different
05:08 percentages and these are useful for
05:10 creating circles and other shapes if you
05:15 want to have a jack with a circle
05:17 essentially what you want to do is you
05:20 want to set the percentage rounding to
05:23 fifty percent on all sides this alone
05:27 will not give you a circle you're
05:29 actually also going to have to make sure
05:31 that you inside your jack layout
05:35 settings set the height proportional to
05:38 be one to one because you have to have a
05:41 square and then when you round the
05:45 corners you then get a circle if you
05:48 don't do the proportional basically
05:50 you'll end up with a pillbox so in this
05:53 example here I have 50 pixel a border
05:58 radius set and then I don't have any
06:01 sort of width or height constraints so
06:03 it's just it's going to remain a
06:04 rectangle and then i have my my rounded
06:08 corners around it now if you want to get
06:11 crazy you can even go a little bit
06:12 farther and then do kind of unique
06:14 shapes we're here i'm using a percentage
06:17 with with thirty percent on the top left
06:22 or top right and bottom left and then
06:25 the top left and bottom right are three
06:28 percent so we get this you know unique
06:30 shape now the last feature here for
06:33 borders is something that is really
06:36 amazing it is Jack's responsive frames
06:40 and basically what this is is it allows
06:43 you to define an image that will be
06:45 scaled around your content and as the
06:49 browser's resized the actual frame will
06:52 respond with your content so if we if we
06:57 look at this example here will notice
06:59 that as I shrunk my browser down oops
07:03 the frames do change to respond to the
07:09 content so that looks great from mobile
07:13 all the way up to desktop now Jack ships
07:16 with over 50 frames that you can use and
07:19 this frame gallery page is a great
07:22 reference to actually see exactly which
07:25 frame you might want to use for your
07:27 project and what's great is all of these
07:29 are number coded and they match the
07:32 actual frame number that is inside the
07:35 stacks library and let's look a little
07:38 bit on how we implement these frames so
07:41 let's look at this example here will
07:44 notice that I turned on border image I
07:47 dragged my border image inside of here I
07:50 set the crop size and then I set the
07:53 repeat but what does all this mean so
07:58 the third button on the stacks a toolbar
08:02 is your media library and when you open
08:05 this you notice that Jack has a bunch of
08:08 groups for Jack frames and tiles in this
08:15 particular example we used this frame
08:18 Art Deco number seven and what's great
08:22 is when you highlight this all you need
08:24 to do is drag and drop into the stacks
08:27 image setting but there is another
08:31 important piece of information here if
08:34 we look at the name of this frame will
08:37 notice that it has cropped 120 inside of
08:41 the image name that is the suggested
08:45 crop size for this particular frame if
08:49 we look at a different frame will notice
08:52 that it has a
08:53 recommended crop size so for this
08:56 particular frame it read it recommended
08:59 a crop size of 120 now based on the
09:03 frame you're going to want to play
09:04 around with the repeat option to see
09:07 which one will look actually better for
09:09 your particular frame some frames it
09:12 doesn't matter and some it will
09:15 drastically change the look of that
09:18 particular frame so that is all that I
09:21 have about Jack borders right you think
09:24 borders are just boring they're just
09:25 solid things around your content but no
09:28 you can really make some amazing
09:31 differences in your layouts just by
09:33 tweaking the borders and of course the
09:37 border opacity is an amazing feature
09:38 that will make you a hipster so and then
09:44 responsive image frames I mean those are
09:46 really great it's a great way to add an
09:49 accent of you know to your site that not
09:53 a lot of people use mostly because it's
09:55 it's not an easy thing to implement so
09:58 many many people don't actually use
10:00 border images and Jack makes it really
10:04 simple for you so thank you very much I
10:07 hope you enjoy Jack I hope you're really
10:09 using it to its fullest to make your
10:12 site's stronger more stylish and just
10:15 better so thank you very much everybody
10:17 I hope you have a great day and take
10:19 care bye
10:25 you"}]
Search the page
0
