About Stacks Guru
Stacks Guru is born from the need to search the vast number of videos out there on stacks built for Stacks Pro and the Stacks 5 plugin for Rapidweaver.
We have scraped over 500 videos to get the transcripts for each in order to make the spoken word searchable.
Please use this free tool to help you learn and discover the awesome power that Stacks and the stacks made for Stacks have to offer.
Stacks Guru
Video Reference
Backgrounds in Jack for RapidWeaver
01/28/2015
Jack Product Page: http://joeworkman.net/rapidweaver/sta... Jack is a very powerful tool to have inside your RapidWeaver toolbox. This video reviews everything that you can do with backgrounds inside the Jack stack. Be sure to check out the other video tutorials on all the other things that we can do with Jack.Jack Product Page: http://joeworkman.net/rapidweaver/sta... Jack is a very powerful tool to have inside your RapidWeaver toolbox.
Transcript
00:06 Hey00:07 so in this video we're gonna be going
00:09 over Jack backgrounds now chances are
00:12 you've watched a couple Jack videos
00:14 already probably the jack overview maybe
00:17 the jack layout video and this one is
00:20 gonna go over all the amazing
00:21 backgrounds so background gradients
00:25 background images fixed backgrounds all
00:27 that really cool stuff so without
00:30 further ado we got lots of stuff to do
00:32 so let's jump on in so here we are in
00:35 the demo file for Jack and we are on the
00:39 backgrounds page now this file is
00:41 available for download all the time from
00:43 our documentation portal on the Jack
00:45 dock page and you can also get it from
00:48 the disk image that you downloaded for
00:50 Jack now Jack allows you to have
00:53 multiple different background types you
00:56 can have no image images solid colors
01:00 and gradients and we're gonna go over
01:03 all of these in this video right now
01:06 we're gonna focus on solid color now
01:08 every stack can have a solid color
01:10 background but Jack allows you to add an
01:12 opacity which really gives you some
01:15 great options for layouts in this
01:18 particular example here I have a nice
01:20 stylish kind of blueprint background and
01:23 in order to make the text legible I
01:25 added a another Jack stack with a white
01:29 transparent overlay on top of the
01:31 background if we didn't have this the
01:34 text that's inside this particular
01:36 example would be a lot less illegible
01:39 right you wouldn't be or it would be
01:41 illegible because you wouldn't be able
01:43 to read it but by adding a transparent
01:45 overlay on top it makes the text much
01:49 more readable so now let's jump into
01:52 background images with Jack and there
01:55 are a lot of things that you can do with
01:58 background images in Jack so let's look
02:01 at each one of these examples here on
02:02 this page and see exactly what they do
02:05 and how we've accomplished them now by
02:09 default like any other stack can do you
02:12 can add a tile
02:13 image now you'll notice first in these
02:17 inside the jacks settings that we have a
02:19 mobile image and a large image option
02:23 what this means is that when you add a
02:27 mobile image that image will be used on
02:29 mobile desktop and tablet devices
02:34 however when you add a large image the
02:37 mobile image will only be used for
02:39 mobile now and the large image will be
02:42 used for tablet and desktop so a lot of
02:46 times what you'll want to do is you'll
02:47 want to add a lower resolution image to
02:50 mobile and a higher resolution
02:51 background image to the large option now
02:56 for tiled images this doesn't really
02:58 make sense because they're normally so
03:00 small anyway in size that you'll just
03:03 define the mobile version and then and
03:05 then Jack will use that same exact image
03:08 for all devices now for background
03:12 images you can also warehouse images so
03:14 if you don't want to drag and drop an
03:16 image here maybe you have an image that
03:18 you want to use throughout a lot of
03:20 various jack stacks and you want to
03:22 leverage browser caching you can
03:24 definitely warehouse your image and then
03:26 provide URLs to the background image so
03:30 let's look at the tiled image options so
03:33 image size we have set to auto and then
03:36 image repeat as normal we have
03:38 horizontal and vertical image repeat but
03:43 if you only wanted to do if you wanted
03:45 to be no-repeat you want to be static or
03:47 you wanted to repeat only horizontally
03:50 or repeat only vertically you can
03:52 definitely do that now for tiled images
03:55 the position doesn't really matter if
03:59 you notice as you swim swapping through
04:00 these options the image background is
04:03 actually shifting a little bit but
04:06 really for tiled images it doesn't
04:08 really make sense for configuring a
04:11 background position it doesn't yeah it
04:14 shifts the image a little bit but not
04:16 long now if we look at this example
04:18 directly below it this is where we're
04:21 actually using horizontal repeats so in
04:26 this particular in
04:27 we're only repeating this particular
04:29 tile horizontally and then we want the
04:33 position to be the left top now let's
04:37 say we wanted to repeat this down the
04:39 side of the jack stack we can go ahead
04:42 and say we want to repeat it vertically
04:44 and then we want it to go on the left
04:47 top but maybe we wanted it to be on the
04:49 right top and then it will start
04:52 repeating the image from the right top
04:54 and down now if you are only going to be
04:58 repeating an image vertically or
05:00 horizontally chances are you gonna want
05:03 to make sure that you define a fallback
05:04 color and this is gonna be the color
05:07 that Jack uses for the rest of the stack
05:10 that doesn't have the background image
05:12 you know shown the next option here is
05:16 for using image size of cover so if you
05:21 set your image size to cover Jack well
05:24 the background image will actually be
05:25 scaled to cover the entire background of
05:29 Jack now image repeat and position don't
05:34 really make sense for cover images
05:36 they're kind of ignored so those
05:38 particular settings aren't really needed
05:40 now in this example we'll notice that I
05:43 defined different images for mobile and
05:45 large you know devices this was really
05:50 to show you that the image is actually
05:52 changing as you look at it from
05:55 different browsers but in reality your
05:57 going to be using the same image in both
05:59 but the mobile version will just be a
06:02 scaled-down version so that it loads
06:05 faster on mobile devices now if we look
06:08 at this second example of cover we'll
06:10 notice that it has a scroll behavior set
06:13 to fixed position instead of the default
06:17 which is scroll with content now when
06:20 you set the scroll behavior to fixed
06:22 position you'll notice as I scroll even
06:25 in edit mode as I scroll up and down the
06:28 page the image background is fixed to
06:31 the browser and the jack content simply
06:34 Scrolls on top of it this is how we can
06:39 achieve the parallax effects
06:41 like in our full page height the example
06:43 where we have these sections of the page
06:47 where the content Scrolls over a fixed
06:50 background now I want to take this time
06:53 to go over the background origin now
06:56 this option is not only for background
07:00 images but it's for solid colors for
07:02 gradients it's for all backgrounds
07:04 however I want to show you an example of
07:06 exactly what that means here we have the
07:09 option of setting the origin of the
07:11 background to be at the padding box the
07:14 border box or the content box so if we
07:19 look at this at this particular example
07:21 of Jack I've added a 20 pixel border now
07:24 I've also added a 20 percent opacity to
07:27 it that we'll see once we look at
07:28 preview now what we're going to be
07:31 explaining here is the CSS box model now
07:35 I've done an entire Weaver cast podcast
07:37 show on this so you may want to check
07:39 out that video but let's review it again
07:41 here because it's very pertinent to this
07:44 so I previewed my page and I've opened
07:47 it up inside the Safari dev inspector
07:49 and I'm looking at the box model for
07:53 this particular Jack stack and full
07:57 notice as I hover over these we'll see
08:00 that it has a border of 20 pixels and
08:02 it's being highlighted it has a padding
08:06 of of a percentage okay and then it has
08:10 the content area those are the border
08:16 box padding box and content box that we
08:21 see inside the background origin so when
08:25 I set the background origin to be border
08:28 box what it's going to do is the
08:31 background is going to start at the
08:33 outside edge of the border if I set it
08:37 to padding box it's going to set it to
08:40 the outside edge of the padding box and
08:43 if I set it to the content box the
08:47 background is going to restrict itself
08:49 to to remain inside the content area
08:54 let's see a couple examples right now
08:57 this stack is set to be padding box so
09:02 the background is set to be fully
09:04 enclosed inside the border let's go
09:09 ahead and change this to be border box
09:15 so inside my stack I'm going to say
09:17 origin of border box and if we preview
09:22 our page again we'll notice here that
09:29 the stack looks vastly different because
09:32 the background has extended to the edge
09:35 of the border which the background is
09:40 now bleeding through because I've add a
09:42 20% opacity to the border purely so that
09:46 we can see this in action now if we go
09:49 back to edit mode and change our origin
09:51 to content box this is very apparent
09:54 you'll see it right away on inside edit
09:57 mode that this entire border or padding
10:00 area here is now white because we
10:03 constricted the background of this jack
10:05 stack to the content area this way the
10:11 padding area of the stack is now
10:13 completely transparent and we still have
10:16 a border that is set to a 20% opacity so
10:21 if we preview this we see that now the
10:25 content here area now has the background
10:29 the padding area is fully transparent
10:32 and we still have a border that is set
10:35 to black at an opacity of 20%
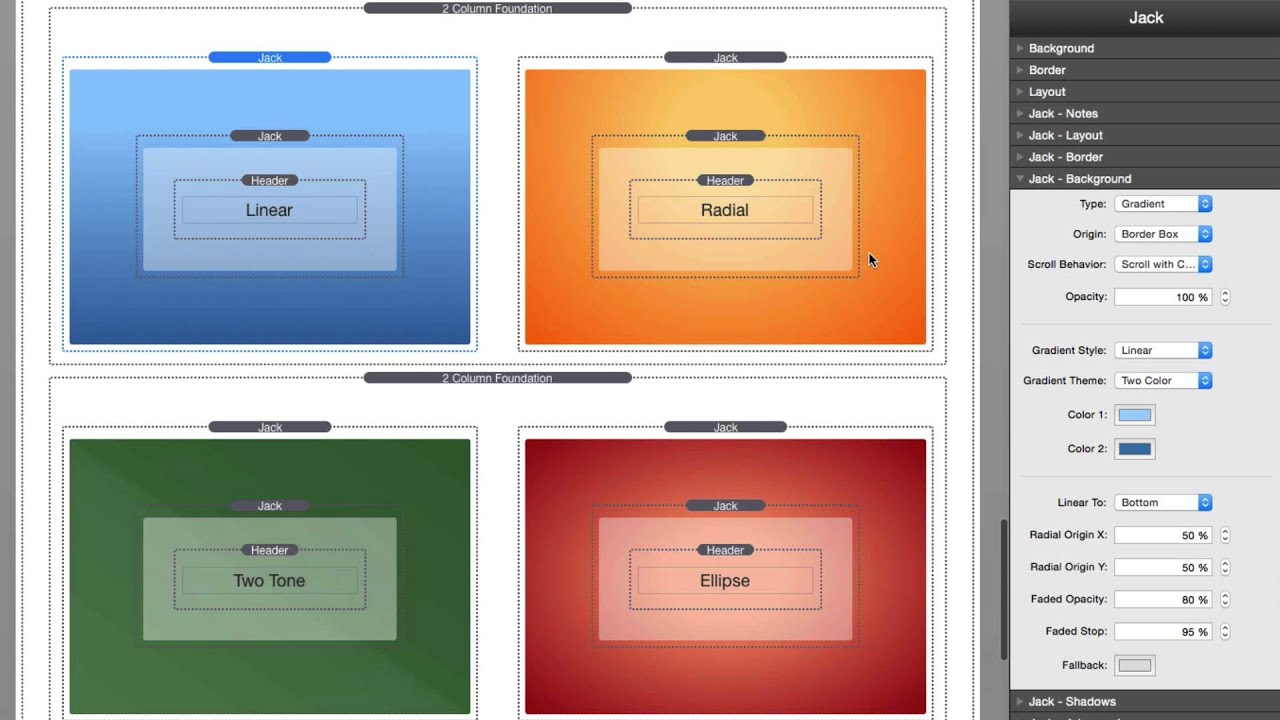
10:38 okay now let's jump into gradient
10:42 backgrounds jack has a lot of really
10:46 advanced controls for some amazing
10:48 gradients let's look at some of them
10:50 here when you set your background type
10:54 to gradient you'll notice you have a a
10:56 lot of new settings show up and these
10:59 allow you to build really good gradients
11:02 for a gradient style we have linear
11:05 search
11:06 any lips and on top of that we have
11:09 gradient themes that I've built into
11:11 Jack for two color themes a simple one
11:14 color which will take the one color one
11:17 color and then you know disperse that
11:20 color across the entire stack we can do
11:24 two tones where um it takes one color
11:28 and then does two variations of it split
11:31 down the middle and last we have a faded
11:35 theme which we'll look at in just a
11:37 little bit but let's go back to the two
11:39 color here
11:43 once you have if you have your gradient
11:45 style set to linear you can do define
11:48 your linear too so the direction that
11:51 your gradient is going from into so is
11:55 it going to the right is it going
11:56 diagonally to the top left is it going
12:00 diagonally to the bottom left okay so
12:04 you can change the actual direction of
12:06 your gradient now remember with
12:09 gradients you can also use the
12:10 background opacity as well so if you
12:13 want to you know have you know maybe a
12:15 background image bleed through from
12:17 another stack through the gradient you
12:20 can do that now if you choose a radial
12:23 gradient you'll notice that we have
12:25 radial origin options and this works for
12:29 both radial circles and radial ellipse
12:32 gradients we can actually define the
12:34 origin of the circle so in this
12:38 particular example if you want it to be
12:40 at the top kind of the top center of the
12:44 kind of the radial gradient to start at
12:46 the top center I said it to be 50% and
12:49 25% now if you wanted to be dead smack
12:52 in the middle you would set it to 50%
12:54 50% and that will the gradient circle
12:58 will start exactly in the middle of the
13:00 jack stack so you can really play with
13:03 the gradients maybe you want it you know
13:04 coming from the top corner or the you
13:06 know to simulate maybe a Sun effect or
13:09 something of that nature right but these
13:13 allow you a lot of flexibility in terms
13:15 of the where to position your radial
13:17 gradients
13:19 now a note about the great faded effect
13:23 that we can I get with Jack now
13:26 unfortunately because of some of the
13:27 code that's used the faded gradient does
13:30 not display inside edit mode but let's
13:34 look at what it does we notice in this
13:37 demo here that I have a background a
13:41 jack stack with a background and then
13:44 that is faded to basically a solid color
13:48 white which in this case actually might
13:51 the background of my site is white so it
13:55 basically allows you a way of doing a
13:57 gradient into nothing or into train what
14:01 looks like into a completely transparent
14:04 layout if we flip that you can actually
14:08 make it look like you have a solid color
14:10 and it's fading into a background
14:13 basically what we're doing here is we're
14:16 taking a single color which is white and
14:19 we're creating a gradient based on the
14:22 opacity so in this second example I'm
14:26 starting with an opacity of 100 and I'm
14:29 fading to an opacity of zero in this
14:34 first example I'm starting with an
14:36 opacity of zero and I'm fading to an
14:38 opacity of 100% so if we look at the
14:42 options here when we set the linear
14:44 great the linear gradient to linear and
14:47 the gradient themed have faded we can
14:50 define the faded opacity okay which
14:54 basically allows me to go to 0% so we'll
14:58 always start at the opacity that the
15:00 background is set to be and then will
15:03 fade to the opacity set here so if we
15:06 wanted to go to 100 to zero we'd set the
15:09 background opacity to 100 and the faded
15:12 opacity to zero but maybe you wanted to
15:14 go from 100 to 50 you can set the
15:17 background opacity to 100 and the faded
15:20 opacity to 50 the faded stop defines the
15:26 actual location where the fade what
15:33 ultimately end up at 0% so in our first
15:36 example when we reach 75% I want the
15:41 background to be at 0% opacity already
15:46 so you want this number to be lower to
15:51 be the the faster your fade is going to
15:53 be to nothing now the last feature of
15:57 Jack backgrounds is the ability to
15:59 animate your background this really
16:04 works amazing with tiled images
16:07 especially and it's really simple to
16:10 turn on all you simply do is inside your
16:13 background settings you check animate
16:15 background you can set the actual
16:18 direction in which the background will
16:20 animate to and then you can choose the
16:23 speed at which the animation happens
16:26 obviously the larger the number the
16:29 slower the animation is going to be now
16:33 I use this in many places on throughout
16:36 the jack demo site and a few of the
16:39 banner images especially the jack
16:40 backgrounds you'll notice that this
16:43 particular background is set to animate
16:46 now a word of caution this background is
16:51 set to be a cover image so it's not a
16:54 tiled image it is a single image that is
16:57 slowly being animated across the page
17:00 now this is a very subtle effect because
17:04 the image isn't you know it's all greens
17:06 it's just you know various you know
17:09 blurs and radiuses of green but you do
17:12 if you pay attention see it animating
17:14 across the screen now a side effect of
17:18 not using a tiled image for your
17:21 animated background is that if you sit
17:23 here long enough you will actually see
17:27 the image get repeated and you'll see
17:30 basically a solid line eventually go
17:33 across the screen now I've made this
17:36 background image big enough and have
17:38 made the animation slow enough so that
17:40 chances are you're not going to be on
17:43 the page long enough to ever see that
17:44 happen
17:46 however it is a risk for not using tiled
17:50 images with animations where this is
17:54 most prevalent is actually in this full
17:56 page height demo where I'm animating
17:59 this nights this nice starry sky
18:01 background and eventually this too since
18:05 it is a fixed image it is not tiled it
18:11 is not a proper tile if we were to watch
18:14 this page long enough we will eventually
18:17 see this image get repeated and you'll
18:20 see the beginning of the image matched
18:23 up with the end of the image and it will
18:25 you know it won't look so great again I
18:28 made a calculated risk that someone is
18:31 probably not going to be sitting on this
18:33 page long enough to ever see that happen
18:36 because I've made the animation so long
18:38 that it would take you quite a few
18:41 minutes probably three or four minutes
18:43 for eventually for you to see the edge
18:45 of that image being animated this is why
18:50 in the jak demo examples here that I
18:53 show in the animate section on the Jacke
18:56 backgrounds page these use official
18:59 titles so there are small images that
19:03 get repeated and since tiles can
19:05 infinitely scale each other you never
19:09 see any sort of break in the background
19:11 so if you can use a tiled image with
19:15 your animations I do recommend that so
19:20 how did I lose you yet that was a lot of
19:23 information right I'm sure you're
19:25 probably gonna have to come back and
19:26 review some of this information because
19:28 there's just so much that you can do
19:29 with jak backgrounds and there's so much
19:32 advanced stuff in there that um you know
19:34 you can learn from and the more again
19:36 the more you use jack the more these
19:39 things are going to become apparent to
19:41 you and you're really going to start
19:43 leveraging Jack to its fullest so I hope
19:47 you enjoy these videos on Jack and how
19:49 to use all of its powerful settings and
19:52 I can't wait to see exactly what you
19:54 build
19:55 Jack so go forth and make your website's
19:58 great and thank you very much for
20:00 joining and watching and being a great
20:02 customer so thanks very much everybody
20:04 bye"}]
Search the page
0
