About Stacks Guru
Stacks Guru is born from the need to search the vast number of videos out there on stacks built for Stacks Pro and the Stacks 5 plugin for Rapidweaver.
We have scraped over 500 videos to get the transcripts for each in order to make the spoken word searchable.
Please use this free tool to help you learn and discover the awesome power that Stacks and the stacks made for Stacks have to offer.
Stacks Guru
Video Reference
Basics of using the Pi Stack for RapidWeaver
01/18/2019
Check out more info about Pi at https://www.weavers.space/rapidweaver... Pi works with your existing favorite form stacks to bring you powerful calculations. You can use these calculations to update page content, augment form data that gets submitted or even use it to apply CSS styles to the page. Pi is the easiest and most powerful formula stack out there.Check out more info about Pi at https://www.weavers.space/rapidweaver...
Transcript
00:00 what does a mathematicians parrot say00:04 ah a polynomial hey everybody
00:13 Joakim in here and in this video we are
00:15 gonna be going over the basics of pi
00:17 right so we're gonna be going over about
00:20 a few of the demos some of the more
00:22 simpler demos that you saw on the PI
00:24 product page so without further ado
00:26 let's jump on in and check it out so
00:29 here we are inside the pi demo project
00:32 that ships with the pi stack and what
00:34 this in this first part of the video
00:35 we're gonna be reviewing a demos 1 2 &
30:39 okay now before i'd start jumping into
00:42 settings and show you how to set
00:43 everything up well let's go just go
00:45 ahead and preview and see exactly what
00:47 these demos do for us so we see in this
00:50 first demo we're taking the number of
00:52 pixels in this number field and we're
00:54 converting them to REM essentially we're
00:56 just dividing it by 16 right so here we
01:00 have if it's 16 pixels we have one REM
01:02 and if we increase that value we'll see
01:04 that PI automatically converts the
01:07 numbers that we want into REM and if
01:09 you've ever used foundation before
01:11 you've probably recognize the REM unit
01:13 it's a responsive sizing unit that is
01:15 used all throughout foundation so this
01:18 is a great little simple demo that
01:20 converts pixels into REM values this
01:24 next demo takes a value from a slider
01:27 okay and as you see as I scroll here all
01:30 the values here will change so this
01:33 first one basically takes the value of
01:35 the slider and multiplies by 3 and then
01:38 the rest of the values here are
01:39 basically rounded versions of that
01:42 number so we have rounding it the
01:44 ceiling floor will dive into what all
01:46 these different values give us but it's
01:48 just great to know that we can derive
01:50 different number of values based off a
01:52 slider as well
01:53 the third demo that we're going to be
01:55 looking at in the first part of this
01:57 video is demo 3 and this is a simple way
02:00 of defining a radius of a circle and
02:02 here we find the perimeter and the area
02:05 of a circle and we see the the actual
02:08 formulas that we use over here so this
02:11 common mathematical you know geometry
02:13 where we can find the perimeter and
02:15 areas of a circle
02:17 just by defining a radius I just want to
02:20 take a quick break out here something I
02:23 should have mentioned is that in this
02:25 demo we're gonna be using all foundation
02:28 form stacks now pi doesn't require a
02:31 foundation it will work with any form
02:33 stack out there at least it should right
02:36 we tested it with forms plus and with
02:38 form snap works a treat okay but for
02:42 this demo we're gonna be using
02:43 foundation forms now pi doesn't ship
02:46 with its own forms at all it you have to
02:48 use it with an existing form solution
02:50 right so all throughout these demos
02:53 we're going to be using the foundation
02:56 forms so if you're familiar with those
02:59 great if not you can use your favorite
03:02 form stack and PI should work
03:04 identically um just with your favorite
03:07 form stack so let's jump back in and
03:09 finish these demos and I hope you enjoy
03:12 pi okay now throughout the PI demo
03:15 you'll notice that one thing we've done
03:18 is we've added a pen stack into the demo
03:21 and this is a free stack that I released
03:23 last year and it's a great way of just
03:25 adding notes for you in edit mode so if
03:28 you don't have this stack go to my
03:30 website download it for free and it's
03:32 just a great way of displaying notes and
03:35 we added notes for every single demo
03:37 that kind of explains about that demo
03:41 and some unique things about it so if
03:44 you're perusing through the demo file
03:45 this pen stack is a great way of seeing
03:48 notes and things about the particular
03:51 demo that you're looking at so one first
03:54 thing we'll notice with PI is that I
03:55 have it inside of a form stack now you
03:59 don't need to have pi inside of a form
04:01 however in this particular demo here or
04:05 this page I have a lot a lot of Pi
04:08 instances right so it is pi is a lot
04:12 more performant when you have it inside
04:15 of a form stack reason being is pi
04:18 watches for various changes in elements
04:23 within the page now if you have it
04:26 within a form it only watches the form
04:29 elements within that
04:31 however if you have pie outside of a
04:34 forum it will look for instances on the
04:37 entire page so just be careful if you
04:40 want to have pie lots of pies on a page
04:43 and maybe that have different formulas
04:45 that do different things you might want
04:47 to encapsulate them inside of a single
04:49 form stack now if we look at this form
04:52 stack this is a foundation form you'll
04:54 notice that I turned off everything
04:55 right I have no validation noce emails
04:58 no my sequel it's just a form that does
05:00 essentially nothing right but it's a
05:03 great way of encapsulating pie so that
05:06 you know we don't need it's faster and
05:09 works a little bit better
05:12 so next up we have let's look at the
05:14 details of this demo here we have a
05:17 single number input so this is just a
05:19 normal number input and if we notice I
05:22 give it a field name of pixels okay
05:24 because that's exactly what this does
05:26 right it gives us the pixels that we
05:28 want
05:30 and here's the pie okay so we added pie
05:33 to the page and what we've done here is
05:36 this is in this area here this is where
05:38 you type in your formula so this is what
05:42 I want pie to do and hopefully it's
05:45 pretty self-explanatory if we look at
05:48 the syntax here you'll notice that we're
05:50 using a common kind of mustache syntax
05:52 that you've probably familiar with if
05:54 you used foundation forms or a lot of my
05:56 other stacks use two curly braces and
06:00 then the name of the field that we want
06:03 so if we remember here I in this first
06:05 number stack I gave it a name of pixels
06:08 so here I'm gonna put that pixels name
06:11 inside brackets and pie is gonna take
06:14 the value from that field and insert it
06:16 into my formula then simply I do divided
06:20 by 16 and we're done now Pi will then
06:24 take the value from the number and
06:26 divide it by 1
66:29 now here's the next part how do we then
06:31 use that value okay so PI if we notice
06:36 here we give it a name as well so I gave
06:38 this PI a name of REM because that's
06:41 what we're calculating we're calculating
06:43 the REM value of the pixels so the next
06:48 bit is we want to display this value on
06:50 the page so how do we do that so there's
06:54 two ways we can do that if we click in
06:57 the PI settings you'll notice that
06:58 there's this show snippet setting here
07:01 if I click on that you'll see that we
07:03 have a snippet here and basically this
07:06 HTML snippet if we put it anywhere on
07:09 the page
07:10 pi will replace that with the actual
07:15 contents of the PI or so that the
07:17 results of your formula okay now if you
07:20 look inside there you'll notice that
07:21 there's also a class pi - R M we can
07:25 actually take that if you and if you
07:27 notice all that is is PI Dash and then
07:30 the name that we defined inside the PI
07:33 settings
07:33 okay so pi - REM if I put that as a
07:36 class on anything it will replace that
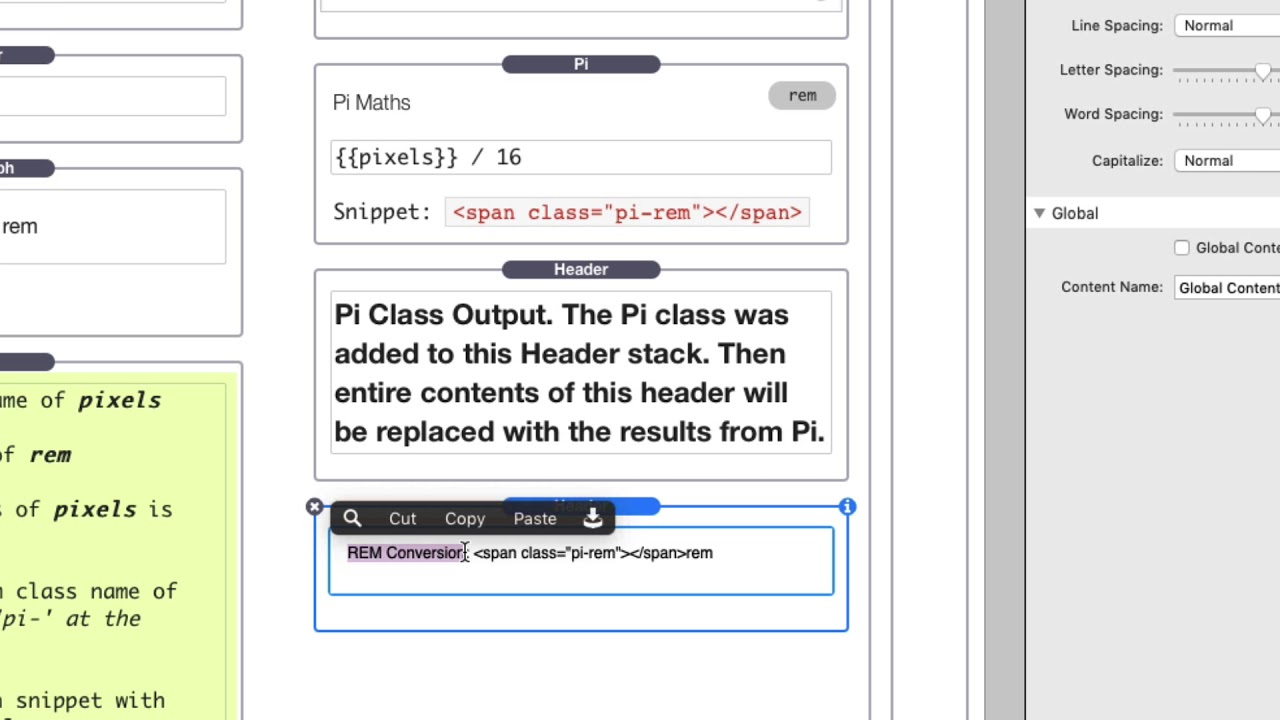
07:41 contents with PI so I have two examples
07:44 here here is a header stack and if
07:47 you'll notice this header stack has a
07:48 lot of text in it okay and this actually
07:51 the text here actually displayed you
07:53 know describes what PI is going to be
07:55 doing for us but if we look at the
07:57 settings again this is just a standard
07:59 Foundation header stack I can add a
08:01 custom class and I add PI REM to the
08:05 class list
08:08 and if we preview this page again you'll
08:10 notice that here inside it's going to
08:13 take that header and it's going to
08:15 replace the contents of it with the
08:17 value that PI calculated
08:21 now let's look at this second one if we
08:24 look at this here's another header and
08:25 this it's a little bit different here I
08:28 added some text REM conversion : and
08:31 then I added the span that was from the
08:37 snippet so span class equals PI REM
08:39 close span and then I added REM at the
08:42 end so what PI is going to do is inside
08:45 of this span it's going to insert the
08:47 number that we wanted basically the
08:49 results from our formula and that's
08:52 exactly what happens
08:55 and whenever I change the value pi
08:58 notices that I change the value and it
09:01 immediately recalculates and refills in
09:04 these fields for us dynamically on the
09:07 fly
09:08 so now let's go ahead and jump into demo
09:11 2 here we have a slider and I've given
09:14 that a field name of slider okay and
09:17 let's look at our first pie this first
09:19 pie I've given it a name of triple and
09:22 what I've done is in my formula I've I
09:24 grabbed the value of the slider input
09:28 right with curly brace curly brace
09:29 slider and close those curly braces and
09:32 I multiply that by 3 now notice here
09:35 multiplication is an asterisk
09:37 not an X right so that is common in in
09:42 all programming languages where
09:44 multiplication is actually defined by an
09:46 asterisk so that's how you do your
09:48 multiplication so I'm taking my slider
09:49 value and I'm multiplying that by 3 now
09:54 let's look at the next one right this is
09:56 a little bit different we have something
09:58 called math dot round and then I'm doing
10:01 the same formula as above so I'm doing
10:03 slider times 3 what is this math dot
10:07 round well pie in your formulas you can
10:11 actually use the entire JavaScript
10:13 programming language directly inside pi
10:17 and so that gives us a lot right it
10:21 gives us a lot of really cool baked in
10:23 mathematical functions that JavaScript
10:26 has and these this one here is math dot
10:30 round so this is your typical it will
10:33 round the number up or down so if the
10:35 number is greater than you know 0.5 it
10:39 will round the number up and if it's
10:42 less than 0.5 it will round that number
10:43 down right so let's see that in action
10:49 here we'll notice that we have 2.25 and
10:52 when we triple that it is 6.75
10:56 well rounding will now round that number
10:58 up because it's closer to 7 and if we
11:01 keep going here we have 8.25 well that's
11:04 it we'll round that number down because
11:06 it is actually closer to 8 right so
11:09 that's what rounding does so if we go
11:11 back we'll notice that I did give this
11:13 pi a name of round and let's look at
11:16 some of the other ones we here we have
11:17 ceiling I give this a pine name of
11:19 ceiling and this is a little bit
11:21 different right
11:22 essentially what ceiling does is it will
11:25 always round up so it'll always go for
11:27 the bigger whole number but there's
11:29 something else different about this
11:31 instead of me putting in the slider
11:33 times 3 I put in triple
11:38 so essentially what I'm doing is I'm
11:40 telling this pie go ahead and pick trip
11:43 the value of triple which is the first
11:46 pie that we have here and use that
11:49 this is powerful because it allows PI's
11:52 to reference other PI's right so here
11:57 triple does slider times three and
11:59 instead of doing slider times three
12:01 again I could just simply reference
12:04 triple so now I can use both values if I
12:09 needed to now if you only need to use
12:12 one value if you never need to know it's
12:14 what triple is exactly then maybe you
12:17 just do it all in one but if you need to
12:20 have access to both numbers it is very
12:23 powerful that Pi allows you to reference
12:26 other PI instances by name very cool
12:30 let's go down and here we have math dot
12:32 floor and we're referencing triple again
12:34 and that essentially will always round
12:37 down so even if it's five point nine it
12:40 will always return five it always goes
12:42 down this next one is a little bit
12:46 trickier right the syntax is a little
12:47 bit different than our math dot syntaxes
12:50 but here we surround our triple in
12:53 parentheses and then we do dot two fixed
12:57 one and what this is gonna do is it's
12:59 gonna round to the nearest one decimal
13:02 place so let's see all of those in
13:05 action here if I go here we'll see that
13:07 here I have nine point seven five
13:09 rounding gives us ten ceiling gives us
13:12 ten because it always rounds up floor
13:14 will give us nine because it always
13:16 rounds down and then our decimal gives
13:18 us nine point eight because that is the
13:21 closest decimal for one decimal place
13:24 pretty cool now to create all those
13:27 values that we were just looking at here
13:29 if we double click in these you'll
13:31 notice that I have triple and then I use
13:33 the little snippet right and then round
13:37 I have round colon and then I use the
13:39 little snippet very simple and again to
13:43 see those snippets we just simply go
13:44 into our PI stacks you can click the
13:47 show snippet and there is the snippet
13:49 that you need to display the value of
13:52 that particular PI stack
13:55 so here we are in demo three and here
13:58 we're gonna do a little bit of geometry
13:59 so in demo three we take a number input
14:03 that we assign the name radius so this
14:06 number input has a name of radius and
14:08 that is gonna be the radius of our
14:10 circle now if you ever take in geometry
14:12 hopefully you have you'll notice that
14:14 the two famous equations for these are
14:16 the perimeter is two PI R and the area
14:19 is PI R squared right so if we look at
14:23 the PI here I gave this obviously a name
14:25 of perimeter we are gonna do a little
14:28 bit of math so here we have two times
14:31 math dot pi now this is a little special
14:35 thing you'll notice you've never seen
14:36 this one before
14:36 this is another little bit of JavaScript
14:38 math dot pi is a special constant that
14:42 you can use if you want to actually use
14:44 pi right because you could type in 3.14
14:48 which most people do but as you probably
14:50 know pi is an infinite number it's three
14:53 point one five one six I'm not even
14:57 gonna continue going I don't know what
14:59 it is but it is a big number that goes
15:01 on for infinite so math dot pi is a very
15:06 useful constant that you can use that's
15:08 baked into JavaScript so we're doing two
15:12 times math pi times radius and that
15:15 obviously gives us our perimeter
15:21 our next one calculates the area of a
15:24 circle and you'll notice in here we have
15:27 a little bit more complex right we have
15:30 math dot pi times and here's a new math
15:34 function here math pow
15:37 this essentially gives us the power to
15:40 right so we have radius and two so that
15:45 does the radius squared so we have
15:48 radius to the power of two and then if
15:52 you notice inside there I do
15:55 parentheses and then I do to fixed to
15:58 now you might want to ask why did you do
16:01 that
16:01 because let's go ahead and I'm going to
16:04 remove this two fixed too
16:08 and we're gonna do simply PI R squared
16:12 so we have pi radius squared um let's
16:15 see what the results of that are if we
16:17 notice here it gives us a big number
16:20 right with lots of decimals so what if I
16:23 only want to have two decimal places
16:26 that's exactly what that two fixed
16:28 syntax does for us so let's go ahead and
16:30 add that back in I'm going over here
16:33 we're gonna add parentheses around the
16:35 entire thing and then do dot two fixed
16:40 and I want two decimal places and we're
16:44 gold in
16:49 there we go so now I have in my area I
16:52 only have two decimal places now
16:56 very cool now just as you saw before in
17:00 order to get these values onto the page
17:02 I just simply use the snippets again so
17:05 you're a have P equals and then I use
17:07 this snippet from the parameter stack
17:09 right again to see that we go to the PI
17:12 we go show snippet and there is my
17:14 snippet that I need to add on to the
17:17 page in order to see the value and we
17:20 did the same thing here for area we have
17:22 span class equals PI - circle area and
17:26 that will then display that so as you
17:29 see pi is really simple to use
17:30 now this last example there was a little
17:33 bit of tricky syntax there was a lot
17:34 going on in there right and so what can
17:37 we do to make that a little bit easier
17:40 to read and create right and basically
17:43 what I recommend is you could
17:45 potentially if you want to do something
17:46 a little bit more complex rather than
17:48 just you know field times three is you
17:52 could definitely use your own kind of
17:54 text editor to edit these things right
17:56 just makes it a little bit simpler to
17:58 use so I'm gonna show you the example
18:00 maybe a couple examples with some apps
18:02 that you probably might have on your own
18:04 machine I'm gonna show you one with
18:06 TextEdit and then I'm gonna we're gonna
18:09 move over and I'm gonna show you what I
18:10 use an app called vs code that allows
18:14 you it's free to download but I'm gonna
18:16 show you kind of the benefits of using
18:18 either of those so as I just said if we
18:22 look at this particular formula from
18:23 demo three and we open that and we want
18:26 to edit this it could get really hairy
18:28 right so what we're gonna do is I'm just
18:31 gonna copy this so here we are in
18:34 TextEdit this is on everybody's Mac and
18:37 we can use this now I recommend that you
18:41 use a mono space font when you're
18:43 looking at this stuff it just makes it a
18:45 little bit easier to look at right
18:46 so from here um you probably should have
18:49 Monaco and let's just go ahead for this
18:52 video I'm gonna make it big let's make
18:54 like 24 pixels and I'm gonna paste that
18:57 in so here we are as you see this is
19:00 just a little bit easier to read and
19:02 look at sometimes you can add some
19:04 spaces to kind of give us some context
19:07 of what we need right
19:10 so if we notice here we have math dot pi
19:13 times and then we have math dot POW and
19:16 that math up power requires that it's
19:18 inside two different brackets and then
19:22 here we define our radius by giving our
19:25 curly brackets and then we have a comma
19:28 because we have to provide the radius or
19:30 a number and then the power that we want
19:33 to do so we're going to do the power of
19:35 2 for radius and then basically I want
19:39 to take that value
19:41 and then I want to do to fixed right so
19:45 essentially what we're doing is I'm just
19:47 going to go ahead we're doing this this
19:50 gives me a value that has a big huge
19:53 decimal number then I'm placing that
19:56 inside of parenthesis so here's open
19:59 open parenthesis close parenthesis and
20:01 then I'm doing dot two fixed and then
20:05 we're doing I want two decimal places
20:07 so we're getting a little bit advanced
20:10 here right because um in JavaScript
20:13 syntax matters and essentially if if you
20:18 lose any of this so let's say I forgot
20:21 that closed parenthesis pi will break
20:25 this will break your page and be careful
20:29 because it is very sensitive to syntax
20:34 you have to have your syntax down
20:36 perfect so that everything will work so
20:41 here we are in the code editor that I
20:43 use on a daily basis it's called vs code
20:45 and this is what I use to develop stacks
20:49 and websites and stuff every day so um I
20:53 like vs code because if you notice it
20:55 gives us a little bit of syntax
20:56 highlighting so when I pasted this on to
20:58 the page down at the bottom here you can
21:00 define that this is actually JavaScript
21:02 and then kind of give us us gives us a
21:04 little bit of help okay now this curly
21:07 brace curly brace is kind of a PI
21:09 specific thing so you'll see you might
21:11 see little red things on there but
21:14 because that isn't technically
21:16 JavaScript that's a little bit of
21:17 additive stuff on top of JavaScript for
21:20 PI to work but it does gives us a nice
21:23 little you know helper in terms of the
21:27 nice syntax highlighting and stuff like
21:28 that another thing it does so remember
21:30 we wanted to add this two decimal places
21:32 so what I do is here at the beginning
21:34 I'm going to do parentheses now you do
21:36 close parentheses and if you notice um
21:39 it did give me a little red thing saying
21:42 hey I expected a parenthesis there okay
21:46 that's pretty cool so now I add the
21:49 parentheses and that little red thing
21:50 goes away because we're syntactically
21:52 correct now and then I do dot
21:55 and what's cool here is that um vs code
21:58 gives us things that we can do right so
22:00 I could do a look to fixed and then I
22:03 know I have to do parentheses and it's
22:05 telling me I have to pass a number so I
22:07 can do number two pretty cool if we
22:10 hover over these you'll notice that um
22:12 it didn't it didn't like these curly
22:14 braces it didn't expect that expect that
22:19 with PI you need these for pi but your
22:21 code editor might say hey I don't
22:23 understand that but everything else the
22:26 errors that you know they give you let's
22:28 say if I delete that that parenthesis
22:31 it's now going hey something's wrong
22:33 you're missing a parenthesis somewhere
22:34 right so very cool I recommend that you
22:39 use vs code if you're gonna do any sort
22:41 of complicated math and then basically
22:44 all you have to do is you just copy this
22:46 head back into rapidweaver and just
22:49 paste it directly into pi and you should
22:53 be good to go so as you see pi um it
22:57 can't get complicated if you want to
22:58 start doing your own javascript okay now
23:01 just a word of note while pi allows you
23:05 to build on some really complex and
23:09 amazing things I cannot help you write
23:13 your javascript you know if PI works
23:17 great um you know test that with
23:19 something simple like my value plus one
23:21 or something like that if it works
23:23 awesome chances are if it doesn't work
23:26 when you put in your complex JavaScript
23:28 or the page breaks it means something is
23:31 wrong right
23:32 um and I cannot help you write
23:34 JavaScript i I just don't have the time
23:36 or resources to help people a thousand
23:38 people you know develop the things so
23:41 what I do recommend is if you have some
23:43 issues with your JavaScript inside PI go
23:47 ahead and create a post on Weaver space
23:48 and um you know there are a lot of
23:51 really smart users as well as I will
23:53 attempt to help you you know create
23:56 things that you want but officially
23:59 please don't be emailing me that your
24:02 JavaScript is broken and that you can't
24:04 get your formula working pi is a
24:07 powerful tool
24:09 um but I can't help you code I give I'm
24:11 giving you the power to use that right
24:15 so I hope you enjoy it use your power
24:18 wisely
24:19 I can't wait to see what you build with
24:21 it I hope that this basics of Pi really
24:24 gets your head around PI play around
24:27 with it and we will have a lot more
24:29 videos on more advanced stuff to do with
24:32 PI as well so hope you enjoy pi we'll
24:35 talk to you later bye"}]
Search the page
0
