About Stacks Guru
Stacks Guru is born from the need to search the vast number of videos out there on stacks built for Stacks Pro and the Stacks 5 plugin for Rapidweaver.
We have scraped over 500 videos to get the transcripts for each in order to make the spoken word searchable.
Please use this free tool to help you learn and discover the awesome power that Stacks and the stacks made for Stacks have to offer.
Stacks Guru
Video Reference
Bento Scroll for Stacks Pro: How to
02/15/2024
In this video, we will go over how to use Bento Scroll for Stacks Pro to build a bento grid for our website. For more information about Bento, head over to https://www.weavers.space/stacks/bento
Transcript
00:10 so in this video we're going to be00:11 looking at Bento scroll and how we can
00:15 Implement that now hopefully you've
00:17 already watched the general Bento
00:18 overview video because we're going to be
00:21 talking about how this behaves a little
00:23 bit differently than that stack now when
00:26 would you use scroll versus the normal
00:28 Bento stack Bento
00:30 the default Bento stack is kind of based
00:33 on a fixed number of items right you're
00:35 going to have five or 10 items inside of
00:38 your Grid it's going to be static grid
00:41 whereas Bento scroll it can have an
00:43 actually an infinite number of items it
00:45 just Scrolls and we create generic rules
00:48 to
00:49 essentially create our grid that has an
00:53 unlimited number of items within
00:56 it and the structure of this is a little
00:58 bit different as well as you see we
01:00 still have the great grid designer up at
01:02 the top um but now we have our rules as
01:05 well as our content they're kind of
01:07 separated in Bento it was one stack you
01:09 had your Bento uh item that had your
01:12 rule and your content all inside
01:15 one now with Bento scroll we have the
01:18 ability to actually separate those out
01:20 because our rules need to be separate
01:21 from our
01:23 content now there are two styles of
01:26 grids that we can actually have within
01:28 Bento scroll we have Auto grid as well
01:32 as a columns based grid let's talk about
01:35 the differences there the auto grid
01:38 allows us to define a minimum width for
01:41 each item for example here I have a
01:44 minimum width of 250 pixels this means
01:48 that it's going to squeeze as many items
01:51 inside of a row that it can but ensures
01:55 that each item is at least 250 pixels
01:58 wide for example if we preview our grid
02:00 down to medium it can't fit four items
02:03 um on medium devices because it can only
02:06 fit three and then on small we have two
02:08 and extra small it goes down to one now
02:11 just like the Bento stack you can
02:13 actually customize those break points
02:14 we're not going to dive into that right
02:16 now but you can easily customize these
02:18 break points uh for your
02:21 needs now in the columns grid this
02:24 allows us to explicitly Define the
02:27 number of columns that we want for each
02:30 breakpoint so here we have columns for
02:32 extra small small medium and large as
02:36 well as
02:36 gutters and you see if we preview the
02:39 grid we can change that be from being
02:41 one to one to medium and to
02:46 large now I do want to point out that
02:49 the columns grid um by default it will
02:51 show 20 different cells but there is a
02:54 maximum height so depending on the rules
02:55 that we Define here you might see a
02:58 little bit less but we we are seeing
03:00 enough to be able to design our grid as
03:02 we see going
03:04 forward so as I said earlier we can go
03:06 ahead and manually add as much content
03:09 as we want here I just added a container
03:10 and a header similar to what we did in
03:12 the Bento video and I'm just going to
03:15 copy and paste a bunch of these out onto
03:17 the page so here I just copied and
03:20 pasted a ton of these um this is just
03:22 going to be all the same content in our
03:24 grid but you can actually go ahead and
03:26 add your own content and probably make
03:28 it a little bit more interesting than
03:29 just a header inside of a gray
03:32 box so if we preview this grid you'll
03:35 see that we have all of our content and
03:37 the grid uh dynamically changes based on
03:40 the rules that we've defined this is the
03:42 auto grid so as soon as we're able to
03:45 have another set of another column that
03:48 has a minimum of 250 pixels it will add
03:51 another
03:52 column but this isn't too exciting like
03:55 this isn't Bento right this is just a a
03:57 run-of-the-mill grid so let's go ahead
03:59 how can we go ahead and make this a
04:01 little bit more
04:02 exciting now I also want to add that
04:05 Bento scroll supports some really
04:07 interesting Integrations with Stacks
04:09 such as feeds particle generator and
04:11 total CMS to dynamically generate our
04:15 content for us now in this example I'm
04:17 using particle generator which is a part
04:19 of our slot machine stack set to quickly
04:22 generate 50 um items within Bento scroll
04:25 so we can really test out and see how
04:27 our grid is going to look and be
04:30 behave so now let's have a look at the
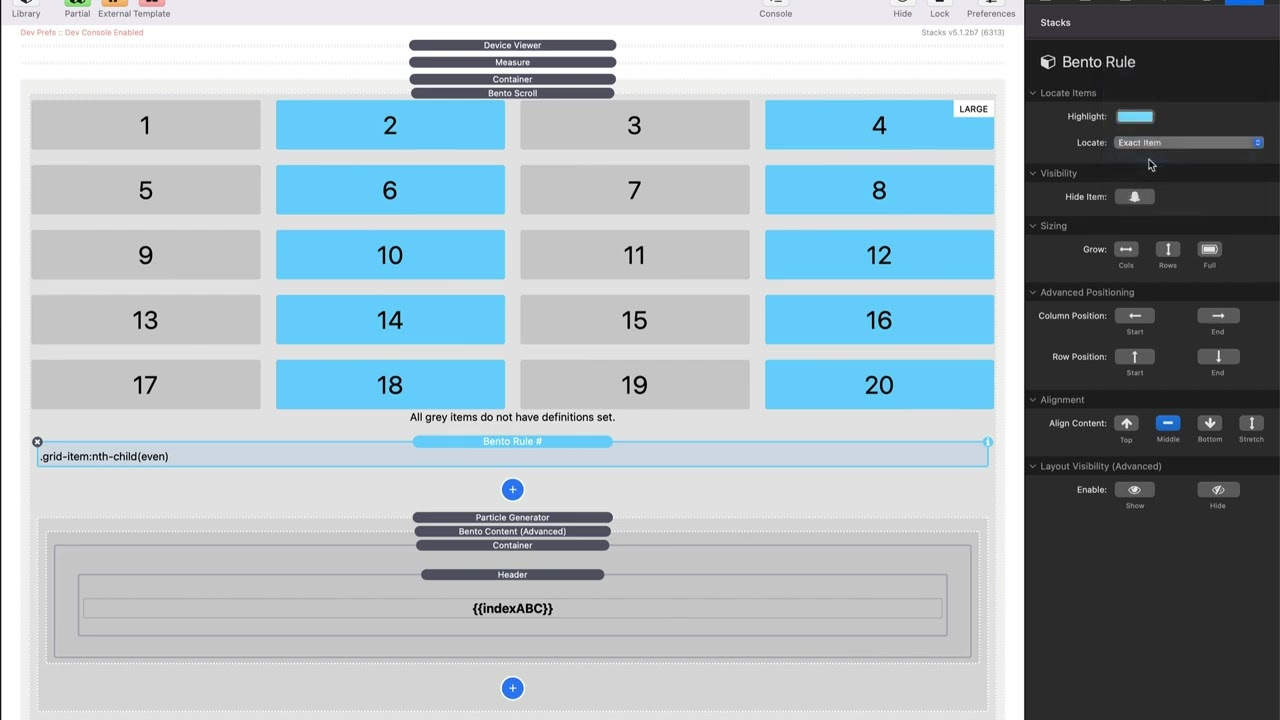
04:32 Bento rules um inside Bento scroll so
04:36 that we can go ahead and start making
04:37 our layouts a little bit more
04:39 interesting just like the normal Bento
04:41 stack all of our rules have colors and
04:43 we can go ahead and change those colors
04:45 to be whatever we like and those colors
04:47 will then be reflected on every single
04:50 item in the grid that is actually um
04:54 applied by that rule so here the we can
04:59 locate items and the very first one is
05:00 default rule so we can actually Target a
05:03 rule for every single item in the
05:07 layout we can do first item as you see
05:09 which is number one we can do last item
05:12 which will then Target the very last
05:13 item in the grid we can Target every
05:17 odd every
05:19 even an exact number so in this case we
05:22 want to Target number three or maybe
05:25 number eight right so we want to have a
05:27 rule for a very specific cell
05:30 this kind of similar to having a very
05:32 specific rule like in our original Bento
05:36 stack next is one of my favorites is
05:38 actually the nth item and this allows us
05:41 to do something like every third item or
05:44 every fourth item every fifth item right
05:47 so it's very interesting allows us to
05:49 really add some really um kind of
05:52 Randomness or what seems like Randomness
05:55 to our
05:56 layouts so that's all about locating our
05:59 item
06:00 next is the actual rules and logic that
06:02 we can apply and how can we customize
06:04 those so first is we can actually hide
06:06 an item so in this case I just hid every
06:09 fifth
06:11 item um we can grow so we can grow by
06:14 column or rows or make something full
06:17 WID so if I go ahead and click on
06:20 columns you'll notice that we have on a
06:22 per breakpoint basis how we can grow
06:25 those
06:27 columns so in here I'm growing each of
06:30 those each fifth one is going to be two
06:33 columns
06:34 wide we can then also grow it by rows as
06:38 well and you can combine these so you
06:39 can have it by columns or just rows or
06:42 columns and rows so if I did this and I
06:45 go I want it to grow by two right that
06:48 then boom it makes it very large right
06:51 maybe this doesn't make sense because
06:52 now it kind of makes our grid look less
06:55 random right so this is where you can
06:57 kind of um utilize these rules to kind
06:59 of create a grid that is very
07:01 interesting um for yourself you can see
07:03 whether or not those rules are going to
07:06 work and lastly we can make it
07:08 completely full width so let's say every
07:10 fifth one I want it to be full
07:16 width next is column positioning now
07:20 this column positioning and row
07:21 positioning probably don't make too much
07:23 sense for nth items but allows us to
07:26 Define um a start and ending position
07:29 for our items so let's say we want every
07:33 fifth item here it's going to start at
07:35 column one right we can say we wanted it
07:37 to start at column two or column three
07:41 right um if we started it at column two
07:43 and then we ended at column four as you
07:47 see this is kind of another way of of
07:49 controlling the sizing as
07:51 well and then you can also customize the
07:53 row position so um where do do we want
07:56 all the fifth ones to maybe go to the
07:58 top or go to the uh you we can actually
08:00 stretch them as well so we have row
08:01 start and row end these are definitely
08:03 more advanced settings um that are
08:06 probably going to cover maybe some Edge
08:08 case scenarios but most of the time
08:10 we're going to be stick with either
08:11 visibility or the sizing of columns and
08:16 rows and just as we saw in the normal
08:18 Bento we can actually then stretch or
08:20 align our content so that most time
08:23 you're going to want either middle or
08:25 stretch depending on what your content
08:27 is now the last settings here are very
08:30 interesting and what these do it enables
08:32 some custom classes that you can Target
08:35 things inside of your items so what that
08:39 means is um in this case every fifth one
08:43 anything that has the class of show me
08:45 is going to be displayed anything that
08:48 has the class hide me will be hidden so
08:51 you can add a class to any content
08:54 within the fifth every fifth item and
08:57 hide me will hide that item but only in
09:00 every fifth item this allows us to have
09:02 a lot of really interesting control
09:04 where maybe based on our layouts we want
09:06 to show or display
09:09 content so what I'm going to do now is
09:12 I'm going to show you how you can build
09:14 this grid this grid on the Weaver space
09:17 Stacks page um is using Bento scroll and
09:21 I'm going to show you how we can design
09:23 this exact grid especially this layout I
09:27 mean all those these hover effects
09:28 aren't done by Bento um that's all done
09:31 with swatches and other things but the
09:33 actual just the grid layout is done
09:36 using Bento
09:39 scroll all so what I'm going to do here
09:41 is on the very first item in my grid I
09:43 want it to actually be large so what I'm
09:45 going to do is I'm going to make it take
09:47 up 2 by two so we're going to go ahead
09:50 and say the very first item it's going
09:52 to grow by our columns is going to be
09:55 two okay actually I want these to be a
09:58 little bit different we're we're going
09:59 to make it on small uh and on mobile
10:01 devices it's going to be one and on
10:03 medium large it's going to be two and I
10:05 want the same exact thing on
10:11 rows okay then we're going to add a new
10:13 rule and what I'm going to do is I'm
10:15 going to go down to nth
10:17 item and let's just change the color a
10:20 little bit so we use that color uh and
10:23 we're going to do every ninth
10:27 item and in every n n item what I want
10:30 to do is I want to just grow by The
10:31 Columns and I'm going to make them uh
10:34 one one I'm going to make them three
10:37 columns wide so they're going to be
10:38 really wide so every ninth item is going
10:41 to be
10:42 wide and then what I want to do is let's
10:45 go ahead and copy and paste and I'm
10:47 going to make this every eighth
10:50 item and let's change the color of that
10:52 so we can kind of see and every eighth
10:55 item we're going to make this uh we're
10:58 going to grow The Columns as well as the
11:01 rows and so we're going to make them um
11:05 grow to 2x two actually one one other
11:08 thing I did is um on the thing instead
11:10 of 250 I made it a little bit smaller so
11:12 it's 225 pixels so just we can get a
11:15 little bit more content um in there and
11:18 let's go and preview that so as you see
11:20 here en llarge okay here we're on the
11:23 large breakpoint we know that because of
11:24 our measure stack and we can go ahead
11:26 and resize now you'll notice that some
11:28 of these aren't getting stretched
11:30 because I don't have a lot of content in
11:31 there but we know the fix for that um
11:33 it's really really simple let's go ahead
11:35 and uh so basically it was on uh the
11:39 eighth rule we just want to S the
11:40 content alignment to be stretch because
11:43 we're we want it to we're making these
11:45 have two rows high so we want to make
11:47 sure we stretch those and then on the
11:50 first one we're also stretching the rows
11:52 on those so we want that to stretch as
11:56 well there we go there there is our grid
11:58 this is the Weaver space Stacks grid
12:03 okay we have a large item here A bunch
12:05 of smaller ones and then it as you see
12:08 it just makes everything kind of feel
12:10 very random right cuz here is a wide one
12:13 and then it's wide over here um it just
12:15 adds a lot of Randomness um to the grid
12:19 now I know this just has some dummy
12:21 content in there but again as we add in
12:24 our own images and content it's going to
12:27 um kind of make this
12:30 grid uh look much more Dynamic with
12:33 images and colors and Bento is going to
12:36 make sure that everything grows and
12:38 aligns with each other all dynamically
12:40 you don't need to do any of that really
12:42 really
12:52 cool
Search the page
0
