About Stacks Guru
Stacks Guru is born from the need to search the vast number of videos out there on stacks built for Stacks Pro and the Stacks 5 plugin for Rapidweaver.
We have scraped over 500 videos to get the transcripts for each in order to make the spoken word searchable.
Please use this free tool to help you learn and discover the awesome power that Stacks and the stacks made for Stacks have to offer.
Stacks Guru
Video Reference
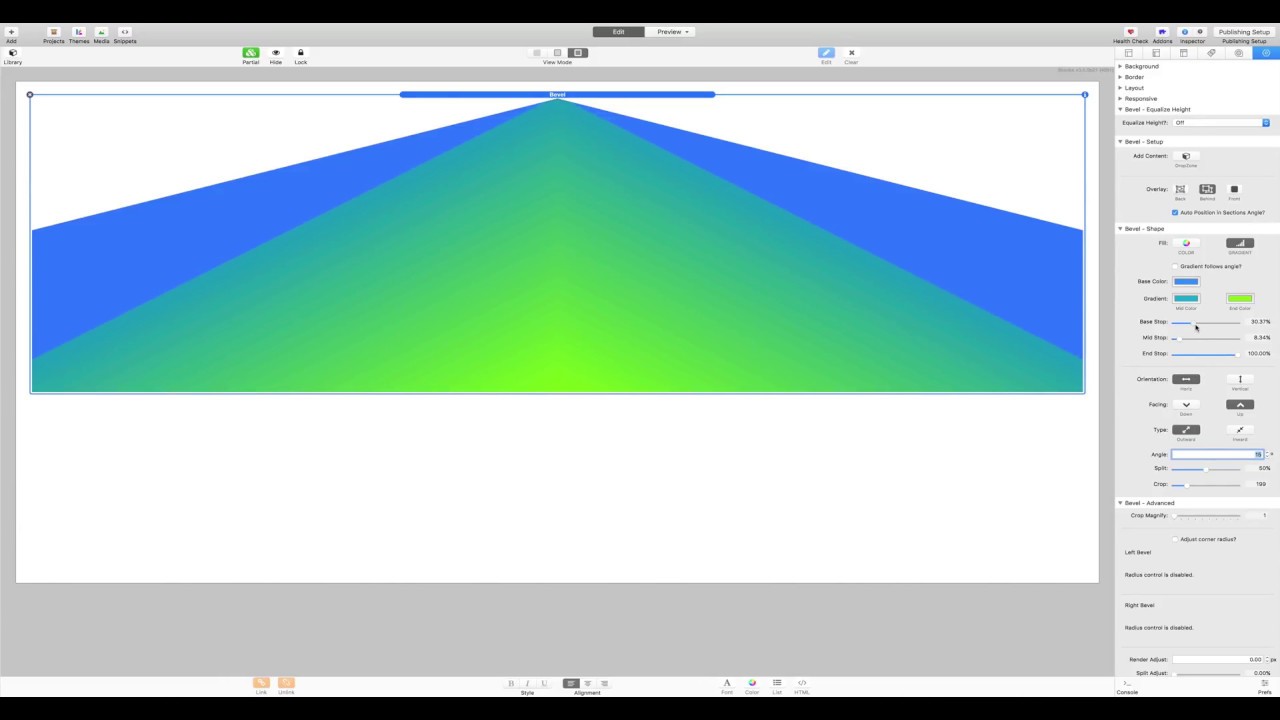
Bevel Gradients
08/01/2017
A quick introduction to the new gradient features in the Bevel StackA quick introduction to the new gradient features in the Bevel Stack
Transcript
00:07 so I just wanted to show you a quick00:11 demonstration of the new gradient
00:12 feature in the bevel stack we've now got
00:15 a selector button here that we can turn
00:19 on the gradients with it will default to
00:20 the original color that you may have had
00:24 set in a previous instance of the stack
00:26 and you can see we get two extra colors
00:29 to play with so we've got a mid color
00:31 and an end color it's pretty
00:35 self-explanatory I think most people
00:36 know about gradients there are a couple
00:39 of little extra tricks we can do though
00:40 with bevel first thing is we've got
00:43 three color stops here so we can play
00:46 with these if we pick the mid stop so
00:48 that's going to be the point at which
00:50 this mid color transitions to the end
00:55 color we can push that down so we just
00:58 got a little tip we can pull it back up
01:00 again if we move the base stop down
01:05 beyond the mid stop as soon as it goes
01:08 beyond the mid stock you see we start to
01:10 get us distinct line rather than a
01:12 gradient and we can take you down we can
01:15 even bring the mid stop rip down a bit
01:18 further as well and constrain the
01:20 gradient to the bottom of the bevel but
01:24 just for now let's let's push the mid
01:25 stock right the way down and let's click
01:29 this gradient follows angle button so
01:31 that sort of does what you'd expect it
01:33 to such as the gradient then follows the
01:36 angle but I wanted to show you it with
01:38 this stops adjusted because you can make
01:40 quite nice borders on the angle and if
01:41 you push it all the way then you can
01:46 essentially use the gradient like a
01:49 border which is something else that had
01:51 been asked for these are not integers
01:55 they are decimals so you can you can get
01:58 it really nice and tight if you want to
02:00 just an age on your bill let's pull that
02:03 base top back down a few other things to
02:08 note about it if you're using it
02:13 at 50% split light as in the default or
02:18 you're using it at one end or the other
02:21 for a straight bevel you can do what you
02:25 like essentially by unchecking the
02:28 gradient follows angle you will get a
02:30 flat gradient the one place you
02:33 shouldn't uncheck this is if you're
02:35 using hold splits and this is pretty
02:37 rare but if you use an odd split then
02:40 it's going to go wrong because when it's
02:42 not following the angle we're
02:44 subtracting the gradient angle from the
02:49 gradient itself and the two sides aren't
02:54 gonna match so you just turn on gradient
02:56 follows angle if you really want a
02:57 gradient when you've got a split that's
03:00 not either naught fifty or a hundred
03:02 percent let's just push that base stop
03:07 down a bit six and so we get a bit of a
03:10 distinct gradient showing again and then
03:14 we'll just have a look at a few other
03:16 things if we switch it to vertical we
03:20 get a vertical representation let's just
03:22 reduce that padding down a bit and we've
03:26 got the split let's put that back to
03:29 fifty so it's nice and symmetrical so
03:32 exactly the same things apply when it's
03:34 vertical in terms of making making edges
03:37 on the gradients and messing around with
03:41 the color stops we can turn the follow
03:45 angle off as well if we make the angle
03:47 more extreme you'll see this more easily
03:49 so it's like fifteen degrees so now it's
03:53 following the angle now it's flat again
03:56 if we make it a sharp line you can see
04:00 that very clearly and it is following
04:03 the anklet if we go back to our
04:08 horizontal level and just to take some
04:11 of this crop off because I've put a load
04:13 of padding on it you can all
04:18 so think about making different double
04:25 bevels if you like with this um if we
04:27 reduce the top stop back and we get a
04:31 nice sharp line it's a bit like a a big
04:37 fat border but we've we've essentially
04:39 made a double angle if the base color
04:42 was white of course then and we push it
04:49 all the way down past there then we made
04:53 a chevron which you could do with bevel
04:56 in other ways but that's a very quick
04:59 and simple way to do it so let's let's
05:03 pull that that base color back to some
05:06 sort of some sort of blue that looks
05:08 half decent a few other things to be
05:12 aware of if you start using inward
05:15 angles these use a portion of the height
05:20 so you stop so going to need adjusting
05:23 the the gradients will work but for
05:26 inward angles we're going to need to
05:28 push everything and which way it that
05:35 way so just play with them and you'll
05:39 you'll soon you'll soon get there so if
05:42 we push the end stop back out of the way
05:49 and there we go we've got our a gradient
05:52 if we turn the follow angle off it will
05:54 be a horizontal gradient if we now on
06:00 our inward
06:00 and we make them face upwards then these
06:03 three stops are going to have to be up
06:05 this end so let's just try and replicate
06:07 that quickly wrong way around the you
06:15 can see that there we go
06:17 we're following the angle so it's a bit
06:19 more difficult to see it's a bit easier
06:22 to see if we let me go but you saw in
06:27 there there are some quite interesting
06:29 effects that you can make
06:30 just playing with these color stops so
06:33 I'm sort of discovering as I go there
06:35 but the best way is that so
06:37 things like that for instance you could
06:40 do if you really wanted to I've don't
06:42 know why you'd want to but it's just
06:45 easy to play with and and see what you
06:48 can do and we'll put it back to facing
06:51 outwards but upwards and then you see
06:53 we've got a little splurge of color
06:58 emanating from the bottom we pushed all
07:01 the way up and replicate what we just
07:03 saw the other way so it's just a case of
07:04 playing with these color stops and you
07:06 can you can do all sorts of interesting
07:10 things so same rules apply if you start
07:14 going off without splits you're going to
07:19 get you might want something like that
07:21 could be an interesting effect and some
07:23 backgrounds I don't know but noir split
07:26 then we're going to have to adjust their
07:28 color stops to push it out but odd
07:33 splits we're going to get weird effects
07:36 no matter what we do without color stops
07:38 we'll always get that vertical line so
07:40 really unless you want to turn on follow
07:43 follow angle avoid odd split numbers and
07:47 that is gradients in a nutshell thanks
07:52 for watching"}]
Search the page
0
