About Stacks Guru
Stacks Guru is born from the need to search the vast number of videos out there on stacks built for Stacks Pro and the Stacks 5 plugin for Rapidweaver.
We have scraped over 500 videos to get the transcripts for each in order to make the spoken word searchable.
Please use this free tool to help you learn and discover the awesome power that Stacks and the stacks made for Stacks have to offer.
Stacks Guru
Video Reference
Custom Styles & Marker Offsets
06/21/2017
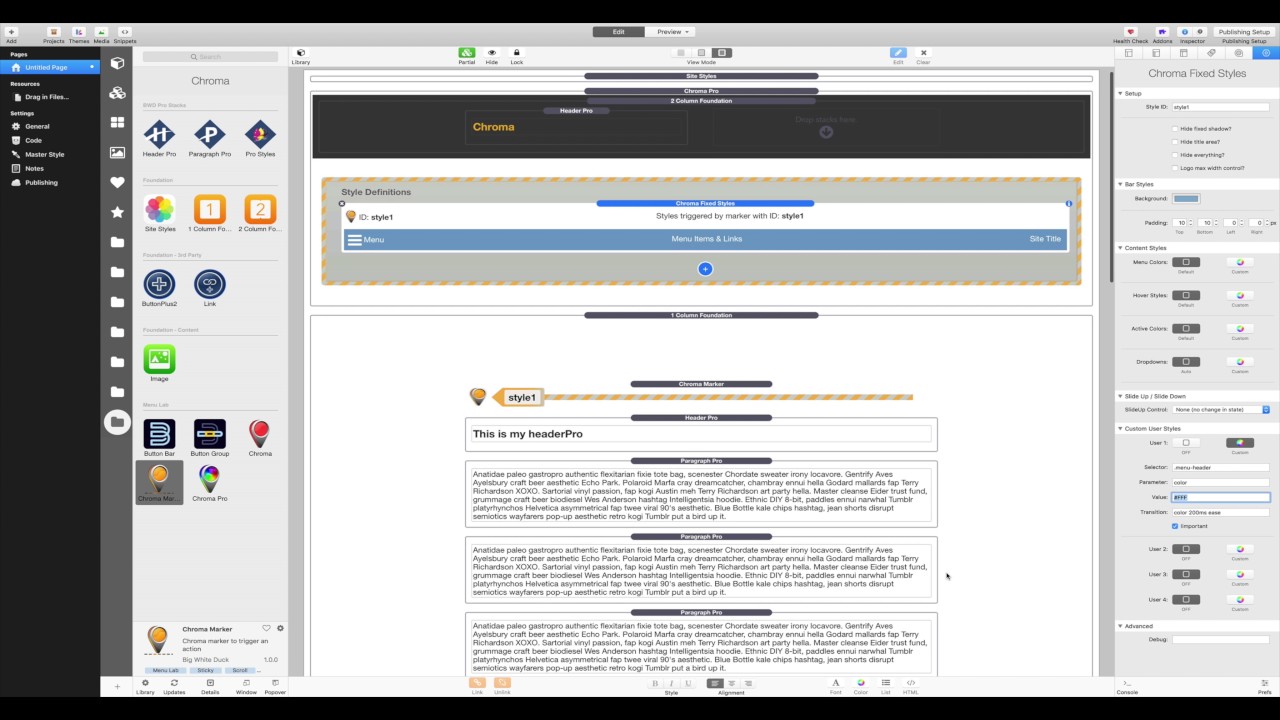
Learn how to use the custom user styles in Chroma Pro. Some tips on using marker offsets to trigger at the bottom of the page.Learn how to use the custom user styles in Chroma Pro.
Transcript
00:10 this is a very quick tutorial on how to00:13 use the custom user styles in chroma Pro
00:16 so if we start by just adding a chroma
00:20 Pro stack to our page and this time what
00:24 we'll do is we'll just drop some
00:26 different content into it other than a
00:28 menu and we'll use a header as an
00:33 example and the first thing we're going
00:36 to do is just give this a bit of style
00:40 so we're going to make it a yellow color
00:45 let's say and let's just change it so
00:49 this is Chrome now you may have
00:53 something alongside an existing menu
00:56 where you may be building a menu or
00:58 using the dotter builder menu and in
01:02 which case you can style other things
01:04 just by giving them a custom class so
01:08 we're going to go down to the bottom of
01:10 these header Pro settings and just call
01:12 this menu header with a hyphen in it if
01:18 the stack you want to use doesn't have a
01:21 custom class selector you can always put
01:23 it in one of those CSS box stacks and
01:26 address it that way so what we're going
01:31 to do with this we're going to have it
01:32 as a fixed position menu at the top of
01:35 the page and we'll leave pretty much all
01:38 the settings at default and then we're
01:41 going to change the color of the bar and
01:44 we'll leave this at this this blue color
01:46 and let's perhaps add a bit of padding
01:49 top and bottom when we change the color
01:52 so we're going to need a marker to tell
01:55 it when to adopt this setting and we'll
01:58 put it just at the top of our page text
02:01 here I'm just going to leave the style
02:04 names as the default style one for now
02:10 so if we preview that
02:16 we'll see that when we get to our marker
02:18 as expected we get our padding and the
02:21 color change so it'd be nice to change
02:24 the color of that header which is what
02:27 we're here to do and for that we have
02:30 custom user styles so when it's
02:33 something that's not in the predefined
02:35 settings like menu colors which will do
02:38 all the major menu bars and there other
02:42 styles and dropdowns
02:43 then we can use custom styles and we've
02:48 got fired for to play with sir and you
02:51 can see in the first control we've got
02:53 the selector now this can be a class or
02:56 an ID or even an affricate and you can
03:00 stack them up with commas as well so you
03:02 can refer to several things in your bar
03:04 at once in this case we just want to
03:06 refer to dot menu header so that's going
03:12 to address the menu header class and you
03:16 can see the default settings are to
03:18 change the color which is what we want
03:21 but let's change that to white so we'll
03:25 make that hash FFF you could just type
03:28 white in there if you want to use one of
03:30 the standard colors and you see there's
03:33 a transition setting here as well now by
03:35 default again that's set to color so we
03:39 can just leave that as it is and we
03:42 should now have our color change on also
03:48 there we go as well as the menu glass
03:50 changing we've changed our custom class
03:54 color so that's very easy but I just
03:58 want to mention a more advanced usage
04:01 where you may want to change two things
04:03 at once
04:04 so if we think about changing the
04:10 opacity at the same time so we one might
04:13 want to make the opacity nor point eight
04:15 as we change the color and for that we
04:19 would set the opacity of the parameter
04:24 naught point eight as the value and we
04:26 want to transition the opacity
04:29 this time now the way CSS transitions
04:32 work is they all have to be on one line
04:35 now each one of these user Styles is
04:38 going to write a block of CSS code as
04:41 per these instructions so what's going
04:44 to happen if we did this is that the
04:47 menu header item is only ever going to
04:50 have a transition of opacity because the
04:52 last instruction written will win if
04:55 they're different selectors it's fine
04:57 you can use different things so all we
05:00 need to do in this case and this is
05:01 really a bit of an advanced case is just
05:04 get rid of the color out of there and
05:07 put it in there with a comma so now
05:10 we're going to transition the color to
05:14 white we're going to transition the
05:16 audacity to naught point eight and that
05:19 transition which is going to get used
05:21 for the menu header class is going to be
05:25 color 200 milliseconds ease opacity 200
05:29 milliseconds ease now we could in fact
05:31 change the opacity timing so that takes
05:35 longer we could make that 500 but the
05:38 key is the transitions all have to be on
05:40 one line of code for a given selector
05:45 like the menu header that's the only
05:48 time that this gets a bit complicated if
05:54 we don't preview that we now see that
05:59 the opacity drops as well as the color
06:03 changing if we were to make that a bit
06:05 more extreme so we can make it not point
06:08 to and it really saves in you see the
06:13 difference and the two things transition
06:15 smoothly together
06:22 now while we've got this project open I
06:24 just wanted to show you one other things
06:25 that we can do and this is to do with
06:28 markers and offsets imaginary if we
06:32 wanted to change the style of the menu
06:35 when we get to the bottom of the page so
06:38 let's let's create a new fixed style
06:41 while we're up here and I'm just going
06:44 to copy that one and change the
06:45 background to red so then we'll have all
06:47 that having settings already there and
06:49 everything else will stay the same
06:51 including our transition so nothing's
06:55 going to change other than the
06:56 background color and we're going to call
06:58 this mark this style page bottom and we
07:06 therefore need a marker for our page
07:08 bottom which we're going to put
07:10 unsurprisingly at the bottom of the page
07:12 and let's just make sure we've got that
07:16 named the same before we do anything
07:18 else now markers trigger when they get
07:23 to the top of the page plus or minus
07:26 this offset that we define here so what
07:31 we need to do is we need this marker to
07:33 trigger when it comes on to the bottom
07:35 of the page not when it gets to the top
07:37 because it's never going to get to the
07:39 top so for that we have marker units of
07:43 browser height so we can offset this
07:47 marker by the full height of the browser
07:50 so push it down to the bottom and it
07:54 will then trigger when it comes on at
07:58 the bottom rather than when it goes off
08:00 at the top so what we need to do is move
08:04 this apparent position of this marker up
08:07 by the height of the browser so that
08:09 when the actual marker itself comes on
08:11 to the page at the bottom here then each
08:16 trigger position is an entire browser
08:18 height up so we're going to need a
08:20 modern negative marker off so we're
08:23 going to add - now the first thing you
08:26 might think well if we add 100 - 100
08:28 percent of the browser height we're
08:30 going to be good to go and
08:34 the trouble with browsers is they bounce
08:36 and if we get down to the bottom of our
08:39 page if I hold it at the bottom of the
08:41 page with my touchpad then yes it works
08:44 but because of the bounce it just comes
08:47 back slightly and we lose it so
08:49 solutions very simple is we don't use
08:52 exactly a hundred let's say use one
08:56 hundred and five percent because then it
08:57 will get to the top of the screen we're
08:59 going to make it a hundred and five
09:01 percent offset upwards so it'll get to
09:04 the top of the screen just slightly
09:06 before we actually scroll to the bottom
09:08 and it will mean you don't get that
09:11 nasty bad so you can scroll down to the
09:13 bottom and even flick it down to the
09:15 bottom with the bounce and it will stay
09:17 read so that simple way that you can
09:21 make markers relative to the bottom of
09:23 the page instead of relative to the top
09:25 of the page and you can play around with
09:27 this this value depending on how far I
09:30 mean if we made this 125 percent then it
09:34 will trigger a lot sooner than the
09:36 bottom of the page so we're going to get
09:39 sort of that that behavior so you might
09:43 want it to trigger when a footer comes
09:44 into view something like that but it's
09:47 very easy once you realize that you've
09:50 just got to move the apparent position
09:51 of the marker up relative to the height
09:54 of the browser and we get our three
09:58 state bar finished thanks for watching I
10:01 hope that's been useful and I'll see you
10:04 next time"}]
Search the page
0
