About Stacks Guru
Stacks Guru is born from the need to search the vast number of videos out there on stacks built for Stacks Pro and the Stacks 5 plugin for Rapidweaver.
We have scraped over 500 videos to get the transcripts for each in order to make the spoken word searchable.
Please use this free tool to help you learn and discover the awesome power that Stacks and the stacks made for Stacks have to offer.
Stacks Guru
Video Reference
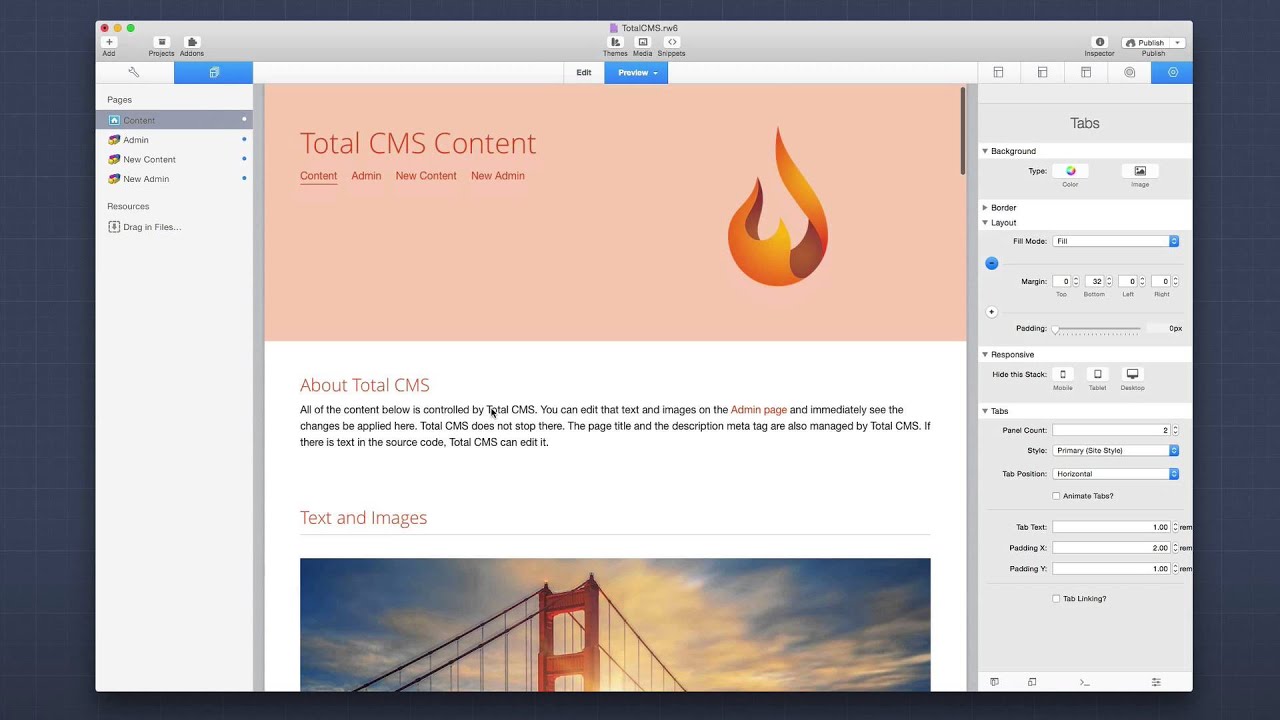
Introduction to Total CMS for RapidWeaver (Pre-Release)
09/05/2015
This video covers the pre-release version of Total CMS. Some thing will be different from the final released version.This video covers the pre-release version of Total CMS. Some thing will be different from the final released version.
Transcript
00:06 hey everybody Joe workman and today i'm00:08 excited because we're gonna integrate
00:10 total CMS into an existing rapidweaver
00:13 project we're gonna start from scratch
00:15 and see kind of how we how easy it is to
00:17 use right and how we can set it up and
00:20 get started with it so before I really
00:24 get started with it I want to back up
00:26 and tell you a little bit of backstory
00:28 now when I built the CMS I wanted to you
00:33 know throw out all the preconceptions of
00:35 what we think is CMS is right normally
00:38 when we think of a CMS we think we have
00:40 to have a back-end database and then you
00:43 know some sort of ugly front end that
00:45 you know shows our things and we can
00:47 click on it and then it allows us to
00:48 edit it right well I I wanted to think
00:52 outside the box I I decided to build
00:55 something completely from scratch that
00:58 is exactly what rapidweaver users need
01:02 right it is completely custom I don't
01:04 leverage any existing paradigms right it
01:07 is built from scratch for rapidweaver
01:10 and I had two requirements one was 0 set
01:16 up I don't want any sort of complicated
01:18 setup process for the CMS second one was
01:21 no database databases are hard and I
01:24 want this to be easy and powerful and I
01:29 am so happy that we have accomplished
01:31 setup 0 database all you need to do is
01:35 publish and go it all just works and I'm
01:39 really really excited to show you this
01:41 first glance at a total CMS so without
01:44 further ado let's jump in and see how
01:46 awesome it is now here we have the total
01:50 CMS demo project that is available for
01:52 download as well as you can get it on
01:55 the dock portal and inside the disk
01:58 image that you download a total CMS with
02:00 now I'm not going to go over every
02:02 single stack right now and then show you
02:04 the settings right I want to kind of
02:07 break this down and show you the basic
02:09 concepts of how to get things started
02:12 and to do that we're going to create
02:14 completely blank pages so first off
02:18 we'll see that I've created a new
02:20 content blank page in a new admin blank
02:22 page inside the project there is nothing
02:26 on these pages we are starting from
02:27 scratch now when you look at the total
02:30 CMS stacks you'll see that there are two
02:32 distinct groups we have the top group
02:35 here which is all of the admin stacks
02:36 these are the stacks that you're going
02:38 to use to create and submit content to
02:40 the CMS and then the white icon stacks
02:44 are the ones that are going to be used
02:47 for content these are going to display
02:49 your CMS content inside your website so
02:53 let's do the admin side first and
02:55 basically every admin page you're going
02:57 to want to have an admin core stack this
03:00 contains all the core libraries that we
03:02 will need for the entire admin page okay
03:06 now for this example we're just going to
03:08 do something simple we're just going to
03:10 create a text box so I add the admin
03:13 tech stack to the page and obviously
03:16 we're going to want to have a save
03:19 button so we're going to go ahead and
03:20 click the shows a button now it's the
03:23 save buttons off by default because most
03:25 time you'll want to have like a
03:26 centralized Save button throughout you
03:28 know your admin page potentially so that
03:31 not every text box has a separate Save
03:33 button okay but for this example we just
03:36 want to keep it simple I'm going to have
03:37 a save button here now what you'll
03:40 notice is that every stack throughout
03:41 total CMS contains a CMS ID this ID is
03:46 what links the admin page content that
03:49 is submitted to the actual content that
03:52 gets displayed on the website so I'm
03:55 going to create something that is has
03:57 not been published on this site so let's
03:59 go ahead and do a demo okay I'm just
04:03 going to create a thing called demo and
04:05 this ID doesn't exist on the site yet so
04:07 it's completely fresh and I'm just going
04:11 to leave all the the defaults alone
04:13 that's all we need so since this project
04:15 uses the foundation theme I've added a
04:17 few foundation stacks just so that we
04:20 can properly preview everything so here
04:24 we are I have my tech stack
04:26 now it is blank it doesn't show any
04:29 content yet because we haven't actually
04:30 saved any content for this demo area yet
04:33 but now let's go ahead and create the
04:35 content side so here I am on the new
04:39 content page and let's go into the text
04:43 content stacks so I'm going to add a CMS
04:46 text content stack and what will notice
04:49 is that this kind of gives you a hint of
04:53 what it is this stack should be placed
04:55 at the bottom of every page okay this
04:58 stack doesn't actually contain any
04:59 content by default and what it does is
05:02 it processes all the content above it on
05:04 the page ok so this stack should be
05:08 placed at the bottom the last stack
05:11 inside your stacks edit mode okay now in
05:15 order to process the text for that demo
05:18 text box we're going to add another tech
05:20 stack to the page but this time we're
05:22 going to go ahead and say insert text
05:24 macro okay and when you do that you'll
05:27 notice that we have a CMS ID and that
05:30 CMS ID we want to tie it to the previous
05:33 one and we're going to set that to demo
05:35 now remember this is a foundation
05:37 project so I've just added a few
05:38 foundation stacks to the page so we
05:40 could properly preview everything and
05:41 what we'll see is we get an alert saying
05:44 unable to find CMS file with ID demo and
05:47 that's because we actually haven't
05:49 created any content with that so let's
05:53 go ahead and do this now I've previously
05:57 published this file and it already
06:01 contains all of the CMS application
06:04 files on the server now I haven't
06:07 actually published these new content and
06:09 new admin pages but that doesn't matter
06:11 as long as the total CMS server files
06:15 exist on your web server we can actually
06:18 submit text content directly from
06:21 rapidweaver so let's go ahead and insert
06:23 some sample text into here and what
06:26 you'll notice is after I inserted this
06:28 text the outline of the box has turned
06:30 red what that tells us is it says that
06:33 this box contains unsaved changes so
06:37 that means I've actually made changes to
06:38 this area which we have
06:40 we've added a bunch of text and all I
06:42 need to do now is click the Save button
06:45 that is submitted the content from
06:48 within rapidweaver to your web server
06:51 okay and if we go back to their our
06:54 content page we will actually notice
06:58 that the content is now displayed now
07:01 this is a really powerful concept what
07:04 you'll notice is that we actually
07:06 displayed the CMS contents inside
07:09 rapidweaver right we we didn't need to
07:12 create our content in Rapid River and
07:15 then publish it hoping that it looks
07:18 correct when once we publish to the CMS
07:21 right everything looks exactly inside
07:25 rapid eiver as if you were to publish it
07:26 so you now have full preview
07:28 capabilities just as if all that content
07:31 was local to your rapidweaver file now
07:35 again we saw that we can actually submit
07:37 text content through rapidweaver to our
07:41 live website now because of a few
07:44 caveats you'll notice that we actually
07:46 can't do that with images but with text
07:49 content you can now if you notice inside
07:52 the text content stack when we added the
07:54 CMS ID you'll see that it created this
07:57 little macro for us or it's displaying
07:59 it for us this is a little helper to get
08:02 you started but as you get using the CMS
08:06 you'll learn that you can actually
08:07 replace the contents of any stack with
08:11 these macros a perfect example of this
08:14 is if we were to go to the main content
08:15 demo page will see that I have a
08:18 foundation tabs stack here now obviously
08:22 total CMS can't ship with every possible
08:25 stack out there so what we've done is
08:27 we've given you the ability to place
08:29 these macros anywhere you want in any
08:32 stack and they will be replaced with the
08:36 text from the actual content that's
08:39 saved in the CMS and what's great is it
08:42 all works in preview so if we look at
08:45 this page in preview will notice that
08:47 these tabs actually contain the text
08:49 that was saved
08:51 on the CMS on our sites this allows us
08:55 to easily preview not only text as you
08:59 see in this example where we're showing
09:01 the text here as well as the images as
09:03 well as galleries and everything else
09:06 works beautifully all inside rapidweaver
09:08 now total CMS also supports formatting
09:12 of our text content and to make that a
09:15 little bit easier we actually have a
09:17 toolbar that we can add to our page now
09:20 if I go back and look at our admin mode
09:22 for this will see that if I actually
09:24 select some text here okay first will
09:27 notice that there's a tooltip that comes
09:29 down that has a lot of options that we
09:31 have available so if we want to make
09:33 this particular text bold we can go
09:35 ahead and click the bold button and if
09:38 you notice that actually makes that text
09:40 it adds a little bit of syntax there
09:41 that will make that text bold if we
09:46 wanted to make this particular text
09:48 italic we can also use the toolbar and
09:51 it adds some specific syntax that allows
09:54 us to make that text italic if we were
09:57 to save this and look at our content
09:59 again what will notice is that our text
10:03 isn't formatted here well that's really
10:05 easy to change if we go into the content
10:08 text ax settings will notice that we
10:12 have a display option and what we can do
10:15 is we can say we want to make sure that
10:16 that text is formatted and you'll notice
10:20 that we actually have a new macro now
10:22 that you can use this anywhere
10:24 throughout any stack to place formatted
10:27 text and when we preview our text with
10:30 the display set to formatted will see
10:33 that that text that we set to be bold is
10:35 now bold and that Thundercats were that
10:38 we highlighted and said it's italic well
10:40 it's italic that's a very powerful now
10:44 spend a little bit extra time showing
10:46 you some of the intricacies of the text
10:48 processing but we've kind of nailed down
10:51 all of the basics you assign a ID to
10:54 your admin stack and then use that same
10:57 ID inside your content stacks to display
10:59 it now with the text we have the power
11:03 of all of those macro
11:05 because you can place those macros
11:07 inside any stack that you want in order
11:10 to customize the content that could be
11:12 tab names it could be headers inside
11:15 your header stacks or it could be
11:17 buttons text right it could be anything
11:22 you want it could be I you know tooltips
11:24 or anything it could be a font awesome
11:26 icon right anything that you can is on
11:29 yay HTML page can be customized by total
11:33 CMS now you can also use these in your
11:36 page titles or in your browser
11:39 descriptions or in your meta tags to
11:43 allow your users to actually have
11:45 control over their browser descriptions
11:48 or their browser page titles it doesn't
11:52 need to be inside of a stack it could be
11:54 any content that is within the HTML that
11:58 is published to the server so this
12:02 allows us a lot of power a lot of power
12:05 and may I say this is huge right so now
12:09 what we're gonna do is I'm just going to
12:10 quickly just braised over some of the
12:13 other stacks I'm not going to go into
12:15 the settings I'm just gonna talk about
12:16 some of the options and things that you
12:19 should look out for so that when you
12:20 start building your sites um you'll know
12:23 but we have the basic concepts down the
12:25 admin stack is tied to the content stack
12:28 via the ID you don't have to set up a
12:31 database you don't have to have any
12:33 complicated setup process you build
12:36 everything in stacks and publish now
12:39 this is actually a great point another
12:41 thing that differentiates total CMS is
12:43 you have the power to build your admin
12:46 areas this means you're not allowing
12:50 this the developer of the CMS to say
12:54 this is what your clients are going to
12:55 see when they go to edit their content
12:57 you have the power you design the admin
13:01 interface the way you want it this uh
13:05 you know really allows us a lot of
13:07 flexibility here now obviously you want
13:09 to password protect your admin areas and
13:12 you could do that with the built-in
13:13 protect stack or if you have my page
13:15 safe stack you can use that as well
13:18 but you get control over everything now
13:21 you don't have to have one big huge
13:22 admin page either you can build it out
13:24 maybe you have two three four admin
13:26 pages and you know all of them are
13:29 password protected obviously so that you
13:31 know your users can log in and then
13:34 access all of their admin areas so here
13:37 we have the admin interface inside the
13:40 total CMS demo project and let's just go
13:43 down this down the list and we'll look
13:44 at each of these options here so the
13:47 first one here we have here is an image
13:49 and to upload new images you simply drag
13:53 and drop a new image and once you drop
13:55 it it'll automatically upload and go to
13:58 the server now when you hover over the
14:00 image you'll notice that there's a
14:01 toolbar the first one the first button
14:04 on that toolbar allows you to edit the
14:07 alt tag for this particular image the
14:11 next button when we click on it you'll
14:14 see that it provides URLs to the actual
14:17 warehoused image where this image is
14:19 stored this way you can use this image
14:22 not only within a total CMS image stack
14:25 but in any image stack that supports
14:28 warehoused images simply copy these URLs
14:32 and use anywhere you want to use that
14:35 image and will automatically be managed
14:37 by total CMS now you may notice here
14:41 that it also contains three URLs the
14:45 reason for this is that the CMS not only
14:49 uploads the image but it resizes that
14:52 full image to a max size that you define
14:56 inside the stack as well as creates two
15:00 different thumbnails for us to use it
15:03 creates a proportional scale down
15:05 thumbnail as well as a cropped square
15:08 thumbnail this allows us to if your
15:12 customer uploads a 10 megapixel file the
15:15 CMS will scale that image down to the
15:18 dimensions that you as the designer have
15:20 defined so that your customers don't
15:22 have 5 10 megabyte images slowing down
15:25 their websites now next as we scroll
15:28 down we'll see that we have more text
15:30 boxes and more
15:31 is that we've all seen as well as the
15:33 toolbar here are some text boxes that i
15:36 was using as an example to edit the
15:38 metadata within our page the page title
15:41 as well as the meta tag for do this for
15:44 the description and here's the gallery
15:47 the gallery works the same thing as
15:49 images drag and drop you can add new
15:52 images to the gallery very easily now
15:55 when you hover over each image you'll
15:57 notice that just like the normal image
15:59 we have the ability to actually edit the
16:02 alt tag okay so you can actually edit
16:05 the alt tag for every single image in
16:07 your gallery and on the content side
16:10 that alt tagging actually used as a
16:12 caption inside the gallery or slideshows
16:16 now you can also click this and get the
16:18 access to the actual full image and
16:21 thumbnails that are generated for the
16:23 gallery if we notice here this is an
16:26 example of where the square thumbnails
16:28 are used these images weren't originally
16:31 square when they were uploaded the CMS
16:33 generated these square thumbnails so
16:35 that we can use them and obviously you
16:39 can trash an image in a gallery so if
16:41 you no longer want an image in your
16:43 gallery you can just simply delete that
16:45 image next is we have the video and you
16:50 can paste in any YouTube or Vimeo video
16:52 URL here and YouTube supports both
16:55 playlist URLs as well as individual
16:59 video URLs so this simply just paste in
17:02 the URL to the video that you want to
17:04 embed on your page and total CMS takes
17:07 care of the rest it's really easy now we
17:11 have feeds and fees are very very
17:13 amazing actually now you can easily type
17:16 in a post and drag in an image for your
17:18 feed and then when you save it it's
17:20 added to your existing feed list over
17:23 here and then for each feed you can
17:26 actually go ahead and for each item
17:28 click on it and edit that post so you
17:31 can maybe you had a typo in the text or
17:33 you want to change the image you can
17:35 easily edit all existing posts you can
17:38 also contain you know create alt tags
17:41 for each image and the post doesn't
17:44 necessarily need to have
17:45 image so when it post doesn't have an
17:47 image here in the admin interface I just
17:49 have a default feed icon and lastly we
17:53 have the RSS button where you can
17:55 actually copy and get the RSS feed URL
17:57 for this news feed this allows a lot of
18:01 possibilities in terms of integrating
18:03 with you know if this than that so you
18:05 can maybe auto post to Facebook right
18:08 and things of that nature having an RSS
18:11 feed for your newsfeed will be a great
18:13 thing it allows a lot of flexibility
18:17 last at the bottom we can you know
18:19 easily do files and file depots and you
18:23 can click on the link and get the exact
18:26 download link so that maybe you want to
18:29 put this URL to this file in a button so
18:31 that this zip file always downloads from
18:34 a button and then whenever a user drags
18:37 in a new zip file the same URL is used
18:39 and then for file depose you know
18:43 similar things you can delete a file as
18:45 well as get the link directly to that
18:47 particular file within the file depot
18:51 and last thing at the very bottom is
18:53 just a formatting cheat sheet that ships
18:55 with total CMS so you can give your
18:57 users may be a little bit of you know
18:59 help in terms of the syntax for that you
19:03 know markdown formatting that we use
19:05 inside the text areas or they could just
19:07 use the toolbars so everybody I'm really
19:11 excited I tried to keep this video short
19:13 but there's just so much awesome stuff
19:16 to talk about with this CMS and I hope
19:18 you got the core concepts of how to
19:20 build the CMS into your sites you build
19:23 an admin page and then you display that
19:26 content all with stacks you have all of
19:29 the control and all of the power and
19:30 again 0 setup 0 database you just
19:34 publish and go I hope you are excited
19:37 try the free trial for total CMS you
19:40 have you can download it and use it on
19:42 your active site for 30 days so give it
19:45 a shot you have no excuses just go ahead
19:48 and give it a shot and you'll never look
19:50 back um it this has features that people
19:53 have wanted in rapidweaver for 10 years
19:56 right and we finally have it
19:58 in a beautiful rapidweaver stacks way
20:02 that is true to rapidweaver right you
20:05 can preview everything in rap Weaver
20:07 build it all it all feels native and it
20:11 just works and I'm really excited about
20:14 it we've been working really hard for
20:16 over 10 months now on this project and
20:19 I'm so excited to give it to you so that
20:22 you guys can then take it in and extend
20:24 it to even further I can't wait to see
20:26 what you guys did build with it so have
20:29 a great day everybody thanks for
20:30 watching this video and take care bye"}]
Search the page
0
