About Stacks Guru
Stacks Guru is born from the need to search the vast number of videos out there on stacks built for Stacks Pro and the Stacks 5 plugin for Rapidweaver.
We have scraped over 500 videos to get the transcripts for each in order to make the spoken word searchable.
Please use this free tool to help you learn and discover the awesome power that Stacks and the stacks made for Stacks have to offer.
Stacks Guru
Video Reference
Lead Pages with Post Office Stack v1.6 for RapidWeaver
01/30/2015
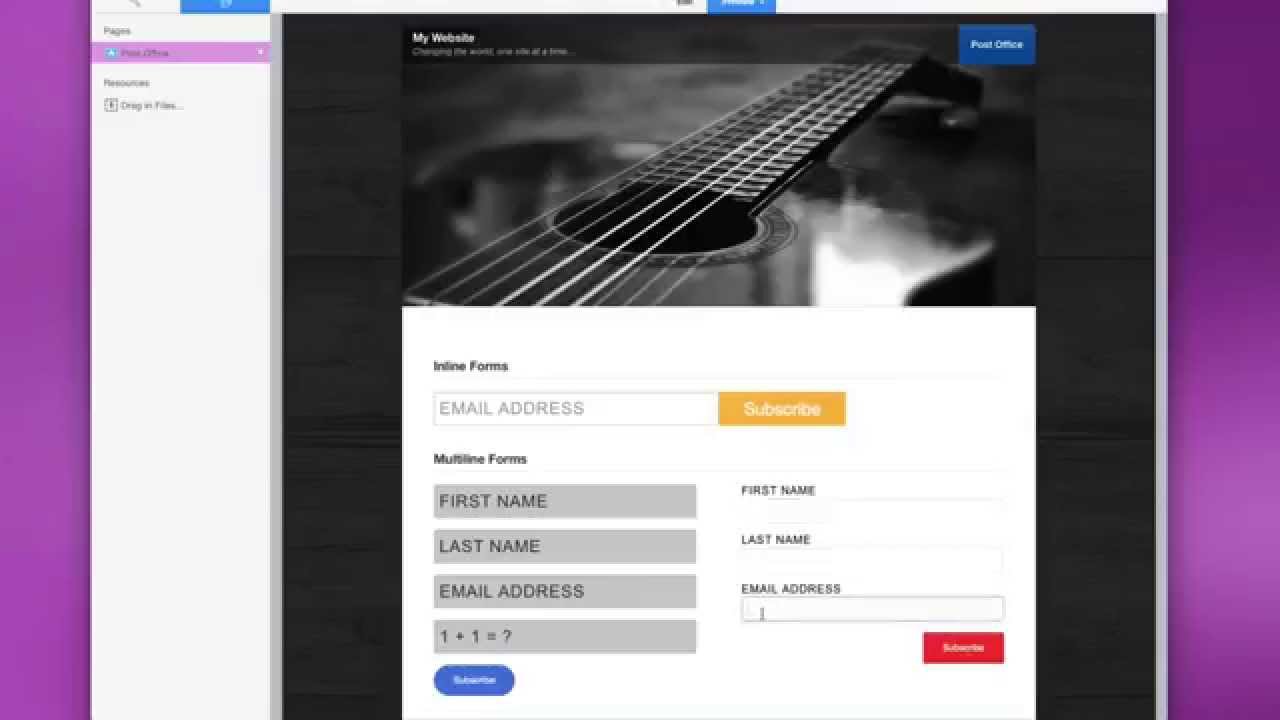
Post Office Product Page: http://joeworkman.net/rapidweaver/sta... Post Office is a great email subscription form that also completely manages its database for you. It allows you to subscribe, unsubscribe and even export your customer info! Post Office also integrates with Sendy, MadMimi, MailChimp, AWeber, and Newsletter Mailer.Post Office Product Page: http://joeworkman.net/rapidweaver/sta...
Transcript
00:05 hey everybody this is Joe workman and00:07 you know last night
00:09 I went on a little coding tangent and I
00:11 decided to revamp post office it needed
00:16 a little bit work and so this new
00:19 version 1.6 is just the bee's knees I
00:23 brought it up it's really current and
00:25 I've added a lot of great new features
00:27 including Cindy integration as you know
00:31 post office integrates with a lot of
00:33 great services MailChimp Aweber mad Mimi
00:36 and now it offers Cindy which is the
00:40 newsletter service that I've recently
00:41 started using so without further ado
00:44 let's jump on in and see some of the
00:46 awesome new features of post office 1.
60:50 so if you are familiar with the previous
00:52 versions of post office you'll see how
00:54 fresh and clean and current the new
00:57 forms are in post office 1.6 and as you
01:01 see the style options that we have are a
01:02 lot nicer here we have an inline form
01:05 where it looks like the actual input box
01:08 and the button are made to be directly
01:11 right next to each other as see we can
01:13 also do multi-line forms where we have
01:16 labels online labels inside the
01:19 individual fields as well as labels that
01:22 are on top of the input fields as well
01:24 as see we have a lot of controls over
01:27 text size size the input boxes colors
01:31 and sizes of everything let's jump on in
01:34 and see exactly how to configure it all
01:36 now post office ships with two stacks
01:39 the first is post office which is the
01:41 one you're going to be using a majority
01:43 of the time and the post office box
01:45 stack we'll see later on
01:47 this allows you to actually trigger
01:49 actions and display content after a form
01:52 has been submitted now any add post
01:55 office the first you'll notice is you
01:57 got to configure your service now post
02:00 office offers the ability to use your
02:02 own my sequel database that post office
02:04 will help set up for you as well as mad
02:07 mimi MailChimp newsletter mailer
02:10 Aweber and
02:12 nd next up is the form builder now here
02:17 it's really simple to add new fields if
02:19 I want to add a last name field to
02:21 simply check it if I want to add maybe a
02:23 custom field or a human test field I can
02:26 add that as well
02:27 next we can configure all of these
02:29 labels for every single input field as
02:32 well as provide our human tests as well
02:35 as the answer for human tests if we're
02:37 using that field now once you configured
02:40 what fields you want you're gonna want
02:41 to go ahead and look at form validation
02:43 and determine whether or not you want to
02:44 require first name last name custom
02:47 fields as well as enter in the error
02:50 text that users will get if they enter
02:52 in the wrong information next up is
02:55 styling our forms and we use our text
02:58 size to actually adjust the actual size
03:00 of the input fields so the size of the
03:04 text basically affects the size of the
03:06 inputs now this uses responsive sizing
03:09 so we use 1.5 will give us 1.5 times the
03:14 root element size and this will allow
03:17 the text to actually scale properly from
03:20 mobile device all the way to desktop
03:22 nicely then we can define our text color
03:25 and that's the color of the text within
03:27 the each input area now by default our
03:31 labels are going to be inline inside the
03:33 text areas however if you uncheck that
03:35 you can easily apply your own label size
03:40 and color to the labels as you see they
03:42 are on top of our form inputs next
03:46 you'll see that we have full control
03:47 over the background color of each input
03:50 as well as the border color and the
03:53 border focus now the border focus is the
03:56 color of the border and drop shadow when
03:59 a specific input field is selected now
04:02 if we were to jump down to the button
04:04 settings one less that we have full
04:06 control over the size of the button the
04:07 alignment of the button whether or not
04:10 we want round corners or pill shaped
04:13 buttons as well as making maybe we want
04:15 our button to be full width and
04:17 obviously you can change the color and
04:19 text now if you're using foundation
04:22 you'll notice that inside the style
04:24 drop-down you have
04:25 access to all of these styles that are
04:27 configured inside the foundation site
04:29 style stack now I had skipped we have
04:32 our label options so obviously a label
04:34 is the text that is inside of your
04:35 button now the success label is the
04:38 actual text that the button will change
04:40 to once your form is successfully
04:43 submitted this provides your users
04:46 feedback that what they submitted
04:47 actually worked now if you don't like
04:53 the button that ships with post office
04:54 because there are a lot of amazing and
04:57 third-party buttons out there elixir has
04:59 a great flat button stack and there are
05:02 many more if you want to use those
05:04 simply check the use third party button
05:06 setting and what you'll notice is that
05:09 you'll see a stack drop zone up here and
05:13 what you'll notice is a stack drop zone
05:15 area will appear and this will allow you
05:17 to add any button stack that you want
05:19 inside of here and whenever you click
05:21 that button it will submit the post
05:23 office form now if we look at the very
05:25 bottom of post office we'll see that we
05:27 have success content and this allows us
05:30 to do something after a form has been
05:32 successfully submitted the most simple
05:35 of the two is definitely redirect so
05:37 after a form has been successfully
05:39 submitted he could redirect the page to
05:41 any URL now I had mentioned the post
05:45 office box earlier and what this allows
05:48 you to do is when you add a post office
05:50 box to the page you can add content and
05:52 that content will be hidden
05:55 now once the form is successfully
05:57 submitted you can reveal the contents of
06:00 that stack this is great if you want to
06:03 unveil a download content or maybe you
06:06 know a free ebook for your customers or
06:07 something of that nature now there was
06:10 one setting that I skipped over on
06:11 purpose and this was customized sizing
06:14 and I wanted to go over this last to
06:17 show you exactly how we can change the
06:19 layout of our post office forms now when
06:23 you open up custom sizing you'll notice
06:26 that right away if you have first name
06:29 and last name checked you will see that
06:32 they are now on one line and the email
06:35 address field is on the third line and
06:37 all of this is configured
06:39 by configuring the percentage width of
06:41 each field inside custom sizing as you
06:45 see we have first width and last width
06:47 set to 50% now because 50 plus 50 is a
06:51 hundred they will both be on the same
06:53 line now there is also a field gap
06:57 setting which allows you to define the
06:59 gap between each input field if they are
07:03 directly next to each other now this is
07:06 exactly how we achieved this one line
07:08 post office form by configuring custom
07:11 sizing we can actually but the email
07:14 address and the button field directly
07:17 next to each other so in order to do
07:20 this you're going to want to customize
07:22 settings to find that the field size for
07:25 your email column to be 50% or whatever
07:28 you like and then also do the button
07:31 field setting to be 50% or whatever
07:33 you'd like then lastly you need to check
07:36 the inline button setting inside the
07:38 button styles and this will allow the
07:42 button to stay the same exact height as
07:45 the input field form well and that does
07:49 it for the new post office update
07:50 everybody I hope you enjoy this update
07:52 it really brings a modern flair to the
07:54 post office and if you're using
07:57 foundation it integrates beautifully
07:59 with it so I hope you use it one note if
08:03 you are are updating from an older
08:05 version of post office the post office
08:08 previous versions will their name will
08:11 change and you'll see existing instances
08:14 be called pio legacy and this will be a
08:17 cute clue that if you want to use the
08:19 latest post office features you're going
08:21 to want to add a new post office stack
08:23 to the page and use that now all your
08:26 existing instances will continue to work
08:28 as they did before but if you'd want to
08:30 use the new features of the current 1.
68:34 version of post office you're gonna add
08:36 a new instance to the page so I hope you
08:38 enjoy post office um it's a really great
08:40 update um I I kind of built it for
08:43 myself a little bit because I wanted a
08:45 nicer fancier form on my website and I
08:48 hope you enjoy it too so thank you very
08:50 much I hope you have a great weekend
08:51 everybody bye"}]
Search the page
0
