About Stacks Guru
Stacks Guru is born from the need to search the vast number of videos out there on stacks built for Stacks Pro and the Stacks 5 plugin for Rapidweaver.
We have scraped over 500 videos to get the transcripts for each in order to make the spoken word searchable.
Please use this free tool to help you learn and discover the awesome power that Stacks and the stacks made for Stacks have to offer.
Stacks Guru
Video Reference
Leave a Tip!
Every little bit helps to keep this going. I'll be doing my very best to keep up with the likes of Joe when it comes all the videos he posts!
MovingBox 3 Stack - Building a basic slider
Learn the basics of MovingBox 3 and build a slider with custom layouts, images, video and animations. Check out MovingBox at https://www.weavers.space/stacks/movingbox
Transcript
come on
hey so in this video we're going to be
looking at the basics the getting
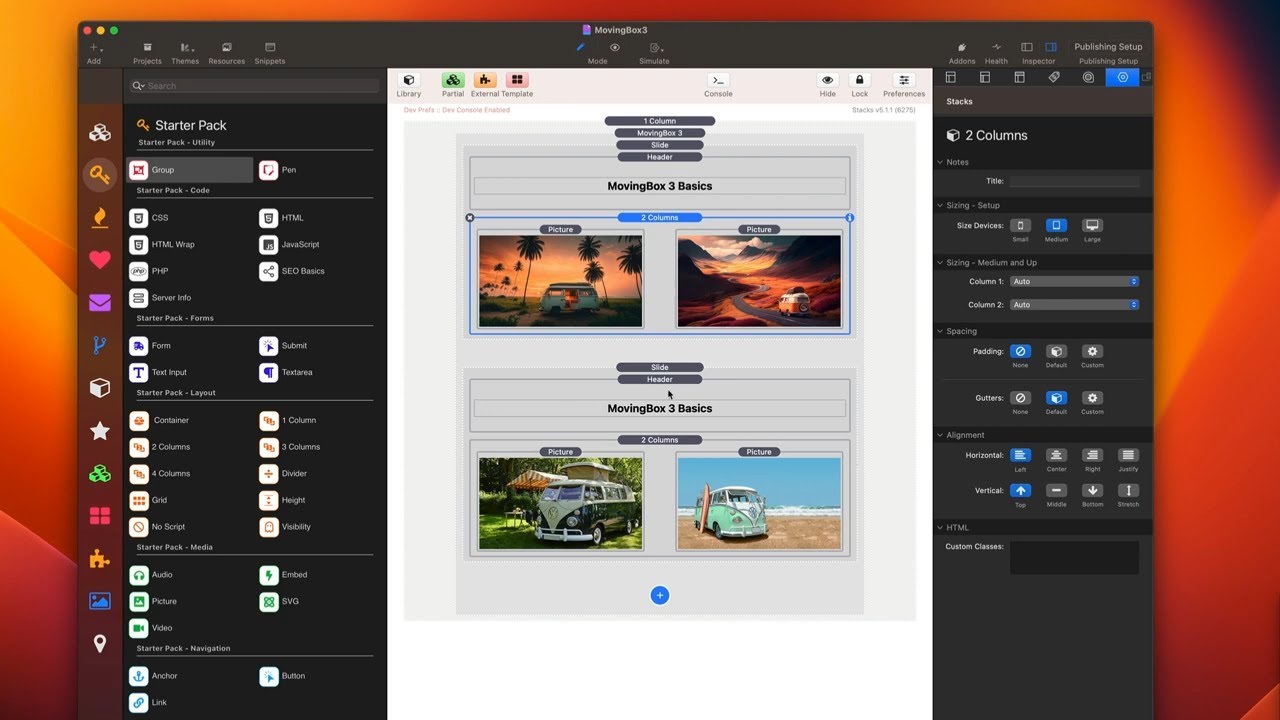
started of moving box three so you'll
notice when you first add moving box to
the page
you will initially get two slides
and you will notice there's a blue
button this blue button when you click
on it you'll be able to add a bunch of
more features
um now in this video I'm not going to be
going through all of these things you
might see a couple things in here and
there but I won't be diving into the
details of each of these individual
slides here okay now obviously we can
add in our slide content so let's just
go ahead and add a little bit of content
for us here
so here you'll notice I've used some
stacks for my free starter pack just to
kind of build out a little layout per
slide we just have a simple little
header as well as some columns with a
couple images just to add a little bit
of Interest
now
there are a couple other slides that
ship with moving box the default slide
stack allows you to add whatever stack
that you want inside right so basically
you could just take any stack you want
drag it in and build whatever layout
that you'd like
now we also have an image slide and this
allows you to funny enough add an image
so let's go ahead and add an image to
this slide
there we go we just simply drag and drop
there's also Warehouse available you can
add an ALT tag such as you know moving
box three
okay now you can also not add a caption
we're not going to dive into all of this
right now but you can add a caption and
add some animations to your captions as
well which is super cool so let's leave
that caption on there for now
and next up we can add a video slide so
just like the images this allows us to
add a video to our slide so let's go
ahead and let me configure this video
there we have it I've gone ahead and
added the URL to my mp4 file and I've
added a poster image as well and defined
all of my sizing
now changing the order of the slides is
super easy with moving box you simply
take your slides and you can just drag
and drop them to change the order in
which they are so let's do this we have
our kind of our basic uh you know slide
with our two images and then we have an
image slide then we're going to have
another basic slide with our custom
layout and then a video slide
now one thing almost every slider is
going to have that we kind of need is
let's go ahead and add some arrows
I'm going to go ahead and add nav arrows
and I'm not going to tweak many of the
settings I I do want to just make the
horizontal position the outside edge
okay and uh let's go and see how this
looks
so now here we are in preview and we see
our custom slide layout and we click
next and we can see our lovely image
slide with our animated caption that we
got and then we had our third slide and
then here lastly our video
now what you might notice is the video
actually doesn't play
um it would be nice if it played
automatically and we can enable that
super easy inside of moving box so here
we're going to start changing our first
settings here we're going to go ahead
inside moving box
and we're going to go down to slide
content and I'm going to click auto play
and uh if you're curious this other one
stretch what this does is if you have
any images that are not potentially
large enough to scale to the full width
of your moving box slider
um this will force them to stretch okay
so let's go ahead and preview
we go next next and next
and what we'll notice is
now we have autoplay enabled for video
which is really really cool
now next thing I'd like to fix is if you
notice um these slot this slide content
here isn't necessarily you'd be nice if
it was all centered right so um by
default it kind of just goes up at the
top because that's you know it's not as
tall as this image right but how can we
fix that
so let's quickly fix that we're going to
add another stack to this uh moving box
instance called slide styles
now I'm not going to go into all of this
here you can actually add background
colors to your slides if you want you
can add margins and paddings what I'm
going to do is I'm going to check this
set aspect ratio and by default 16x9
which is the size luckily of my video
and my image so I'm going to go ahead
and set that and let's go ahead and
preview again
and there we go we'll see now that all
of the content is nicely centered
um within the slides and our slider just
looks beautiful
okay so let's dive into some of the
other options that we have inside moving
box three now as you see here inside
edit mode sometimes
when you have a slider with a lot of
slides it can take up a lot of space so
the very first setting here is super
convenient and allows us to collapse our
slides this allows us to just basically
condense moving box so it takes up less
space
it will show the first slide and hide
the rest and then it will still show
your nav arrows and your slide Styles
and all that stuff
so by default moving box will show one
slide at a time we can easily configure
that through this simple slider that
tells us how many slides we want to see
at a time
we can also configure the initial slide
that it will start on as well as how
many slides do we want to scroll for
example if I want to show two slides at
a time but then also scroll two slides
at a time we can see that here so here
I'm displaying two slides and if I click
next it will scroll both slides and I
can see the next two slides and if we
were to change that to be slides to
scroll of one we can go ahead and scroll
one slide at a time
so as we move down to the settings let's
look at the slide animation
here you're going to choose between
slide and fade and then if you have
slide you can choose the direction of
whether or not you want a vertical or
horizontal slider so your direction of
your sliding
next you can choose your timing curve
and if you look in the tooltips here
you'll notice that there is a website so
greensock.com docs V3 slash eases and
that will give you a great
representation of what all of these look
like in terms of the timing curves okay
now here in the timing curve you'll
notice that we have in in out and out
and the tooltip here kind of explains
those so the out will start fast and
finish slow the in starts slow and
finishes fast and the in out will start
and finish slow but in the middle it
kind of speeds up right so think of it
as it starts slow and then fast right so
that's kind of what those timing curves
um do
next is our features now a lot of times
you're going to want to have autoplay
turned on
um so this is actually on by default I
did shut this off earlier
but the auto advance basically allows
you to Auto cycle through your slides
and this is a wait time in milliseconds
so by default it will wait four seconds
before animating to the next slide
and then here we have pause on Hover so
a lot of times if you have content that
you want your users to be able to
analyze or consume you can actually have
pause on Hover so when they hover over
the slider the actual animations will be
paused
then we have some controls for touch so
swipe is on by default we also have drag
and drop as well as touch targets touch
targets are on mobile if you tap on left
or right of the slider
it'll actually go to previous or next
I guess another nice feature to show off
in this Basics video would be adding
some nav dots so if we just go ahead
and
so we just go ahead and add the nav Dots
here we'll see that we can then
configure all of our various options for
our navigation dots
and as you see here they do show up at
the bottom by default you can configure
those to be in all kinds of different
locations within the dot settings and if
you click on the dots it'll actually
navigate to that particular slide as
well
and last but definitely not least is the
new animate options that we have within
the moving box slides
so here we add the mv3 animate and let's
go ahead and add that to some of our
slide content
okay so what I've added here is I've
made the animations
um for the moving box set to fade and
then what I've done here is on the
header this is going to fade in down and
it's going to fade out up and it's going
to delay by a quarter second so not much
but it is going to be delayed actually
let's make that half a second okay and
then these images they're going to fade
in from the sides and Fade Out from the
sides
so there we go we got our images coming
in and the header faded down we saw that
they animated out when the slide changed
and if we go back to that slide let's go
back to that slide
you'll see that those animations happen
again so super easy way to add
animations to our slides this is a
really powerful feature inside moving
box
so I hope you enjoy the moving box 3
stack as you see it's super powerful
it'll definitely be the most powerful
slider that you have inside your Stacks
Library uh you can just do so many
things with it I can't wait to see the
amazing designs that you make with
moving box now go forth and make your
websites great
thank you
[Music]
hey so in this video we're going to be
looking at the basics the getting
started of moving box three so you'll
notice when you first add moving box to
the page
you will initially get two slides
and you will notice there's a blue
button this blue button when you click
on it you'll be able to add a bunch of
more features
um now in this video I'm not going to be
going through all of these things you
might see a couple things in here and
there but I won't be diving into the
details of each of these individual
slides here okay now obviously we can
add in our slide content so let's just
go ahead and add a little bit of content
for us here
so here you'll notice I've used some
stacks for my free starter pack just to
kind of build out a little layout per
slide we just have a simple little
header as well as some columns with a
couple images just to add a little bit
of Interest
now
there are a couple other slides that
ship with moving box the default slide
stack allows you to add whatever stack
that you want inside right so basically
you could just take any stack you want
drag it in and build whatever layout
that you'd like
now we also have an image slide and this
allows you to funny enough add an image
so let's go ahead and add an image to
this slide
there we go we just simply drag and drop
there's also Warehouse available you can
add an ALT tag such as you know moving
box three
okay now you can also not add a caption
we're not going to dive into all of this
right now but you can add a caption and
add some animations to your captions as
well which is super cool so let's leave
that caption on there for now
and next up we can add a video slide so
just like the images this allows us to
add a video to our slide so let's go
ahead and let me configure this video
there we have it I've gone ahead and
added the URL to my mp4 file and I've
added a poster image as well and defined
all of my sizing
now changing the order of the slides is
super easy with moving box you simply
take your slides and you can just drag
and drop them to change the order in
which they are so let's do this we have
our kind of our basic uh you know slide
with our two images and then we have an
image slide then we're going to have
another basic slide with our custom
layout and then a video slide
now one thing almost every slider is
going to have that we kind of need is
let's go ahead and add some arrows
I'm going to go ahead and add nav arrows
and I'm not going to tweak many of the
settings I I do want to just make the
horizontal position the outside edge
okay and uh let's go and see how this
looks
so now here we are in preview and we see
our custom slide layout and we click
next and we can see our lovely image
slide with our animated caption that we
got and then we had our third slide and
then here lastly our video
now what you might notice is the video
actually doesn't play
um it would be nice if it played
automatically and we can enable that
super easy inside of moving box so here
we're going to start changing our first
settings here we're going to go ahead
inside moving box
and we're going to go down to slide
content and I'm going to click auto play
and uh if you're curious this other one
stretch what this does is if you have
any images that are not potentially
large enough to scale to the full width
of your moving box slider
um this will force them to stretch okay
so let's go ahead and preview
we go next next and next
and what we'll notice is
now we have autoplay enabled for video
which is really really cool
now next thing I'd like to fix is if you
notice um these slot this slide content
here isn't necessarily you'd be nice if
it was all centered right so um by
default it kind of just goes up at the
top because that's you know it's not as
tall as this image right but how can we
fix that
so let's quickly fix that we're going to
add another stack to this uh moving box
instance called slide styles
now I'm not going to go into all of this
here you can actually add background
colors to your slides if you want you
can add margins and paddings what I'm
going to do is I'm going to check this
set aspect ratio and by default 16x9
which is the size luckily of my video
and my image so I'm going to go ahead
and set that and let's go ahead and
preview again
and there we go we'll see now that all
of the content is nicely centered
um within the slides and our slider just
looks beautiful
okay so let's dive into some of the
other options that we have inside moving
box three now as you see here inside
edit mode sometimes
when you have a slider with a lot of
slides it can take up a lot of space so
the very first setting here is super
convenient and allows us to collapse our
slides this allows us to just basically
condense moving box so it takes up less
space
it will show the first slide and hide
the rest and then it will still show
your nav arrows and your slide Styles
and all that stuff
so by default moving box will show one
slide at a time we can easily configure
that through this simple slider that
tells us how many slides we want to see
at a time
we can also configure the initial slide
that it will start on as well as how
many slides do we want to scroll for
example if I want to show two slides at
a time but then also scroll two slides
at a time we can see that here so here
I'm displaying two slides and if I click
next it will scroll both slides and I
can see the next two slides and if we
were to change that to be slides to
scroll of one we can go ahead and scroll
one slide at a time
so as we move down to the settings let's
look at the slide animation
here you're going to choose between
slide and fade and then if you have
slide you can choose the direction of
whether or not you want a vertical or
horizontal slider so your direction of
your sliding
next you can choose your timing curve
and if you look in the tooltips here
you'll notice that there is a website so
greensock.com docs V3 slash eases and
that will give you a great
representation of what all of these look
like in terms of the timing curves okay
now here in the timing curve you'll
notice that we have in in out and out
and the tooltip here kind of explains
those so the out will start fast and
finish slow the in starts slow and
finishes fast and the in out will start
and finish slow but in the middle it
kind of speeds up right so think of it
as it starts slow and then fast right so
that's kind of what those timing curves
um do
next is our features now a lot of times
you're going to want to have autoplay
turned on
um so this is actually on by default I
did shut this off earlier
but the auto advance basically allows
you to Auto cycle through your slides
and this is a wait time in milliseconds
so by default it will wait four seconds
before animating to the next slide
and then here we have pause on Hover so
a lot of times if you have content that
you want your users to be able to
analyze or consume you can actually have
pause on Hover so when they hover over
the slider the actual animations will be
paused
then we have some controls for touch so
swipe is on by default we also have drag
and drop as well as touch targets touch
targets are on mobile if you tap on left
or right of the slider
it'll actually go to previous or next
I guess another nice feature to show off
in this Basics video would be adding
some nav dots so if we just go ahead
and
so we just go ahead and add the nav Dots
here we'll see that we can then
configure all of our various options for
our navigation dots
and as you see here they do show up at
the bottom by default you can configure
those to be in all kinds of different
locations within the dot settings and if
you click on the dots it'll actually
navigate to that particular slide as
well
and last but definitely not least is the
new animate options that we have within
the moving box slides
so here we add the mv3 animate and let's
go ahead and add that to some of our
slide content
okay so what I've added here is I've
made the animations
um for the moving box set to fade and
then what I've done here is on the
header this is going to fade in down and
it's going to fade out up and it's going
to delay by a quarter second so not much
but it is going to be delayed actually
let's make that half a second okay and
then these images they're going to fade
in from the sides and Fade Out from the
sides
so there we go we got our images coming
in and the header faded down we saw that
they animated out when the slide changed
and if we go back to that slide let's go
back to that slide
you'll see that those animations happen
again so super easy way to add
animations to our slides this is a
really powerful feature inside moving
box
so I hope you enjoy the moving box 3
stack as you see it's super powerful
it'll definitely be the most powerful
slider that you have inside your Stacks
Library uh you can just do so many
things with it I can't wait to see the
amazing designs that you make with
moving box now go forth and make your
websites great
thank you
[Music]
Search the page
0
{name}
{rating}
{comment}
