About Stacks Guru
Stacks Guru is born from the need to search the vast number of videos out there on stacks built for Stacks Pro and the Stacks 5 plugin for Rapidweaver.
We have scraped over 500 videos to get the transcripts for each in order to make the spoken word searchable.
Please use this free tool to help you learn and discover the awesome power that Stacks and the stacks made for Stacks have to offer.
Stacks Guru
Video Reference
Shadows with Jack for RapidWeaver
01/28/2015
Jack Product Page: http://joeworkman.net/rapidweaver/sta... Jack is a very powerful tool to have inside your RapidWeaver toolbox. This video reviews how you can use Jack to create shadows and even new ways of using them that you may not have ever thought before. Be sure to check out the other video tutorials on all the other things that we can do with Jack.Jack Product Page: http://joeworkman.net/rapidweaver/sta... Jack is a very powerful tool to have inside your RapidWeaver toolbox.
Transcript
00:06 okay everybody so here's everything in00:09 this video that you're gonna want to
00:10 know about Jack shadows chances are
00:12 you've watched other Jack videos that
00:15 we've done the jack overview backgrounds
00:17 borders layouts right so we've done
00:21 videos of all the jack sections and this
00:24 one we're going to review everything
00:26 about Jack shadows so without further
00:30 ado let's jump on in okay so here we are
00:33 inside the jack demo project which
00:35 you've probably learned by now you can
00:37 download from our dock portal or from
00:40 the disk image that you purchased at
00:41 Jack from ok so here we're going to go
00:45 over all of the shadow options that you
00:47 can do with Jack okay um as you know you
00:51 can apply a bunch of different shadow
00:54 effects with Jack um you can have simple
00:57 drop shadows we have some special
00:59 shadows this piquing raised corner um
01:01 you have more peaking where you can you
01:03 know peek out the top and the bottom
01:05 inset shadows and flat hipster shadows
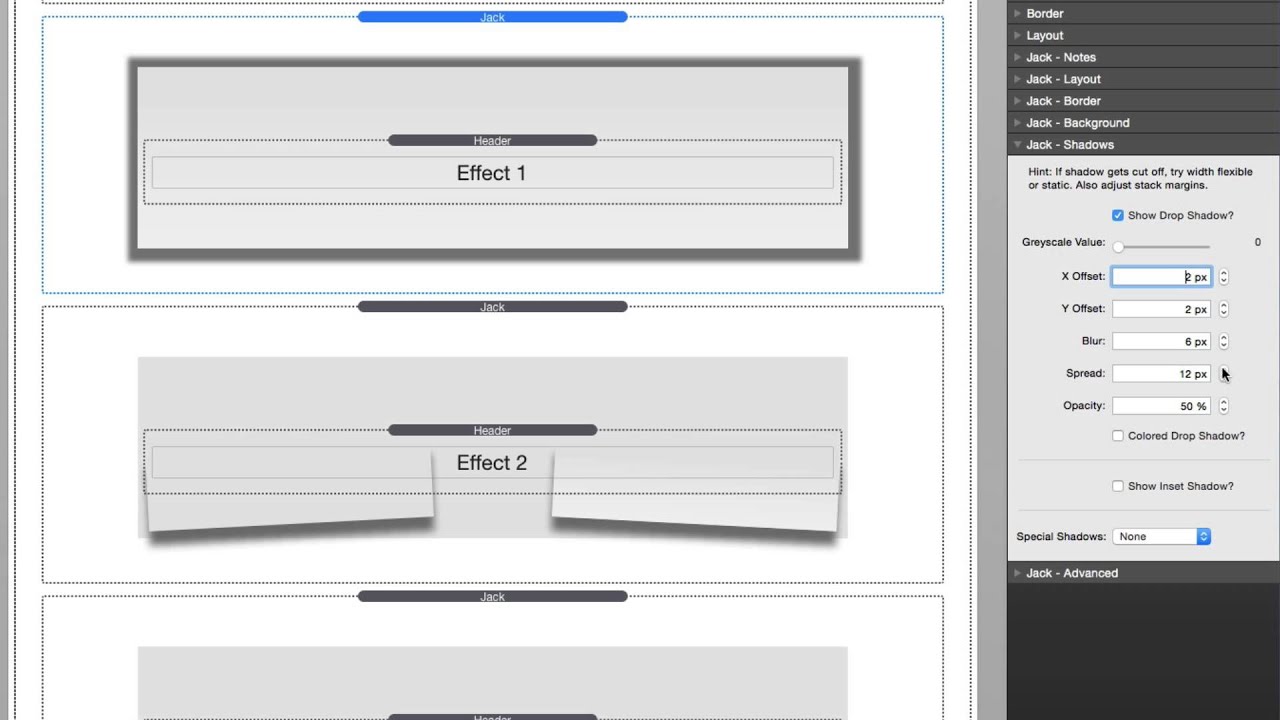
01:09 okay so let's jump on in this first
01:14 effect is purely a the default shadow
01:18 with Jack when you add a drop shadow
01:21 this is exactly what you get now all of
01:25 these values are changeable obviously
01:27 the first is there's grace k value and
01:30 what that means is a majority of shadows
01:33 you're going to want them to be either
01:35 black or white okay or something in
01:39 between so this scale allows you to have
01:43 any a shade of black and white and grey
01:47 that you could ever want okay and what's
01:50 great about this grace k value is when
01:53 you use a grayscale value you can also
01:55 use opacity now there is an option to do
02:00 a color drop shadow however when you
02:03 define a colored drop shadow where you
02:06 can define anything like a red or blue
02:08 you are not allowed to use an opacity
02:12 the opacity value will not work so it's
02:15 recommended that if you want to use
02:18 it'll pack you know have an opacity in
02:20 the transparent shadow that you do use a
02:23 grayscale value okay so other options
02:28 the X offset obviously adjusts the x
02:32 position or the horizontal position of
02:35 the shadow and remember all these values
02:37 can be positive and negative integers so
02:40 the X office offset right now is 9 and
02:43 it shifted to the right if I wanted to
02:45 shift the shadow to the left I can make
02:48 that a negative number and we can see
02:50 live inside edit mode the shadow
02:52 shifting around jack why conversely is
02:57 going to change the horizontal offset so
03:02 if I wanted it to be on the top I can
03:04 then set a negative Y and it will now be
03:07 on the top now the blur defines the
03:11 pixel radius for the blur of the stack
03:15 now for example if we set the offsets of
03:20 both the x and y 20 ok and let's set
03:25 spread to 0 as well ok will notice that
03:31 we now have a six pixel kind of blur
03:35 peaking on the outside of jack on all
03:38 sides right so by setting the x offset
03:43 20 and the y offset 20 we basically
03:46 envision you have like an invisible
03:48 element behind Jack and our x and y's
03:52 are at zero so it's it's at zero on all
03:55 sides and basically the blur is
03:57 extending that shadow by six pixels on
04:01 all sides now if at this point we are
04:05 going to if we increase the x over 2 and
04:07 the y let's say down to ok we still have
04:12 a little bit of peak on these two sides
04:14 we've just shifted that entire element
04:17 um down and over now what is spread
04:24 spread is what you can do to actually
04:26 make that fictitious invisible element
04:30 bigger or smaller so for instance if I
04:34 make the spread a lot bigger will notice
04:37 that we we kind of have now this kind of
04:39 looks a little ugly right but it as you
04:43 see it's a good example to show exactly
04:45 what you can do we're now making that
04:48 invisible element bigger behind Jack now
04:52 what could be useful is if you make that
04:55 element actually smaller so if we make
04:58 that a negative 6 okay and then we make
05:02 this let's say we start doing this a
05:05 little bit bigger right so here by
05:10 making it a negative 6 we've actually
05:12 made this the size of the pseudo element
05:16 behind six pixels smaller on all four
05:19 sides so hopefully I didn't confuse you
05:24 there but that's exactly what spread is
05:26 and of course opacity allows us to
05:29 change the opacity so if we have a
05:31 shadow that's 100% well that's that we
05:33 have a very harsh black shadow here so
05:37 now let's jump into effect number two
05:39 which allows Jack it's one of the
05:43 special shadows with Jack and it's
05:46 called raised corners and a lot of these
05:49 settings are going to be very identical
05:51 to what we've just gone over in depth in
05:53 the drop shadow we have our grayscale
05:55 grayscale value as well as all of our
05:57 offsets blurs spreads and opacities with
06:02 raised corners you can define whether or
06:03 not you want both corners or just a
06:05 single corner for the shadow there's
06:09 also a max width option which is
06:12 interesting in edit mode the actual
06:15 little pseudo elements that are used to
06:18 create the shadows are actually being
06:20 displayed inside edit mode now if we
06:23 preview our site you'll definitely never
06:29 notice and see these elements
06:33 however it's very interesting to see
06:35 these exactly what's going on so you can
06:38 define exactly where your shadow is
06:40 going to look okay so this is where we
06:43 define the max width of these kind of
06:45 pseudo elements that this raised corner
06:47 effect uses then the bottom and edge and
06:51 rotation changes all of these elements
06:54 how close is it to the edge how close is
06:56 it from the bottom or the top and then
06:59 obviously the rotation is what is the
07:01 degree at which that shadow is going to
07:03 be so if we increase this to aid
07:06 rotation of 10 degrees will notice that
07:09 the angle of that shadow is going to be
07:11 a lot more harsh now at this point we
07:15 want to be careful because we notice
07:16 that the edge of our pseudo element is
07:19 now peaking below Jack this is going to
07:23 give us unwanted results inside preview
07:28 because as we see here we have these
07:31 unwanted these pseudo elements that are
07:34 speaking below Jack we don't want that
07:39 so this is where you're going to want to
07:41 make sure that your bottom position is
07:43 set to a value where those particular
07:47 pseudo shadow elements are completely
07:50 hidden by Jack and only the shadow for
07:55 them is being displayed now effects
07:58 three four and five are just different
08:00 variations of the raised corner shadow
08:02 so let's dump down jump down to effect
08:05 number six and what this uses it
08:08 actually uses a combination of shadows
08:10 and let's go over them first let's turn
08:15 off inset shadow and the drop shadow so
08:19 we're only going to show the special
08:21 shadow of peak and what this does is it
08:25 as just with the raised corners it kind
08:28 of shows you the pseudo element that is
08:30 being generated behind Jack so that we
08:34 can adjust the shadow for it and just as
08:38 all the other shadows you have grace k
08:40 values x and y offsets blurs spread and
08:43 opacities now with the peak
08:46 as is the vertical and horizontal
08:50 configurations so for this particular
08:53 one we have the top set to fifty percent
08:56 so the top of this element is down fifty
08:58 percent because we don't we want zero
09:00 shadow to show at the top and then on
09:04 the horizontal we brought it in about 12
09:08 pixels from the sides because we don't
09:11 want the shadow to be on the sides but
09:13 we want to make sure that the shadow
09:15 gets to as close to the edge as possible
09:18 and what this does is it gives us a nice
09:21 shadow that accents the bottom only of
09:26 our stack now if we looked at the at
09:30 this before we had added a drop shadow
09:34 so what's great with jack is you can
09:36 actually add multiple shadows so what
09:40 we've done here is if we make the
09:42 opacity of this drop shadow one hundred
09:43 percent will notice that we've added a
09:46 very small opacity to the very edge of
09:50 Jack this gets us a little bit of
09:54 opacity on the very corners right so a
09:56 little bit of a shadow so obviously we
09:59 want that to be we'll put that back to
10:01 thirty percent so it is very subtle and
10:04 it obviously doesn't get in the way of
10:05 the peak shadow now if we notice effect
10:09 number six added an inset shadow and
10:13 before we actually that let's jump in
10:15 and see exactly what inset shadows can
10:17 be used for so if we look at effect
10:20 number nine this is a traditional inset
10:23 shadow where the shadow makes it look
10:26 like that particular Jack element is
10:28 embedded into the page and we can
10:31 achieve that by simply making a small
10:34 blur radius and you know I increase the
10:36 spread x 1 pixel so it gives it a little
10:40 bit more harsh on you know edge and then
10:43 you know we have x and y offset set to 0
10:46 but you can play with those as well
10:48 however what if we were to set the
10:51 spread instead of 5 pixels 250 pixels
10:57 let's look at the different change that
10:59 this will actually have on our effect
11:03 now if we notice here it really grows
11:06 the shadow and kind of gives it a
11:08 gradient effect right now if we also
11:12 maybe change this so that it was
11:14 actually maybe a little bit more a
11:16 higher opacity or a lower opacity this
11:19 will give you a nice effect and that's
11:22 exactly what we did in example number
11:24 six when we add the inset shadow to
11:27 effect number six you'll notice that we
11:30 have the offsets of everything set to
11:32 zero we had the blur set to 40 and the
11:35 opacity set to ten percent and what this
11:40 does you can see it right there in edit
11:42 mode is it adds some accent colors kind
11:46 of a gradient style effect two on top of
11:50 jack so instead of this effect number
11:53 six having just a plain solid color
11:56 background we've added a large inset
11:59 shadow which gives it depth this is
12:02 pretty amazing and now just to look at
12:05 some of the other effects that we've
12:07 used with peak we can see that effect
12:10 seven and eight go ahead and use the
12:13 peak with different settings to give you
12:15 much different shadow effects number
12:18 seven brings in the sides but has
12:21 shadows on the top and the bottom an
12:23 effect number eight is the exact
12:26 opposite we have shadows on the left and
12:28 the right but no shadow on the top and
12:31 the bottom so as you see shadows can be
12:34 used for so much more than just adding a
12:36 simple drop shadow to your stack right
12:39 especially with inset shadows they're
12:42 more than just making something look
12:43 like it's embedded on the page use them
12:46 to kind of as a pit as a canvas to paint
12:49 your stacks to add depth you know some
12:52 of the shadows like raised corners and
12:54 the peak give your your jack kind of a
12:58 curved feel more than just a flat look
13:00 right so it really can be used to really
13:04 accentuate and make your layout so much
13:07 more dynamic so I hope you
13:10 learned a lot in this video and I hope
13:12 you've checked out all the other Jack
13:13 videos and ultimately I hope your loving
13:16 jack I mean it's such a powerful stack
13:19 and I've said it at the end of every
13:20 video that the more you use stack the
13:24 more you're going to learn and the more
13:25 you're going to use it and love it and
13:27 it's going to be that really big
13:29 indispensable stack that you have to use
13:31 on every single project so I hope that
13:34 you take Jack and go forth and make your
13:36 websites great thank you very much
13:38 everybody I hope you enjoy it and have a
13:41 great day bye
13:49 I"}]
Search the page
0
